b)
On the floor
When drilling mounting holes or tightening screws, ensure that no cables or pipes
(including water pipes) are damaged.
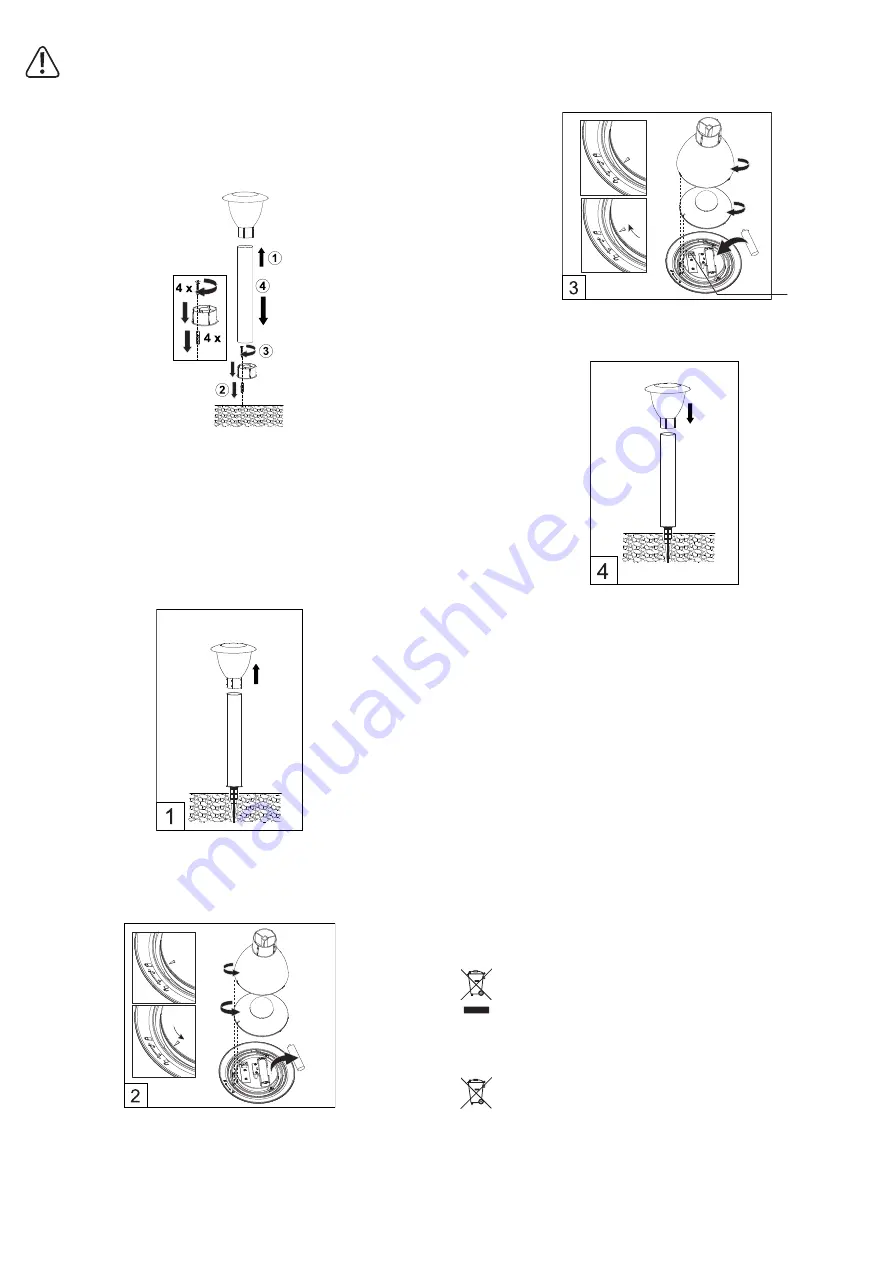
• Using the mounting plate, mark 4 holes in the floor and drill the holes to match the dowels.
The mounting plate (4) is located in the standpipe (3) and must be removed before marking
the holes.
• Fasten the mounting plate using 4 screws. Use an appropriate screwdriver.
• Secure the mounting plate tightly and place the standpipe with the garden light on the
mounting plate.
Charging the battery
• Charge the rechargeable battery for approx. 7 hours in direct sunlight before putting the solar
garden light into operation for the first time. To do this, switch on the garden light by the switch
located in the light (see chapter Operation/switching on).
Replacing the battery
If the power of the battery weakens significantly, remove it and replace with a battery of the
same type (see "Technical data"). Please also see the following illustrations.
1. Pull the garden light upwards from the standpipe and switch off the garden light.
2. Then turn the garden light around, remove the lamp housing and then the illuminant with its
base plate from the cover piece with the solar module (1) by turning each of them
counterclockwise. As a result, the small arrow shifts from the symbol of a closed padlock to
the symbol of an open padlock. Then remove the rechargeable battery from the mount.
3. Insert a battery of the same type. Pay attention to the polarity markings (+/-) shown in the
battery compartment. Press the switch once to set it to the “
I
” position. Reassemble the
garden light in reverse order. For this purpose, put the illuminant and the lamp housing on
the cover piece with the solar module and turn both parts clockwise. As a result, the small
arrow shifts from the symbol of a closed padlock to the symbol of an open padlock.
Switch
O / I
4. Then put the garden light again onto the standpipe.
• The rechargeable battery of the solar garden light must be charged in direct sunlight before
putting it into operation again. To do this, switch on the garden light.
Operation
• Pull the garden light upwards from the standpipe while turning it around. Remove the lamp
housing from the cover piece with the solar module by turning it counterclockwise. Press the
switch
O / I
once to switch on the garden light. Then replace the lamp housing and put the
light onto the standpipe.
• The rechargeable battery will now be charged by the solar module during the day. The twilight
switch turns on the garden light when it gets dark. The capacity of the rechargeable battery
is sufficient for max. 8 hours of lighting time. After that, the battery is exhausted and the solar
garden light switches off to prevent the battery from deep discharge. The process is repeated
the next day.
Care and cleaning
• Turn off the garden light before cleaning.
• Do not use any aggressive cleaning agents, rubbing alcohol or other chemical solutions as
they can cause damage to the housing and malfunctioning.
• Use a dry or slightly moistened lint-free cloth to clean the product.
Disposal
a) Product
Electronic devices are recyclable waste and must not be disposed of in the
household waste. At the end of its service life, dispose of the product according to
the relevant statutory regulations.
Remove any inserted rechargeable batteries and dispose of them separately from
the product.
b)
Rechargeable batteries
As the end user, you are required by law (Battery Ordinance) to return all used
rechargeable batteries; they must not be disposed of in household waste!
Contaminated rechargeable batteries are labelled with this symbol to indicate that
disposal in household waste is forbidden. The designations for the heavy metals
involved are: Cd = Cadmium, Hg = Mercury, Pb = Lead (name on rechargeable
batteries, e.g. below the trash icon on the left).
Used rechargeable batteries can be returned to collection points in your municipality, our stores
or wherever rechargeable batteries are sold.
You thus fulfil your statutory obligations and contribute to the protection of the environment.


