background image

11

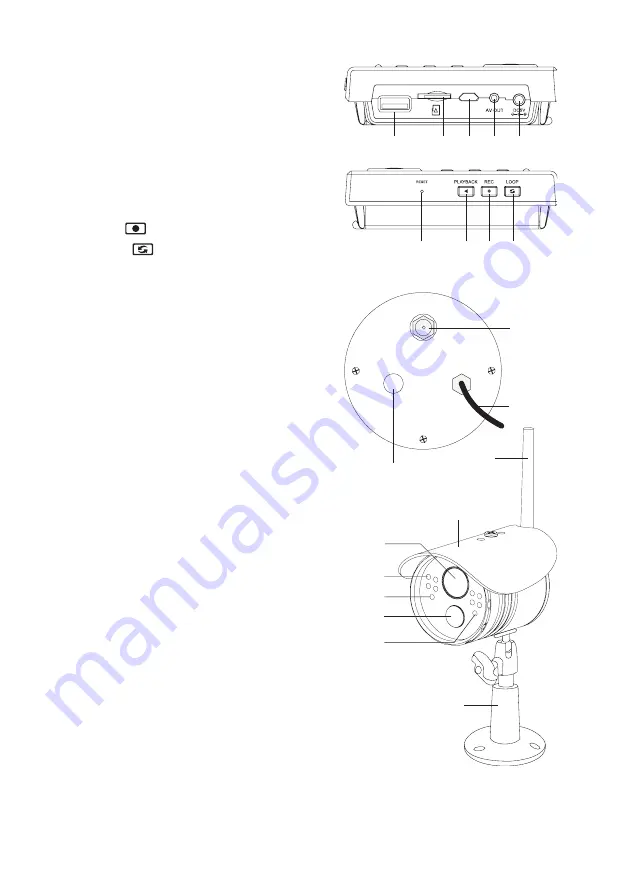
11  USB-Anschluss für externen Datenträger 

11

12 13 14 15

16

17 18 19

(Festplatte oder USB-Stick)

12  Einschub für microSD-/microSDHC-Speicherkarte
13  Micro-USB-Port
14  Buchse für AV-Ausgang
15  Niedervoltbuchse für Spannungs-/Stromversorgung 
16  Taste „RESET“
17  Taste „PLAYBACK“
18  Taste „REC 

19  Taste „LOOP 

b) Funkkamera 

21

20

22

23

25
26

30

24

27

28
29

20  Buchse zum Anschluss der Antenne
21  Kabel mit Niedervoltbuchse für Spannungs-/ 


Stromversorgung 

22  Pairing-Taste 
23  Antenne
24  Sonnenschutzblende (abnehmbar)
25  Kameraobjektiv
26  IR-LEDs (12x)
27  Helligkeitssensor zur Aktivierung der IR-LEDs bei  


geringer Umgebungshelligkeit

28  PIR-Sensor
29  Power-LED
30  Halterung

Содержание 1243795

Страница 1: ...g 2 4 GHz Funk Kamerasystem Best Nr 1243795 Seite 2 38 G Operating Instructions 2 4 GHz radio camera system Item No 1243795 Page 39 75 F Notice d emploi Système de caméra sans fil 2 4 GHz N de commande 1243795 Page 76 115 ...

Страница 2: ...1 8 Inbetriebnahme 12 a Monitor DVR 12 b Funkkamera 13 9 Grundfunktionen 15 a Ein Ausschalten 15 b OSD Menü aufrufen verlassen 15 c AV Ausgang aktivieren deaktivieren 15 d Lautstärke einstellen 16 e Einzel Quad Auto Modus 16 f Aufnahme manuell starten beenden 16 g Reset 17 10 Das OSD Menü 17 a Bedienung des OSD Menüs 17 b Aufbau des OSD Menüs 17 11 Untermenü System 18 a Funktion Date Time 18 b Fun...

Страница 3: ...ding 24 b Funktion Motion Detection 25 c Funktion PIR Recording 26 13 Untermenü Playback 27 14 Untermenü Camera 28 a Funktion Pairing 28 b Funktion Activation 29 c Funktion PIP Setting 30 15 Untermenü Alarm 31 a Funktion Motion Detection 31 b Funktion PIR Detection 31 16 Beseitigung von Störungen 32 17 Reichweite 35 18 Wartung und Reinigung 36 19 Konformitätserklärung DOC 36 20 Entsorgung 36 21 Te...

Страница 4: ... diese Bedienungsanleitung zum Nachlesen auf Alle enthaltenen Firmennamen und Produktbezeichnungen sind Warenzeichen der jeweiligen Inhaber Alle Rechte vorbehalten Bei technischen Fragen wenden Sie sich bitte an Deutschland www conrad de kontakt Österreich www conrad at www business conrad at Schweiz www conrad ch www biz conrad ch 2 Symbol Erklärung Das Symbol mit dem Blitz im Dreieck wird verwen...

Страница 5: ...Wissen und Einverständnis mit der Kamera beobachten Beachten Sie die Bestimmungen und Vorschriften des Landes in dem Sie die Kamera einsetzen Die Sicherheitshinweise sind unbedingt zu befolgen Eine andere Verwendung als zuvor beschrieben führt zur Beschädigung dieses Produktes darüber hinaus ist dies mit Gefahren wie z B Kurzschluss Brand elektrischer Schlag etc verbunden Das gesamte Pro dukt darf...

Страница 6: ... z B für Darstellung des Bildes auf einem weiteren Monitor bzw zur Aufzeichnung auf ei nem anderen DVR PAL NTSC umschaltbar Bedienung über Steuerkreuz und Funktionstasten Betrieb in trockenen geschlossenen Innenräumen b Funkkamera Stromversorgung über mitgeliefertes Steckernetzteil Integrierte IR LEDs diese schalten sich bei Dunkelheit automatisch zu Integrierter PIR Sensor für die Erkennung von W...

Страница 7: ... Sie es in eine Fachwerkstatt oder entsorgen Sie es umweltgerecht Es ist anzunehmen dass ein gefahrloser Betrieb nicht mehr möglich ist wenn das Produkt sichtbare Beschädigungen aufweist das Produkt nicht mehr arbeitet das Produkt längere Zeit unter ungünstigen Verhältnissen gelagert wurde schwere Transportbeanspruchungen aufgetreten sind Wenn das Produkt von einem kalten in einen warmen Raum gebr...

Страница 8: ... den zugehörigen FI Schutzschalter abschalten Ziehen Sie erst danach das Steckernetzteil aus der Netzsteckdose und bringen Sie das Pro dukt in eine Fachwerkstatt Verwenden Sie nur die mitgelieferten Steckernetzteile zum Betrieb von Monitor DVR und Funkkamera Bei einem Defekt eines Steckernetzteils ist dieses gegen ein baugleiches stabi lisiertes Steckernetzteil mit gleichen technischen Daten Spann...

Страница 9: ...ation oder schwerer me chanischer Beanspruchung ausgesetzt werden Stellen Sie sicher dass das Anschlusskabel nicht gequetscht geknickt oder durch scharfe Kanten beschädigt wird Der Betrieb der Funkkamera ersetzt nicht die persönliche Aufsicht von Kindern oder Men schen die besonderer Hilfe bedürfen sondern dient lediglich der Unterstützung dieser Auf sicht Montieren Sie die Funkkamera so dass sie ...

Страница 10: ...emente a Monitor DVR 1 5 6 7 9 8 4 2 1 10 3 1 Ausklappbare Antenne 2 LC Bildschirm 3 Taste mit Power LED 4 Link Lade LED 5 Taste MENU 6 Taste QUAD 7 Taste AV 8 Taste OK 9 Steuertasten S F G 10 Ausklappbarer Standfuß ...

Страница 11: ...mversorgung 16 Taste RESET 17 Taste PLAYBACK 18 Taste REC 19 Taste LOOP b Funkkamera 21 20 22 23 25 26 30 24 27 28 29 20 Buchse zum Anschluss der Antenne 21 Kabel mit Niedervoltbuchse für Spannungs Stromversorgung 22 Pairing Taste 23 Antenne 24 Sonnenschutzblende abnehmbar 25 Kameraobjektiv 26 IR LEDs 12x 27 Helligkeitssensor zur Aktivierung der IR LEDs bei geringer Umgebungshelligkeit 28 PIR Sens...

Страница 12: ...erforderlich kann die Speicherkarte bzw der USB Datenträger neu formatiert werden hierbei gehen aber alle vorhandenen Daten verloren Bei Verwendung einer microSD microSDHC Speicherkarte ist darauf zu achten dass diese mindestens dem Typ Class 4 oder höher entspricht Dies kennzeichnet eine Schreibgeschwindigkeit von mindestens 4 MByte s und ist für eine einwandfreie Funktion bei der Aufzeichnung de...

Страница 13: ...eser Bedie nungsanleitung Wählen Sie den Montageort so dass dieser vor Manipulationsversuchen an der Funkkamera geschützt ist Die Funkkamera sollte deshalb in einer Mindesthöhe von 2 5 m montiert werden Wir empfehlen Ihnen beim Einsatz im Außenbereich einen vor Niederschlag Spritzwasser ge schützten Ort zu wählen z B unter einem Dachvorsprung da eine Tropfenbildung bzw Spritz wasser auf der Fronts...

Страница 14: ...hlusskabel durch eine Mauer hindurch geführt werden so schützen Sie den Stecker dabei z B mit einer kleinen Kunststofftüte o ä vor Staub und Schmutz Verbinden Sie den Niedervolt Rundstecker des zweiten kleineren Steckernetzteils Ausgangsspan nung 5 V DC Ausgangsstrom 1 A mit der entsprechenden Rundbuchse der Funkkamera Das Steckernetzteil ist nur für den Betrieb in einem trockenen geschlossenen In...

Страница 15: ...ra wird empfangen LED leuchtet rot Akku wird geladen LED leuchtet orange Signal einer Funkkamera wird empfangen und Akku wird geladen b OSD Menü aufrufen verlassen Drücken Sie kurz die Taste MENU 5 Anschließend wird das Hauptmenü angezeigt Zum Verlassen des OSD Menüs ist ebenfalls die Taste MENU 5 kurz zu drücken ggf mehrfach erfor derlich wenn sich der Monitor DVR in einem Untermenü befindet c AV...

Страница 16: ...l 1 wird im linken Bereich des LC Displays angezeigt großes Bild die Bilder der anderen Kameras erscheinen verkleinert am am rechten Rand Durch kurzen Druck auf die Steuertaste G oder 9 lässt sich auswählen welches Kamerabild bzw welcher Kanal groß dargestellt wird Modus 3 Das Bild aller 4 Kameras wird gleich groß dargestellt Quad View Oben links im LC Display finden Sie das Bild von Kanal 1 oben ...

Страница 17: ... Menüs die vorhande nen Untermenüs Funktionen auswählen bzw Einstellungen vornehmen Bestätigen Sie eine Auswahl eines Untermenüs einer Funktion oder Einstellung mit der Taste OK 8 Zum Verlassen des OSD Menüs oder um von einem Untermenü ins vorherige Menü zurückzukehren drücken Sie kurz die Taste MENU 5 b Aufbau des OSD Menüs Nach dem Aufrufen des OSD Menüs mit der Taste MENU 5 können fünf verschie...

Страница 18: ...er Taste OK 8 anschließend wird der Einstellmodus verlassen Um den Einstellmodus zu verlassen ohne die Einstellungen zu speichern Abbruch drücken Sie die Taste MENU 5 b Funktion Record Mode Hier lässt sich einstellen was passiert wenn die verwendete Speicherkarte oder der USB Datenträger voll ist Wählen Sie mit den Steuertasten S oder F 9 zwischen folgenden Betriebsarten Normal Wenn die Speicherka...

Страница 19: ...chen SD Card Speicherkarte oder USB Device USB Datenträger Drücken Sie die Taste OK 8 es erscheint eine Sicherheitsabfrage Wählen Sie mit den Steuertasten S oder F 9 zwischen Cancel Abbruch und OK ja Datenträ ger formatieren Zum Bestätigen der Auswahl drücken Sie die Taste OK 8 Alternativ drücken Sie die Taste MENU 5 um zum vorherigen Menü zurückzugelangen Abbruch Wurde das Formatieren des Datentr...

Страница 20: ...SD USB status Anzeige welcher Datenträger angeschlossen verwendet wird USB Symbol Speicherkarte Symbol Camera Kanalnummer Symbol Battery Ladezustandsanzeige des internen Akkus Symbol Um den Einstellmodus zu verlassen drücken Sie die Taste MENU 5 f Funktion TV System Hier lässt sich einstellen welcher TV Standard PAL oder NTSC für den AV Ausgang verwendet wird Nach dem Aufruf der Funktion wählen Si...

Страница 21: ...Menü zurückzugelangen Abbruch i Funktion Scan Mode Period Mit der Taste LOOP 19 wird der automatische Wechsel zwischen den Kamerabildern Kanälen aktiviert Die Zeit wie lange das jeweilige Kamerabild angezeigt wird lässt sich hier in dieser Funktion einstellen Wählen Sie die gewünschte Zeitdauer 5 10 15 20 oder 30 Sekunden mit den Steuertasten S oder F 9 aus Speichern Sie die Auswahl mit der Taste ...

Страница 22: ...autstärke am Monitor DVR ohne Belang Bei einer höheren Einstellung der Lautstärke kann es jedoch zu leichtem Rau schen über den eingebauten Lautsprecher kommen deshalb sollten Sie die Lautstärke auf die niedrigste Position einstellen Nach dem Aufruf der Funktion lässt sich die Lautstärke mit den Steuertasten G oder 9 verän dern Speichern Sie die Auswahl mit der Taste OK 8 anschließend wird der Ein...

Страница 23: ...Interval ausgewählt so lässt sich mit den Pfeiltasten S oder F 9 eine Zeit einstellen nach der sich das LC Display selbst ausschaltet 30 Sekunden 2 Minuten 5 Minuten oder 10 Minuten Wird Off ausgewählt so bleibt das LC Display dauerhaft aktiviert Speichern Sie die Auswahl mit der Taste OK 8 anschließend wird der Einstellmodus verlassen ein Abbruch erfolgt wie üblich mit der Taste MENU 5 Haben Sie ...

Страница 24: ...n ändern Nach dem ersten Aufruf der Funktion erscheint nur New schedule im LC Display Sind bereits Zeitfenster für die automatische Aufzeichnung programmiert so erscheinen diese in einer Liste darunter Mit den Steuertasten S oder F 9 lässt sich dann das gewünschte Zeitfenster auswählen und mit der Taste OK 8 gelangen Sie zum Einstellfenster Um ein neues Zeitfenster für die automatische Aufzeichnun...

Страница 25: ...zwischen den verschiedenen Einstelloptionen wech seln und mit den Steuertasten G oder 9 die Werte verändern Sensitivity Stellen Sie hier die Empfindlichkeit der Bewegungserkennung ein High hoch Medium mittel Low niedrig Je höher die Empfindlichkeit eingestellt wird umso kleinere Veränderungen im Kamerabild genügen um die Aufzeichnung zu starten Motion Detection Bei eingeschalteter Bewegungserkennu...

Страница 26: ...ereich erkannt hat Der PIR Sensor reagiert nicht auf eine reine Bewegung sondern auf eine Temperaturverände rung im Erfassungsbereich z B wenn eine Person in den Erfassungsbereich geht Beachten Sie für die Beschreibung der Funktion des PIR Sensors das Kapitel 8 b Nach dem Aufruf der Funktion können Sie die Aufzeichnung für jede der vier möglichen Funkkameras eine ist im Lieferumfang bis zu drei we...

Страница 27: ...m LC Display erscheint nun eine Art Dateimanager Mit den Steuertasten S oder F 9 können Sie die einzelnen Verzeichnisse auswählen und mit der Taste OK 8 bestätigen Gehen Sie genauso für die Unterverzeichnisse und AVI Dateien vor Werden die AVI Dateien angezeigt so wird die Wiedergabe mit der Taste OK 8 gestartet und pau siert Mit der Taste MENU 5 lässt sich die Wiedergabe beenden und auch jeweils ...

Страница 28: ...it vier Funkkameras betrieben werden so müssen diese am Monitor DVR angemeldet werden Jede Funkkamera kann aus Sicherheitsgründen nur an einem Monitor DVR angemeldet werden Es ist also nicht möglich das Signal einer Funkkamera auf zwei Monitoren DVRs wiederzugeben An jedem Kanal des Monitors DVRs lässt sich nur eine Funkkamera anmelden Ist bereits eine Funkkamera an einem Kanal angemeldet überschr...

Страница 29: ...eras anzeigen Sollte der Pairing Vorgang nicht erfolgreich abgeschlossen werden so kontrollieren Sie ob die Funkkamera mit der Spannungs Stromversorgung verbunden ist LED auf der Vorderseite der Funkkamera leuchtet Starten Sie den Pairing Vorgang erneut b Funktion Activation Nicht vorhandene bzw nicht benutzte Funkkameras bzw Kanäle lassen sich ausschalten Dies kann auch dazu verwendet werden dass...

Страница 30: ...e OK 8 Wechseln Sie mit den Steuertasten G oder 9 zwischen der Einstellung der Auflösung Resolu tion Size und der Videokompression Videoqualität Quality Mit den Steuertasten S oder F 9 lässt sich die jeweilige Einstellung auswählen drücken Sie dann die Taste OK 8 Ein Häkchen rechts daneben zeigt die momentane Einstellung an Resolution Size High Hohe Auflösung Resolution Size Low Niedrige Auflösung...

Страница 31: ...r F 9 zwischen Off Tonsi gnal deaktiviert oder On Tonsignal aktiviert Speichern Sie die Auswahl mit der Taste OK 8 anschließend wird der Einstellmodus verlassen Um den Einstellmodus zu verlassen ohne die Einstellungen zu speichern Abbruch drücken Sie die Taste MENU 5 b Funktion PIR Detection Wenn Sie den Alarm bei Erkennung einer Wärmeveränderung durch den PIR Sensor einschalten gibt der Monitor D...

Страница 32: ...nd von 1 2 m betreiben Führen Sie ggf die Anmeldung Pairing erneut durch siehe oben Wählen Sie die richtige Funkkamera Kanal aus Prüfen Sie ob die Funkkamera über das zugehörige Steckernetzteil mit Strom versorgt wird Prüfen Sie ob die Antenne der Funkkamera korrekt festgeschraubt ist Beachten Sie das Kapitel 17 Geringe Reichweite Richten Sie die Antennen von Monitor DVR und Funkkamera anders aus ...

Страница 33: ...le Abhängig von der Umgebungstemperatur im Sommer nur geringe Temperaturdiffe renz z B Hauswand und Körperoberfläche eines Menschen Abhängig von der Größe und Temperatur des sich bewegenden Objekts z B im Win ter sind Probleme zu erwarten durch isolierende Kleidung Verwenden Sie eine andere Empfindlichkeitseinstellung Richten Sie die Funkkamera anders aus Der Überwachungsbereich des PIR Sensors is...

Страница 34: ... die ältesten Aufzeichnungen mit der jeweils aktuellen Aufnahme über schrieben und gehen verloren Ist das Überschreiben deaktiviert können keine weiteren Aufnahmen gespeichert werden wenn der Datenträger voll ist Formatieren Sie die Speicherkarte bzw den USB Datenträger mit der entsprechenden Funktion des Monitors DVRs siehe Kapitel 11 c Hierbei gehen alle Daten auf der Speicherkarte bzw auf dem U...

Страница 35: ...e Probleme möglich Wenn der Monitor DVR kein Signal von der Funkkamera erhält so verringern Sie die Entfernung zwischen Monitor DVR und Funkkamera bzw richten Sie die Antennen anders aus Optimal ist es wenn die Antennen parallel zueinander stehen Eine starke Verringerung der Reichweite ergibt sich wenn die Spitzen der Antennen aufeinander zielen Die Reichweite kann teils beträchtlich verringert we...

Страница 36: ...nd einem Staubsauger leicht entfernt werden Zur Entfernung von Verschmutzungen an der Funkkamera lässt sich ein leicht mit lauwarmen Wasser an gefeuchtetes weiches Tuch einsetzen Richten Sie niemals den Wasserstrahl eines Gartenschlauchs oder eines Hochdruckreinigers o ä auf die Funkkamera Verwenden Sie auf keinen Fall aggressive Reinigungsmittel Reinigungsalkohol oder andere che mische Lösungen d...

Страница 37: ... x 480 Pixel VGA oder 320 x 240 Pixel QVGA Aufzeichnungsdauer Abhängig vom Bildinhalt Kompression Auflösung Videoausgang ja analog CVBS Videoformat PAL NTSC umschaltbar Umgebungstemperatur 0 C bis 40 C Umgebungsluftfeuchte 10 bis 90 relativ nicht kondensierend Montage Betriebsort Nur in trockenen geschlossenen Innenräumen Abmessungen B x H x T 145 x 92 x 26 mm ohne Antenne ohne Standfuß Gewicht ca...

Страница 38: ...en Außenbereich Umgebungstemperatur 20 C bis 50 C Umgebungsluftfeuchte 10 bis 90 relativ Abmessungen B x L x H 69 x 90 x 59 mm Gewicht ca 198 g ohne Antenne Halterung c Steckernetzteil für Monitor DVR Betriebsspannung 100 240 V AC 50 Hz Ausgang 5 V DC 3 A d Steckernetzteil für Funkkamera Betriebsspannung 100 240 V AC 50 Hz Ausgang 5 V DC 1 A ...

Страница 39: ... Camera 48 8 Commissioning 49 a Screen DVR 49 b Radio Camera 50 9 Basic Functions 52 a Switching On Off 52 b Calling Leaving OSD Menu 52 c Activate Deactivate AV Output 52 d Setting Volume 53 e Single Quad Auto Mode 53 f Starting Terminating Recording Manually 53 g Reset 54 10 The OSD Menu 54 a Operation of the OSD Menu 54 b Setup of the OSD Menu 54 11 Submenu System 55 a Function Date Time 55 a F...

Страница 40: ...rding 61 b Function Motion Detection 62 c Function PIR Recording 63 13 Submenu Playback 64 14 Submenu Camera 65 a Function Pairing 65 b Function Activation 66 c Function PIP Setting 67 15 Submenu Alarm 68 a Function Motion Detection 68 b Function PIR Detection 68 16 Troubleshooting 69 17 Range 72 18 Maintenance and Cleaning 73 19 Declaration of Conformity DOC 73 20 Disposal 73 21 Technical Data 74...

Страница 41: ...Therefore retain these operating instructions for reference All company names and product names are trademarks of their respective owners All rights reserved If there are any technical questions please contact International www conrad com contact United Kingdom www conrad electronic co uk contact 2 Explanation of symbols The symbol with a lightning bolt in a triangle is used where there is a healt...

Страница 42: ...gers with this camera without their knowledge and consent Observe the provisions and regulations of the country in which you use the camera The safety information must be observed at all times Any use other than that described above can damage the product and may involve additional risks such as short circuit fire electric shock etc No part of this product must be modified or converted This produc...

Страница 43: ... aerial Integrated base AV output e g for displaying the image on another screen or to record it on another DVR PAL NTSC can be switched Operation via control cross and function buttons Operation in dry closed inner rooms b Radio Camera Power supply via enclosed plug in mains adapter Integrated IR LEDs they switch on automatically in darkness Integrated PIR sensor for recognition of heat changes i...

Страница 44: ...operating it and take it to a specialist workshop or dispose of it environmentally compatibly It can be assumed that safe operation is no longer possible if the product is visibly damaged the product no longer functions the product has been stored under unfavourable conditions for an extended period of time if it was subjected to heavy stress during transport If the product is brought from a cold ...

Страница 45: ...sociated FI protection switch Only then pull the plug in mains adapter from the mains socket and take the product to a spe cialist workshop Only use the enclosed plug in mains adapters for operation of the screen DVR and radio cam era In case of defects of a plug in mains adapter replace it with a stabilised plug in mains adapter of the same build with the same technical data voltage current c Scr...

Страница 46: ...e exposed to extreme temperatures intense vibration or heavy mechanical strain Ensure that the connection cable is not crushed bent or damaged by sharp edges The operation of this radio camera is no substitute for your responsibility to supervise children or other people in need of special care It only serves as a support Install the radio camera so that it does not point right at bright light sou...

Страница 47: ...g Elements a Screen DVR 1 5 6 7 9 8 4 2 1 10 3 1 Unfolding aerial 2 LC screen 3 Button with power LED 4 Link loading LED 5 MENU button 6 QUAD button 7 AV button 8 OK button 9 Control buttons S F G 10 Unfolding base ...

Страница 48: ...ltage current supply 16 RESET button 17 PLAYBACK button 18 REC button 19 LOOP button b Radio Camera 21 20 22 23 25 26 30 24 27 28 29 20 Socket to connect the aerial 21 Low voltage socket for voltage current supply 22 Pairing button 23 Aerial 24 Sun protection blind removable 25 Camera lens 26 IR LEDs 12x 27 Brightness sensor to activate the IR LEDs at low ambient brightness 28 PIR sensor 29 Power ...

Страница 49: ...s FAT FAT 32 no NTFS If necessary the memory card or the USB data carrier can be reformatted all present data will be lost When using a microSD microSDHC memory card ensure that it corres ponds at least to type Class 4 or higher This marks a writing speed of at least 4 MByte s and is absolutely necessary for proper function when re cording surveillance videos A change of the memory card or the USB...

Страница 50: ...he radio camera therefore should be installed at a minimum height of 2 5 m We recommend to choose a site protected from precipitation splashing water when using it out doors e g below a protruding roof since drop formation of splashing water on the front screen of the camera will cause the image to be distorted ad useless Point the lens of the radio camera and thus the PIR sensor as well at the de...

Страница 51: ...dust and dirt e g with a small plastic pocket or similar Connect the low voltage round plug of the second smaller plug in mains adapter output voltage 5 V DC output current 1 A with the corresponding round socket of the radio camera The plug in mains adapter is only suitable for operation in dry closed rooms It must never be come moist or wet There is a fatal danger from electric shock The radio c...

Страница 52: ...he signal of a radio camera is received LED is lit red The battery is being charged LED is lit orange The signal of a radio camera is received and the rechargeable battery is loaded b Calling Leaving OSD Menu Briefly push the MENU button 5 Then the main menu is displayed To leave the OSD menu also briefly push the button MENU 5 several times if required if the screen DVR is in a submenu c Activati...

Страница 53: ...f the LC display large image the images of the other cameras appear smaller at the right edge Briefly pushing the control button G or 9 permits choosing which camera image or which chan nel is displayed in large Mode 3 The images of all 4 cameras are displayed in the same size Quad View At the top left of the LC display you will find the image of channel 1 top right channel 2 lower left channel 3 ...

Страница 54: ... S F G 9 to select the present submenus functions within the OSD menu or to make settings Confirm selection of a submenu function or setting with the button OK 8 To leave the OSD menu or to return to the previous menu from a submenu push the button MENU 5 b Structure of the OSD Menu After calling the OSD menu with MENU 5 five different submenus functions can be selected System Record Playback Came...

Страница 55: ... with the button OK 8 then you will leave setting mode again To leave setting mode without saving the settings cancel push the button MENU 5 b Function Record Mode Here you can set what happens when the memory card used or the USB data carrier is full Use the control buttons S or F 9 to choose between the following operating modes Normal If the memory card or the USB data carrier is full the recor...

Страница 56: ... buttons S or F 9 to choose between the SD Card memory card or USB Device USB data carrier Briefly push the OK 8 button A safety prompt appears Use the control buttons S or F 9 to choose between Cancel and OK yes format data carrier To confirm the selection push the button OK 8 Alternatively push the MENU 5 button to return to the previous menu cancel If formatting of the data carrier was confirme...

Страница 57: ...the radio camera Icon SD USB status Display of which data carrier is connected used USB Symbol memory card Symbol Camera Channel number Icon Battery Charge condition of the internal rechargeable battery Icon To leave setting mode push the button MENU 5 f Function TV System Here the TV standard PAL or NTSC is used for the AV output can be set After calling the function use the control buttons S or ...

Страница 58: ...y push the MENU 5 button to return to the previous menu cancel i Function Scan Mode Period Use the LOOP 19 button to activate automatic switching between camera images channels The time for how long the respective camera image is displayed can be set in this function Choose the desired time 5 10 15 20 or 30 seconds with the control buttons S or F 9 Save the selection with the button OK 8 then you ...

Страница 59: ...erefore setting of the on the screen DVR is irrel evant If the volume is set higher there may however be a slight hum in the installed speakers Therefore adjust the volume to the lowest position After the function is called the volume can be changed with the control buttons G or 9 Save the selection with the button OK 8 then you will leave setting mode again To leave setting mode without saving th...

Страница 60: ...ave chosen Time Interval the arrows S or F 9 can be used to set a time after which the LC display will switch itself off 30 seconds 2 minutes 5 minutes or10 minutes If you choose Off the LC display remains activated permanently Save the selection with the button OK 8 then you will leave setting mode again Cancel as usual with the MENU 5 button If you have chosen Wake up on Motion the arrows S or F...

Страница 61: ...r the first call of the function only New schedule appears in the LC display If time windows for automatic recording are already programmed they appear in a list below Use the control buttons S or F 9 to select the desired time window and use the button OK 8 to get to the setting window After programming a new time window for automatic recording use the control buttons S or F 9 to choose between N...

Страница 62: ...enu Use the control buttons S or F 9 to switch between the different setting options and to change the values with the control buttons G or 9 Sensitivity Set the sensitivity of motion detection High Medium Low The higher the sensitivity is set the smaller changes in the camera screen will be sufficient to start the recording Motion Detection With the motion detection switched on On the screen DVR ...

Страница 63: ...n the recording area The PIR sensor does not react to a pure movement but to a temperature change in the recording area e g when a person walks into the recording area For the description of the function of the PIR sensor observe chapter 8 b After calling the function you can separately activate the recording for each of the four possible radio cameras one is enclosed up to three more can be order...

Страница 64: ... to confirm The LC display now shows a kind of file manager Use the control buttons S or F 9 to select the individual directories and use the button OK 8 to confirm Proceed accordingly for the subdirectories and the AVI files If the AVI files are displayed playback is started and paused with the OK 8 button Use the MENU 5 button to end playback and return by one directory level each If an AVI file...

Страница 65: ... with four radio cameras in total they must be paired with the screen DVR Each radio camera can be logged on to only one screen DVR for reasons of safety It therefore is not possible to play back the signal of a radio camera on two screens DVRs Only one radio camera can be logged on to each channel of the screen DVR If a radio camera has already been registered at a channel a new registration of a...

Страница 66: ...amera image of all taught in radio cameras If pairing is not completed successfully check if the radio camera is connected to the voltage current supply LED at the front of the radio camera is lit Start pairing again b Function Activation Missing or unused radio cameras or channels can be switched off This may also be used to avoid displaying missing radio cameras when selecting the camera image w...

Страница 67: ...ush the OK 8 button Use the control buttons G or 9 to switch between the settings for the resolution Resolution Size and the video compression video quality Quality Use the control buttons S or F 9 to select the respective setting then push the button OK 8 A check mark to the right shows the current setting Resolution Size High High resolution Resolution Size Low Low resolution Quality Top Best im...

Страница 68: ...use the control buttons S or F 9 to choose between Off sound off or On sound on Save the selection with the button OK 8 then you will leave setting mode again To leave setting mode without saving the settings cancel push the button MENU 5 b Function PIR Detection If you switch on alarm at recognition of heat change by the PIR sensor the screen DVR will emit a sound signal The volume of the alarm s...

Страница 69: ...ce of 1 2 m If required perform the login pairing again see above Pick the right radio camera channel Check if the radio camera is supplied with power through the associated plug in mains adapter Check if the aerial of the radio camera is screwed on correctly Observe chapter 17 Low range Align the aerials of the screen DVR and the radio camera differently Do not point the two aerials at each other...

Страница 70: ...tness changes Disadvantages Dependent on the ambient temperature in summer only slight temperature differ ence e g house wall and body surface of a person Dependent on the size and temperature of the moving object e g in winter problems must be expected due to insulating clothing Use a different sensitivity setting Align the radio camera differently The monitoring area of the PIR sensor is a littl...

Страница 71: ...see chapter 11 b The oldest recordings are overwritten with the respective current recording here and will be lost When overwriting is deactivated no further recordings can be saved when the data carrier is full Format the memory card or the USB data carrier with the corresponding function of the screen DVR see chapter 11 c All data on the memory card or the USB data carrier will be lost The scree...

Страница 72: ...ms If the screen DVR does not receive any signal from the radio camera reduce the distance be tween the screen DVR and the radio camera or align the aerials differently It is best when the aerials are in parallel to each other The range reduces too far if the aerial tips point at each other The range may be considerably reduced by Walls reinforced concrete ceilings Coated metallised insulated glas...

Страница 73: ...and a vacuum cleaner To remove contamination at the radio camera use a soft cloth slightly moistened with lukewarm water Never point the water jet of a garden hose or a high pressure cleaner or similar at the radio camera Never use any aggressive cleaning agents cleaning alcohol or other chemical solutions since these may damage the casing or even impair function 19 Declaration of Conformity DOC W...

Страница 74: ...320 x 240 pixels QVGA Recording duration Depending on the image content compression resolution Video output Yes analogue CVBS Video format PAL NTSC can be switched Ambient temperature 0 C to 40 C Ambient humidity 10 to 90 rel humidity non condensing Installation operation site In dry closed inner rooms only Dimensions W x H x D 145 x 92 x 26 mm without aerial without base Weight approx 210 g b Rad...

Страница 75: ...r outdoor area Ambient temperature 20 C to 50 C Ambient humidity 10 to 90 relative Dimensions W x H x D 69 x 90 x 59 mm Weight approx 198 g without aerial holder c Plug in Mains Adapter for Screen DVR Operating voltage 100 240 V AC 50 Hz Output 5 V DC 3 A d Plug in Mains Adapter for Radio Camera Operating voltage 100 240 V AC 50 Hz Output 5 V DC 1 A ...

Страница 76: ...4 b Caméra sans fil 85 8 Mise en service 86 a Moniteur numériscope 86 b Caméra sans fil 87 9 Fonctions de base 89 a Marche arrêt 89 b Ouverture fermeture du menu OSD 89 c Activation désactivation de la sortie AV 89 d Réglage du volume 90 e Mode simple quadruple auto 90 f Démarrage arrêt manuel de l enregistrement 90 g Réinitialisation 91 10 Le menu OSD 91 a Utilisation du menu OSD 91 b Structure d...

Страница 77: ...n Detection 99 c Fonction PIR Recording 100 13 Sous menu Playback 101 14 Sous menu Camera 102 a Fonction Pairing 102 b Fonction Activation 103 c Fonction PIP Setting 104 15 Sous menu Alarm 105 a Fonction Motion Detection 105 b Fonction PIR Detection 105 16 Dépannage 106 17 Portée 109 18 Maintenance et nettoyage 110 19 Déclaration de conformité DOC 110 20 Élimination 110 21 Caractéristiques techniq...

Страница 78: ...nt mode d emploi afin de pouvoir le consulter à tout moment Tous les noms d entreprises et appellations de produits contenus dans ce mode d emploi sont des marques déposées des propriétaires respectifs Tous droits réservés Pour toute question technique veuillez vous adresser à France email technique conrad france fr Suisse www conrad ch www biz conrad ch 2 Explication des symboles Le symbole de l ...

Страница 79: ...ra sans qu elles ne le sachent et sans leur consentement Observez les dispositions et consignes en vigueur dans le pays d utilisation de la caméra Impérativement respecter les consignes de sécurité Toute utilisation autre que celle désignée ci dessus peut endommager le produit et entraîner des risques tels que des courts circuits des incendies l électrocution etc Il est interdit de transformer ou ...

Страница 80: ...tie AV par ex pour la visualisation de l image sur un autre moniteur ou pour l enregistrement sur un autre numériscope Commande via touche directionnelle et touches de fonction Utilisation uniquement en intérieur dans les locaux fermés et secs b Caméra sans fil Alimentation électrique à partir du bloc secteur fourni DEL infrarouges intégrées sont automatiquement activées dans la pénombre Capteur P...

Страница 81: ...le à un atelier spécialisé ou mettez le au rebut en respectant les impératifs environnementaux Une utilisation sans danger n est plus garantie lorsque le produit est visiblement endommagé le produit ne fonctionne plus le produit a été stocké dans des conditions défavorables pendant une période prolongée suite à de sévères contraintes liées au transport De l eau de condensation peut se former au co...

Страница 82: ...tirez ensuite le bloc secteur de la prise de courant puis confiez le produit à un atelier spé cialisé Employez uniquement les blocs secteur fournis pour l alimentation du moniteur numériscope et de la caméra sans fil Lorsqu un bloc secteur est défectueux il doit être remplacé par un bloc secteur stabilisé du même type avec les mêmes caractéristiques techniques tension courant c Moniteur numériscop...

Страница 83: ...s températures extrêmes à de fortes vibra tions ou à de fortes sollicitations mécaniques Veillez à ne pas écraser plier ni endommager le câble de raccordement au niveau d arêtes vives Une caméra sans fil ne remplace pas la surveillance personnelle d enfants ou de personnes nécessitant une assistance particulière elle a uniquement été conçue afin de faciliter la sur veillance Montez la caméra sans ...

Страница 84: ...ur numériscope 1 5 6 7 9 8 4 2 1 10 3 1 Antenne escamotable 2 Écran à cristaux liquides 3 Touche avec DEL Power 4 DEL connexion recharge 5 Touche MENU 6 Touche QUAD 7 Touche AV 8 Touche OK 9 Touches de commande S F G 10 Pied escamotable ...

Страница 85: ...uche PLAYBACK 18 Touche REC 19 Touche LOOP b Caméra sans fil 21 20 22 23 25 26 30 24 27 28 29 20 Prise femelle pour le raccordement de l antenne 21 Câble avec prise basse tension pour l alimentation élec trique en tension 22 Touche d appairage 23 Antenne 24 Pare soleil amovible 25 Objectif de la caméra 26 DEL infrarouges 12 pièces 27 Capteur de luminosité pour l activation des DEL infra rouges en ...

Страница 86: ...cas échéant vous pouvez formater la carte mémoire ou le support de données USB toutes les données enregistrées sont alors effacées En cas d utilisation d une carte mémoire microSD microSDHC veiller à ce que la carte mémoire soit au moins du type Class 4 ou supérieur Cela équivaut à une vitesse d écriture minimale de 4 Mo s et est absolument in dispensable pour un fonctionnement irréprochable duran...

Страница 87: ...lure toute manipulation de la caméra sans fil Il est donc recommandé de monter la caméra sans fil à une hauteur minimale de 2 5 mètres En cas d utilisation en plein air nous vous recommandons de choisir un emplacement à l abri des intempéries et des éclaboussures par ex au dessous d une avancée du toit car la formation de gouttes et les éclaboussures sur le verre à l avant de la caméra peuvent déf...

Страница 88: ... Si le câble de raccordement doit être passé à travers un mur protégez la fiche contre la poussière et la saleté par ex à l aide d un petit sachet en plastique ou similaire Raccordez le connecteur enfichable rond basse tension du deuxième bloc secteur de plus petite taille tension de sortie 5 V CC courant de sortie 1 A à la prise ronde correspondante de la caméra sans fil Le bloc secteur convient ...

Страница 89: ...nal d une caméra sans fil DEL allumée en rouge charge de la batterie en cours DEL allumée en orange réception d une caméra sans fil et charge de la batterie en cours b Ouverture fermeture du menu OSD Appuyez brièvement sur la touche MENU 5 Le menu principal s affiche ensuite sur l écran Pour fermer le menu OSD appuyez également brièvement sur la touche MENU 5 le cas échéant plusieurs fois lorsqu u...

Страница 90: ... les images des autres caméras sont affichées avec un format réduit dans la partie droite de l écran Une pression brève sur la touche de commande G ou 9 permet de sélectionner l image de la caméra ou le canal à afficher en grand Mode 3 Les images de toutes les 4 caméras sont affichées au même format quadravision L image du canal 1 est affichée en haut à gauche de l écran celle du canal 2 en haut à...

Страница 91: ...sous menus et fonctions disponibles dans le menu OSD ou d effectuer des réglages Après avoir sélectionné un sous menu ou une fonction appuyez sur la touche OK 8 pour valider la sélection Pour fermer le menu OSD ou pour retourner au menu précédent à partir d un sous menu appuyez brièvement sur la touche MENU 5 b Structure du menu OSD Après l ouverture du menu OSD en appuyant sur la touche MENU 5 il...

Страница 92: ...OK 8 le mode de configuration est ensuite désactivé Pour désactiver le mode de configuration sans enregistrer les réglages annulation appuyez sur la touche MENU 5 b Fonction Record Mode Cette fonction permet de définir ce qui se produit lorsque la carte mémoire employée ou le support de données USB sont pleins Sélectionnez l un des modes de fonctionnement suivants à l aide des touches de commande ...

Страница 93: ...ce support de données USB à l aide des touches de commande S et F 9 Appuyez sur la touche OK 8 une demande de confirmation s affiche sur l écran Sélectionnez Cancel annulation ou OK oui formater le support de données à l aide des touches de commande S et F 9 Pour valider la sélection appuyez sur la touche OK 8 Vous pouvez également appuyer sur la touche MENU 5 pour retourner au menu précédent annu...

Страница 94: ... USB status Affichage du support de données raccordé ou employé USB symbole carte mémoire symbole Camera Numéro du canal symbole Battery Affichage de l état de charge de la batterie interne symbole Appuyez sur la touche MENU 5 pour quitter le mode de configuration f Fonction TV System Cette fonction permet de définir la norme de télévision PAL ou NTSC employée pour la sortie AV Après avoir sélecti...

Страница 95: ...r retourner au menu précédent annulation i Fonction Scan Mode Period Une pression sur la touche LOOP 19 permet d activer l affichage en alternance automatique des images des caméras canaux La durée respective d affichage des différentes images de la caméra peut être définie à l aide de cette fonction Sélectionnez la durée souhaitée 5 10 15 20 ou 30 secondes à l aide des touches de commande S et F ...

Страница 96: ...volume sur le moniteur nu mériscope ne joue donc aucun rôle En cas de réglage plus élevé du volume le haut parleur intégré peut toutefois émettre un léger grésillement il est donc recommandé de régler le volume au niveau le plus bas Après avoir sélectionné la fonction le volume peut être modifié à l aide des touches de commande G et 9 Enregistrez la sélection à l aide de la touche OK 8 le mode de ...

Страница 97: ...échées S et F 9 permettentdedéfiniruneduréeau boutdelaquellel écranàcristauxliquidess éteintautomatiquement 30secondes 2minutes 5minutesou 10 minutes Si vous sélectionnez Off l écran à cristaux liquides reste allumé en permanence Enregistrez la sélection à l aide de la touche OK 8 le mode de configuration est ensuite désactivé vous pouvez annuler l opération comme d habitude en appuyant sur la tou...

Страница 98: ...fonction seule l indication New schedule s affiche sur l écran à cristaux liquides Si des créneaux horaires sont déjà programmés pour l enregistrement automatique ces cré neaux s affichent plus bas dans une liste Le créneau horaire souhaité peut être sélectionné à l aide des touches de commande S et F 9 une pression sur la touche OK 8 permet d afficher la fenêtre de configuration Pour programmer u...

Страница 99: ...ur ouvrir le menu de configuration Vous pouvez sélectionner les différentes options de réglage à l aide des touches de commande S et F 9 puis modifier les valeurs à l aide des touches de commande G et 9 Sensitivity Définissez ici la sensibilité de la détection des mouvements High élevée Medium moyenne Low faible Plus la sensibilité est élevée plus de petites variations sur l image de la caméra suf...

Страница 100: ...pérature dans la zone surveillée Le capteur PIR ne réagit pas aux simples mouvements mais aux changements de température dans la zone surveillée par ex lorsqu une personne entre dans la zone surveillée Observez le descriptif de la fonction du capteur PIR dans le chapitre 8 b Après avoir sélectionné la fonction vous pouvez activer séparément l enregistrement pour chacune des quatre caméras disponib...

Страница 101: ...s affiche maintenant sur l écran à cristaux liquides Les différents répertoires peuvent être sélectionnés à l aide des touches de commande S et F 9 puis validés en appuyant sur la touche OK 8 Procédez de la même manière pour les sous dossiers et les fichiers AVI Lorsque les fichiers AVI sont affichés la lecture peut être lancée ou mise en pause en appuyant sur la touche OK 8 Une pression sur la to...

Страница 102: ...r avec quatre caméras sans fil vous devez les connecter au moniteur numériscope Pour des raisons de sécurité chaque caméra sans fil ne peut être connectée qu à un seul mo niteur numériscope Il n est donc pas possible de visionner le signal d une caméra sans fil sur deux moniteurs numériscopes Seule une caméra sans fil peut être connectée sur chaque canal du moniteur numériscope Lorsqu une caméra s...

Страница 103: ...images de toutes les caméras connectées Si la procédure d appairage a échoué contrôlez si la caméra sans fil est raccordée à l alimen tation électrique en tension la DEL à l avant de la caméra sans fil est allumée Répétez la procédure d appairage b Fonction Activation Il est possible de désactiver les caméras ou canaux indisponibles ou non utilisées Cette fonction peut également être employée pour...

Страница 104: ...S et F 9 Appuyez sur la touche OK 8 Basculez entre le réglage de la résolution Resolution Size et le taux de compression la qualité de la vidéo Quality à l aide des touches de commande G et 9 Les touches de commande S et F 9 permettent de sélectionner le réglage correspondant ap puyez ensuite sur la touche OK 8 Une coche à droite indique le réglage actuel Resolution Size High Haute résolution Reso...

Страница 105: ...e désactivé ou On signal so nore activé à l aide des touches de commande S et F 9 Enregistrez la sélection à l aide de la touche OK 8 le mode de configuration est ensuite désactivé Pour désactiver le mode de configuration sans enregistrer les réglages annulation appuyez sur la touche MENU 5 b Fonction PIR Detection Lorsque vous activez l alarme en cas de détection d un changement de température pa...

Страница 106: ...fil le canal correspondant Contrôlez si la caméra sans fil est alimentée en courant par le bloc secteur prévu à cet effet Contrôlez si l antenne de la caméra sans fil est correctement vissée Observez le chapitre 17 Faible portée Modifiez l orientation des antennes du moniteur numériscope et de la caméra sans fil Ne pointez jamais les deux antennes l une vers l autre cela réduit considérablement la...

Страница 107: ...érature ambiante uniquement de faibles diffé rences de température en été par ex entre un mur d un bâtiment et la surface du corps humain Fonction indépendante de la taille et de la température de l objet en mouvement des problèmes sont par ex probables en hiver en cas de port de vêtements isolants Modifiez le réglage de la sensibilité Modifiez l orientation de la caméra sans fil Le périmètre de s...

Страница 108: ...Les enregistrements les plus anciens sont alors écrasés par les nouveaux enregis trements et sont effacés Lorsque l écrasement est désactivé il n est pas possible de sauvegarder de nouveaux enregistrements lorsque le support de données est plein Formatez la carte mémoire ou le support de données USB à l aide de la fonction correspondante du moniteur numériscope voir chapitre 11 c Toutes les donnée...

Страница 109: ...cope ne reçoit aucun signal de la caméra sans fil réduisez la distance entre le moniteur numériscope et la caméra sans fil ou modifiez l orientation des an tennes Un positionnement parallèle des antennes entre elles est optimal La portée est diminue consi dérablement lorsque les pointes des antennes sont orientées l une vers l autre La portée peut notamment considérablement être réduite par les mu...

Страница 110: ...eau doux et propre à longs poils et d un aspirateur Pour éliminer la saleté de la caméra sans fil employez un chiffon doux légèrement imbibé d eau tiède Ne pointez jamais le jet d eau d un tuyau de jardin ou d un nettoyeur haute pression ou similaire sur la caméra sans fil N employez jamais de détergents agressifs de l alcool de nettoyage ou d autres solutions chimiques Ces produits pourraient att...

Страница 111: ...l enregistrement 640 x 480 pixels VGA ou 320 x 240 pixels QVGA Durée d enregistrement En fonction du contenu de l image de la compression de la résolution Sortie vidéo oui analogique CVBS Format vidéo Commutation PAL NTSC Température ambiante 0 C à 40 C Humidité de l air ambiant humidité relative de 10 à 90 sans condensation Emplacement de montage de service uniquement en intérieur dans les locaux...

Страница 112: ...IP IP66 Emplacement de montage de service En intérieur plein air Température ambiante 20 C à 50 C Humidité de l air ambiant humidité relative de 10 à 90 Dimensions l x L x h 69 x 90 x 59 mm Poids env 198 g sans antenne support c Bloc secteur pour le moniteur numériscope Tension de service 100 240 V CA 50 Hz Sortie 5 V CC 3 A d Bloc secteur pour la caméra sans fil Tension de service 100 240 V CA 50...

Страница 113: ...113 ...

Страница 114: ...114 ...

Страница 115: ...115 ...

Страница 116: ...te reproduction quelle qu elle soit p ex photocopie microfilm saisie dans des installations de traitement de données nécessite une autorisation écrite de l éditeur Il est interdit de le réimprimer même par extraits Cette publication correspond au niveau technique du moment de la mise sous presse Copyright 2015 by Conrad Electronic SE V1_0115_02 VTP D Impressum Dies ist eine Publikation der Conrad ...

Отзывы: