7 Windows/Dialogs
7.15.2.5 Measure the Execution Time of Task
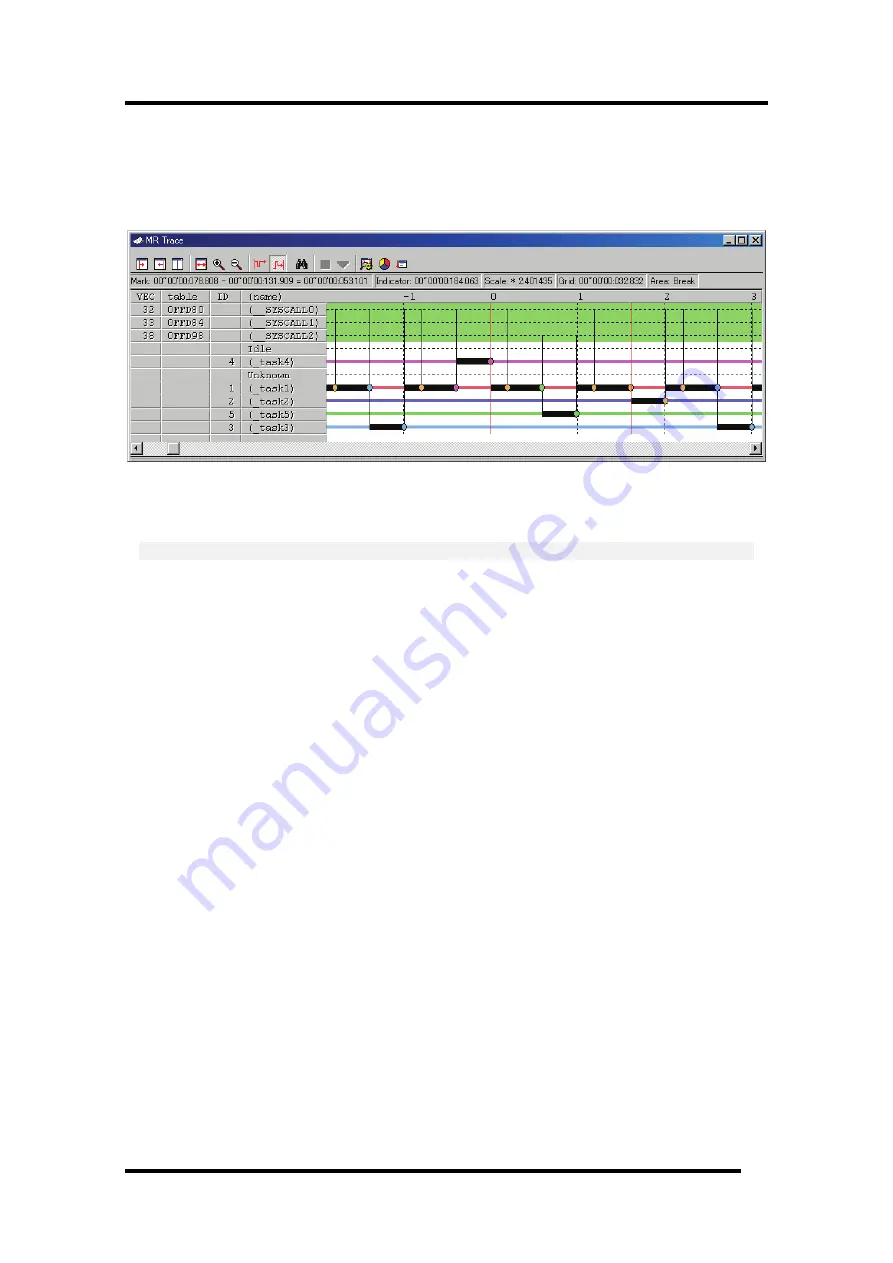
You can measure the execution time between the markers by changing the positions of start marker
and end marker in the MR Trace window.
Drag the start marker position and end marker position.
The time interval between the markers is displayed in the status bar.
Note
[Definition of time value in the MR Trace window]
The time value in the MR Trace window indicates the execution elapsed time which sets the program
execution start point to 0 in all the cases.
On the contrary, a numeric value above the grid line (scale) in the MR Trace window is a relative
value which sets the start marker to 0 (the grid interval is specified in the Value dialog), which has
nothing to do with the time value. (It is provided so that you can see the window easily.)
7.15.2.5.1. Move the Marker
Each marker can be moved by dragging. When moving the mouse on the marker, the cursor shape
changes. Then, start dragging.
The start marker moves into the window (left portion) by clicking the "Start Marker" button in the
tool bar. (Or, select Menu - [Start Marker].)
The end marker moves into the window (right portion) by clicking the "End Marker" button. (Or,
select Menu - [End Marker].)
The indicator moves into the window (center) by clicking the "Indicator" button. (Or, select Menu -
[Indicator].)
The other markers can move only to the specified positions listed below.
•
Position to which the interrupt processing or task execution transits
•
Position to which the task state transits
•
Position where the system call issuance history is displayed
217
Содержание Emulator Debugger M16C PC4701
Страница 13: ...Setup of Debugger 1...
Страница 14: ...Blank Page 2...
Страница 73: ...Tutorial 59...
Страница 74: ...Blank Page 60...
Страница 95: ...Reference 81...
Страница 96: ...Blank Page 82...
Страница 119: ...7 Windows Dialogs When TRIGGER is selected Breaks for the status of signal input from external trace cable 105...
Страница 127: ...7 Windows Dialogs 7 7 6 1 1 Writing Reading a Specified Address Set as below Example Writing to even address 400h 113...
Страница 128: ...Example Writing byte length data 32h to even address 400h 114...
Страница 130: ...16 bits bus width 116...
Страница 132: ...2nd point 118...
Страница 133: ...7 Windows Dialogs 16 bits bus width 119...
Страница 134: ...Example Writing data 10h 3Fh to even address 400h 120...
Страница 138: ...Example Writing byte length data 32h to even address 400h 124...
Страница 140: ...16 bits bus width 126...
Страница 141: ...7 Windows Dialogs Example Writing word length data 1234h to even address 400h 127...
Страница 142: ...Example Writing data 10h 3Fh to even address 400h 128...
Страница 146: ...Example Writing byte length data 32h to even address 400h 132...
Страница 147: ...7 Windows Dialogs Example Writing data 10h 3Fh to even address 400h 133...
Страница 153: ...7 Windows Dialogs 7 7 8 2 Interrupt Termination Set as below 139...
Страница 172: ...For condition 7 choose the Mode shown below and set the Start event 158...
Страница 177: ...7 Windows Dialogs When TRIGGER is selected Measures for the status of signal input from external trace cable 163...
Страница 294: ...MEMO 280...


