background image


19 

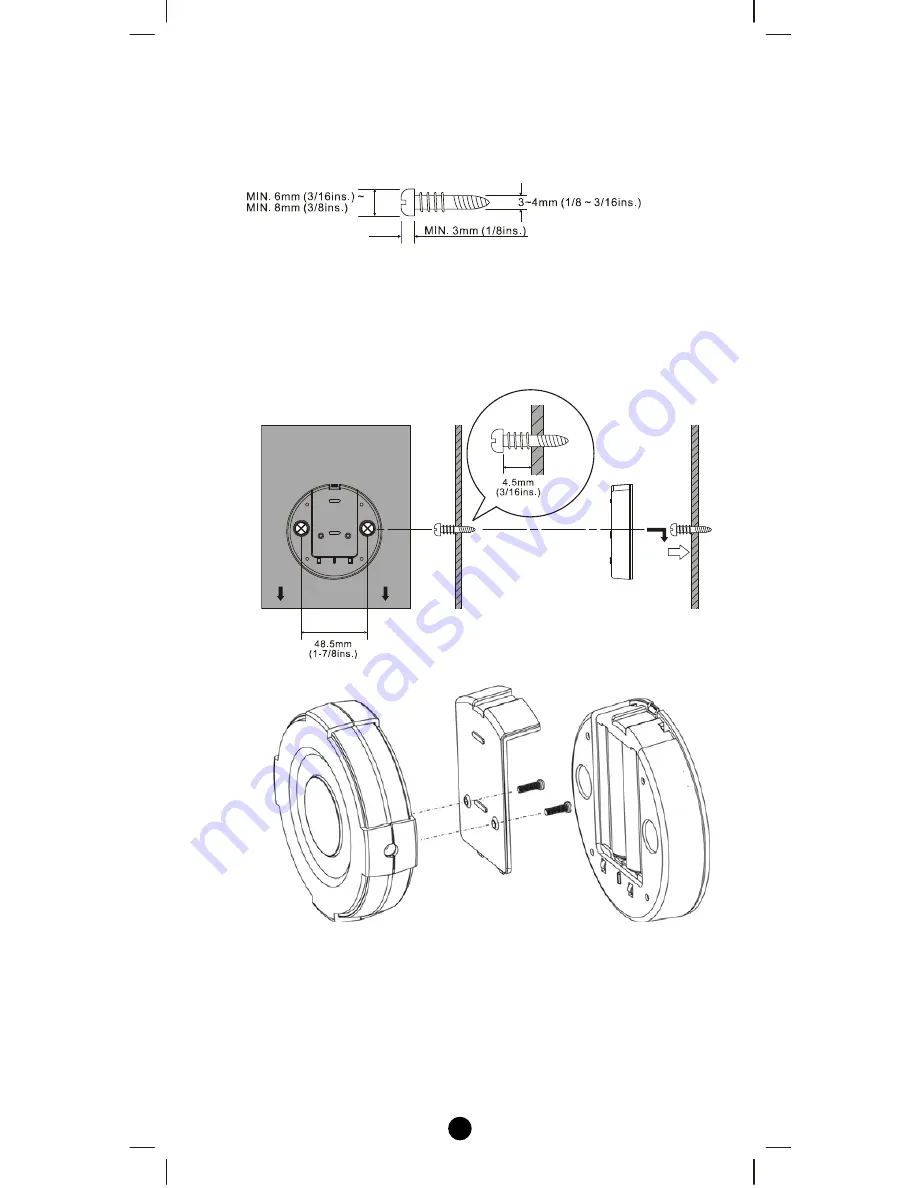
Note 2: Before mounting to a wall, be sure to fully read the precautions. 


1.


Obtain


two


screws


suitable


for


the


wall


strength


and


material.


The


screw


size


is


shown


in


the


figure


below.


2.


The


positional


relationship


between


the


ZXT

120


key


holes


and


the


screw


mounting


positions


are


shown


in


the


figure


below.


Note 1: When mounting the screws to the wall, leave a space 

between the wall and screw cap as shown in the figure. 


3.


Insert


the


ZXT

120


key


holes


onto


the


two


screws


mounted


to


the


wall,


and


then


slide


downward


to


secure


in


place.


4.


After


securing


the


ZXT

120


to


the


wall,


connect


the


USB


Power


or


batteries


and


IR


emitter


cable


to


the


ZXT

120.


Содержание Z-Extender ZXT-120

Страница 1: ...1 ZXT 120 Z Wave to AC IR Extender Firmware Version V1 0 ...

Страница 2: ...l 8 ZXT 120 Information 9 Listening Mode Change 11 IR Code Selection 11 IR Code Learning 13 Reset ZXT 120 to factory default 17 INSTALLATION 18 MOUNTING THE ZXT 120 TO A WALL 18 WIRELESS INFORMATION 21 MAINTENANCE 21 FREQUENTLY ASKED QUESTIONS 21 Z Wave Frequently Asked Questions 21 TECHNICAL SPECIFICATIONS 23 CHECKING ACCESSORIES 28 FCC NOTICE 28 WARNINGS 28 CAUTION 28 ...

Страница 3: ...g Slaves FLiRS or Always Listening node after exclusion process before inclusion process FLiRS node type is for battery operated applications and it will enter sleep mode frequently in order to conserve battery consumption that can provide the flexibility if there is out of 5Vdc power source Also user can place the unit in anywhere at home Always Listening node type is for the needs of fast respon...

Страница 4: ...an work with any Z Wave compliant controller or gateway supporting the following Z Wave commands Configuration Command Class Multilevel Sensor Command Class Thermostat Command Class Thermostat Mode Command Class Thermostat Fan Mode Command Class Thermostat Set point Command Class Built in IR code library The Built in IR code library supports most of the popular air conditioner brands in the market...

Страница 5: ...ntroller The first controller is used to set up your devices and network Only the Primary Controller can be used to include or delete devices from a network It is recommended that you mark the primary controller for each network for ease in modifying your network Secondary Controller A controller containing network information about other devices within the network and is used for controlling devi...

Страница 6: ...assis Mount the battery cover into the main unit with 2 screws Check the polarity of the batteries and the marks inside the battery compartment Insert the batteries Push the battery cover and main unit back in place L CAUTION battery and power adaptor safety Use new batteries of the recommended type and size only Never mix used and new batteries together To avoid chemical leaks remove batteries fr...

Страница 7: ...duct Overview Figure 2 PROG Key and IR Port of ZXT 120 Temperature sensor PROG Button Learning and LED Indication External IR Port USB Power 5V DC Battery chassis Surround IR Output for top and 4 directions ...

Страница 8: ... action was unsuccessful please repeat the procedure 3 User can use either primary controller or secondary controller should support configuration command class to setup the ZXT 120 AC code by the parameter 27 IR code number for built in code library please refer to code list for the parameter value then setup your AC control code 4 Once the configuration and setup were completed the controller ca...

Страница 9: ... Note The status value 0x01 and 0x04 will be reset to 0 when the ZXT 120 receive a get command to this parameter 0x00 Idle this IR channel is idle default 0x01 OK the latest learning process successful and completed 0x02 Learning the ZXT 120 is busy processing previous learning request 0x04 Failed the latest learning request failed 27 0x1B IR code number for built in code library Refer Code list f...

Страница 10: ...cation as below Parameter Table 6 4 5 3 2 1 0 7 0 0 0 0 0 1 0 1 Bit Mask Byte 1 Location 0 7 Bit Mask Byte 2 Location 8 15 Bit Mask Byte 3 Location 16 23 Bit Mask Byte 4 Reseved 6 4 5 3 2 1 0 7 0 1 0 0 0 0 1 0 6 4 5 3 2 1 0 7 0 0 0 0 0 0 1 0 6 4 5 3 2 1 0 7 0 0 0 0 0 0 0 0 Figure Learn location On the above example location 1 7 8 12 16 has learned data L Mapping Information BASIC Set Value 0x00 wi...

Страница 11: ...lusion process do not change ZXT 120 operation mode while ZXT 120 is included in a network How to switch ZXT 120 listening mode from Always Listening to FLiRS or vice verse Step Setup Key LED Indication Status on ZXT 120 1 Press and hold the PROG button on the ZXT 120 for around 4 seconds LED stay off 2 Release the button and then press the PROG button 3 times within 2 seconds LED flashes twice th...

Страница 12: ...command you set on Gateway Cool Heat Auto Temperature set etc repeat step 2 and 3 to select the next code on code list LED flashes once every time it receives a command from gateway L Important Information Different brand or model of air conditioner has different function For example some air conditioner only support temperature set from 18 o C 30 o C if user set 17 o C on gateway ZXT 120 will not...

Страница 13: ... 22 C cool which matches value 5 IR code to be learnt will locate at 5 in ZXT 120 Set your original air conditioner remote at 22 C cool and turn it off Besides temperature and mode you may set other desired settings such as Fan Swing etc 3 Go to configuration setting page on the gateway or ZRC 100 and input parameter number 25 and parameter value 5 in this case 4 Press the PROG button on the ZXT 1...

Страница 14: ...y on original remote before learning mode timeout Keep away from incandescent light and direct sunlight during learning Make sure IR Transmitter of your original remote alight with learning diode of ZXT 120 you may also slight adjust closer or further away the distance of two devices Some of remotes the IR transmitter in hidden behind lens and may not installed center of remote Make sure the power...

Страница 15: ... OFF 1 ON resume 2 19 C cool 3 20 C cool 4 21 C cool 5 22 C cool 6 23 C cool 7 24 C cool 8 25 C cool 9 26 C cool Default Cool 10 27 C cool 11 28 C cool 12 19 C heat 13 20 C heat 14 21 C heat 15 22 C heat Default Heat 16 23 C heat 17 24 C heat 18 25 C heat 19 26 C heat 20 27 C heat 21 28 C heat 22 Dry mode ...

Страница 16: ...6 C Cool to air conditioner When user press Heat on gateway without setting temperature ZXT 120 will send the learnt data of 22 C Heat to air conditioner There is only one code for dry mode user can set it at any preferred temperature User can still use gateway to set up scene and schedule with ZXT 120 for example to have AC turn on at 23 C every day at 7pm 25 C at 11pm Just make sure the set code...

Страница 17: ... user should refer to Listening Mode section if you want to change the operation mode L Information If you are using Gateway or other Z wave controllers to operate ZXT 120 Please follow the instruction from the gateway or other controller You can check either the specifications in the manual of your ZXT 120 or also check online at www remotec com hk for a full list of products that can be used wit...

Страница 18: ...jury if the ZXT 120 falls and breaks MOUNTING PROCEDURE PRECAUTIONS Do not modify parts or use the ZXT 120 in ways other than its intended use Doing so could cause the ZXT 120 to fall and result in an injury Be sure to fully check that there are no electrical wires or pipes inside the wall before mounting If any of the screws are loose the ZXT 120 can fall and cause an injury Do not mount the ZXT ...

Страница 19: ...the ZXT 120 key holes and the screw mounting positions are shown in the figure below Note 1 When mounting the screws to the wall leave a space between the wall and screw cap as shown in the figure 3 Insert the ZXT 120 key holes onto the two screws mounted to the wall and then slide downward to secure in place 4 After securing the ZXT 120 to the wall connect the USB Power or batteries and IR emitte...

Страница 20: ...e 2 Insert USB plug or batteries and IR emitter cable so that they are firmly connected to the ZXT 120 5 When removing the ZXT 120 from the wall lift up the ZXT 120 then pull it towards you 6 Detach the main unit from the battery chassis by move toward to top position ...

Страница 21: ... expose your ZXT 120 to dust strong sunlight humidity high temperatures or mechanical shocks 2 Do not use old and new batteries together as old batteries tend to leak 3 Do not use corrosive or abrasive cleansers on your ZXT 120 4 Keep the unit dust free by wiping it with a soft dry cloth 5 Do not disassemble your ZXT 120 it contains no user serviceable parts FREQUENTLY ASKED QUESTIONS Z Wave Frequ...

Страница 22: ...ere is no response on the IR emitter socket why A ZXT 120 supports two IR power levels for the external IR emitter to avoid saturation of the IR receiver You can set the IR output power level by the Parameter Table value normal or high power mode or adjust the position of your external IR emitter Q Can I use 2 or more ZXT 120 in my house What is the max units if yes A Yes and it is very depend on ...

Страница 23: ...n unobstructed environment IR learning Max 23 commands Temperature Measurable range 32 104 F 0 40 C Operation 0 40 C Storage 20 60 C Powered by USB Power DC 5V 100mA or Dry battery AAA x 3pcs Dimension Dia 70mm T 18mm Main unit Dia 70mm T 15 5mm Battery chassis Weight 35g Battery chassis excluded 60g Battery chassis included 90g Main Battery chassis AAA x3pcs Z Wave device type Basic Device Class ...

Страница 24: ...y Save heating NO Energy Save cooling NO Thermostat Set point Away heating NO Off YES Heat YES Cool YES Auto YES Auxiliary Emergency Heat NO Resume YES Fan only YES Furnace NO Dry Air YES Thermostat Mode Moist Air NO COMMAND_CLASS_CONFIGURATION Version1 NO YES COMMAND_CLASS_BASIC Version1 NO YES COMMAND_CLASS_VERSION Version1 NO YES COMMAND_CLASS_SENSOR_MULTILEVEL Version1 NO YES COMMAND_CLASS_SWI...

Страница 25: ...E 2 FAN COMMAND_CLASS_THERMOSTAT _MODE THERMOSTAT_ MODE_SET MODE 6 HEAT COMMAND_CLASS_THERMOSTAT _MODE THERMOSTAT_ MODE_SET MODE 1 DRY COMMAND_CLASS_THERMOSTAT _MODE THERMOSTAT_ MODE_SET MODE 8 MODE AUTO Changeover COMMAND_CLASS_THERMOSTAT _MODE THERMOSTAT_ MODE_SET MODE 10 SETPOINT TYPE 1 HEAT mode Temperature TEMPERATURE VALUE SETPOINT TYPE 2 COOL mode Temperature TEMPERATURE VALUE SETPOINT TYPE...

Страница 26: ...COMMAND_CLASS_CONFIGURATI ON CONFIGURATIO N_SET VALUE 1 PARAMETER NO 33 SIZE 1 SWING SWING OFF COMMAND_CLASS_CONFIGURATI ON CONFIGURATIO N_SET VALUE 0 PARAMETER NO 27 SIZE 2 IR CODE SETUP COMMAND_CLASS_CONFIGURATI ON CONFIGURATIO N_SET VALUE CODE PARAMETER NO 28 SIZE 1 NORMAL POWER LEVEL COMMAND_CLASS_CONFIGURATI ON CONFIGURATIO N_SET VALUE 0 PARAMETER NO 28 SIZE 1 IR TRANSMISSION POWER LEVEL HIGH...

Страница 27: ...L COMMAND_CLASS_BATTERY BATTERY_GET VERSION COMMAND_CLASS_VERSION VERSION_GET MANUF ER SPECIFIC COMMAND_CLASS_MANUFACTUR ER_SPECIFIC MANUFACTURE R_SPECIFIC_GE T TEMPERATURE SENSOR COMMAND_CLASS_SENSOR_MUL TILEVEL SENSOR_MULTI LEVEL_GET ...

Страница 28: ...d operation WARNINGS Changes or modifications not expressly approved by the party responsible for compliance could void the user s authority to operate the equipment RISK OF FIRE RISK OF ELECTRICAL SHOCK RISK OF BURNS The socket outlet shall be installed near the equipment and shall be easily accessible Use only power supplies listed in the user instructions Do not dispose of electrical appliances...

Отзывы: