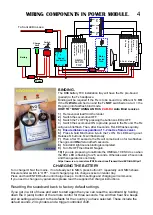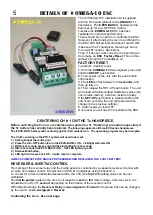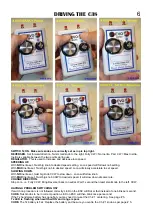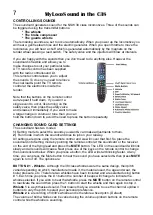
BUTTON 2 – Brake Pump.
This will operate in two ways:
1 beep – Manual. Sounds only if the 2 button on the IR or the R/C is pressed. (Default)
2 beeps – Automatic. Sounds whenever the locomotive is stationary.
BUTTON 3 - Guards Whistle.
This is used to select the guard's sounds from the list below.
1 beep – Sounds a guard's Acme Thunderer whistle. (Default)
2 beeps – Sounds “All aboard”.
3 beeps – Sounds “All aboard” and then the guard's whistle.
BUTTON 4 - Safety Valve.
This will operate in four ways:
1 beep – Manual. Starts when the button is pressed and stops when pressed again.
2 beeps – Throttle controlled. When the loco is stationary, turn the throttle up a little and the
safety valve will blow off until you turn the throttle off or forwards to move off.
3 beeps – Automatic. Blows for ten seconds once a minute.
4 beeps – Automatic. Blows for ten seconds once every three minutes. (Default)
BUTTON 5 – Electric Generator.
This will operate in two ways:
1 beep – Manual. Sounds only if the 5 button on the IR or the R/C is pressed.
2 beeps – Automatic. Sounds whenever the locomotive is stationary. (Default).
BUTTON 6 – Injectors.
This will operate in three ways:
1 beep – Manual. Starts when the button is pressed and stops when pressed again.
2 beeps – Automatic. Operates for twenty seconds once every two minutes. (Default)
3 beeps – Automatic. Operates for twenty seconds once every four minutes.
BUTTON 7 – Setting the steam chuff.
Set the chuff three ways as follows:
1 beep – Voltage triggered. The chuff rate is determined by the motor voltage which means
that it may need adjustment for different load conditions. At a given voltage, a loco running light
engine will be chuffing faster than one with a heavy train. Please refer to the guide below if you
wish to adjust the chuff in this mode.
2 beeps – Semi-automatic. The chuff starts when the tender wheels start moving so should
always be accurate regardless of load. From then on the chuff rate is determined by the motor
voltage and may need adjustment as described below.
3 beeps – Automatic chuff trigger. The chuff is activated by a magnetic trigger on one of the
tender wheels. Therefore no adjustment is needed and it is the easiest to use. However, if your loco
driving wheels slip, under heavy load or wet track, then you may need to change to the two beep
option above. (Default)
When the loco is running, the engine sounds should operate automatically, getting louder when
accelerating and softer when slowing down or idle.
BUTTON 8 – Not used
BUTTON 9 – The Operating Mode.
There is one mode:
One beep – Indicates manual mode. In this mode all sounds are triggered according to the
above settings. The whistle will sound for as long as its button is pressed. (Default)
CHANNEL UP/DOWN BUTTONS – Load Sensitivity.
The soundcard can be programmed to make
the engine loud when accelerating and softer when coasting and slowing down. The channel
up/down buttons change the level of sensitivity as indicated by the number of beeps when pressed.
One beep indicates maximum sensitivity. Five beeps sets minimum sensitivity ie. the engine will be
loud all the time. The default sensitivity is two and change to one if you want more sensitivity or
three or more if the chuff sounds erratic.
SETTING THE VOLTAGE STEAM CHUFF.
The chuff may need to be set to correctly match the loco. This is done with the sound active.
If you are using the one beep option then, starting from static, turn up the throttle until the loco just
starts moving and then press the Power button on the remote control. This will set the voltage at
which the chuff starts. This step is not needed for the two button option.
Next the chuff rate needs to be set to four beats per wheel revolution for the 38 class. Throttle up
the loco so that it is running at a scale walking pace and use the channel up/down buttons on the
remote to adjust the chuff rate to achieve four beats per wheel revolution. When you are satisfied
then restore the other sounds.
A customer, Rik Bennett, has made an excellent video of setting the chuff which can be seen by
going to YouTube and searching for “MyLocoSound steam setting”. It can also be accessed through
the steam page at
SEE PAGE # 4 FOR RESETTING THE SOUND SYSTEM TO DEFAULT VALUES.
8


