background image

16 

Oil Burner Assembly


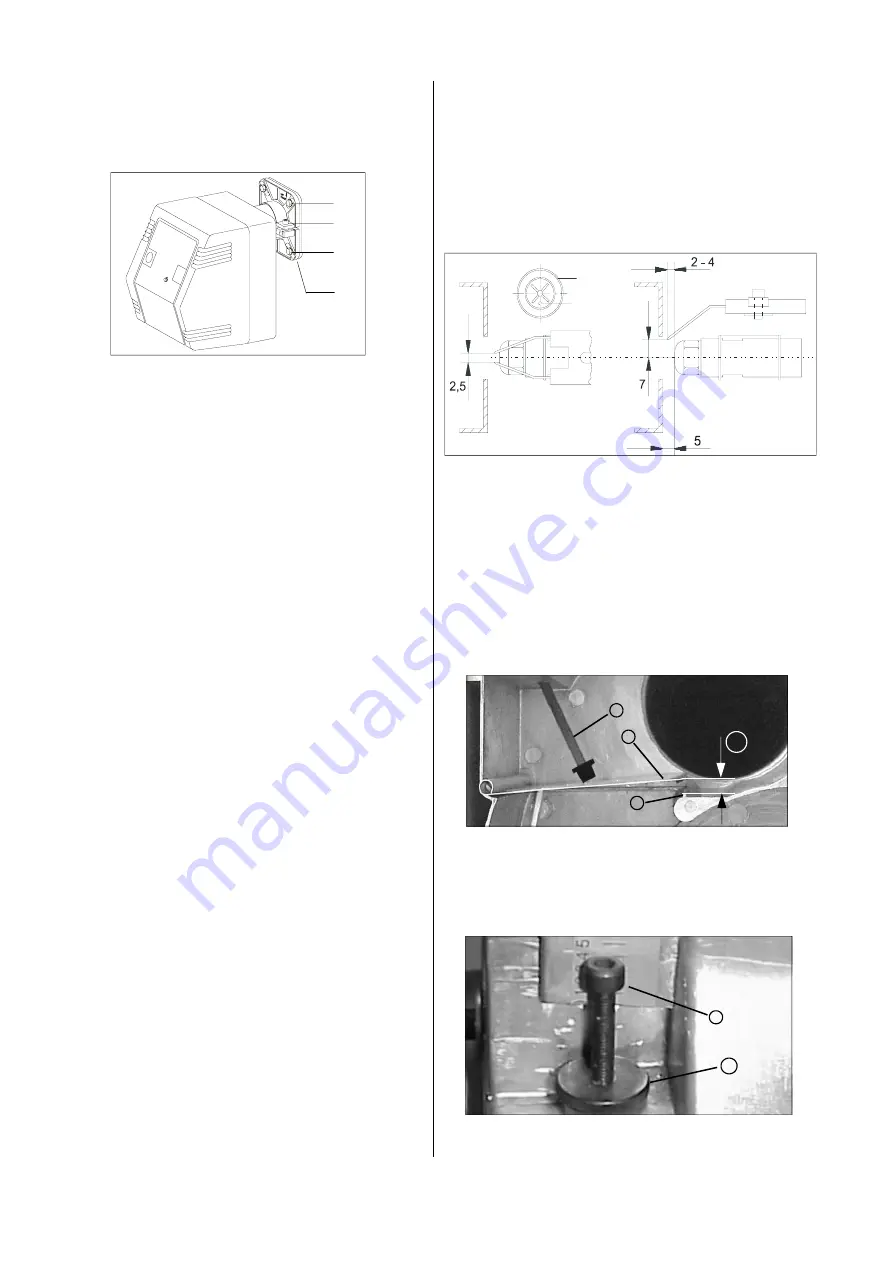
The supplied burner flange 1 which is attached with 4 
screws is used to mount the oil burner. 

Initial Operation


Initial operation of the oil burner may only be per-
formed by authorised personnel

Setting ignition electrode and stabilising disk 

Adjusting the Air flap 

Adjust the air flap with the adjustment screw 7 in such a 
way that the distance A between air flap 8 and stop posi-
tion 9 is approx. 8 mm. 

Proceed as follows to set the required distance: 

1.  Loosen the knurled screw 10 and rotate the adjust-

ment screw 7 accordingly. 


Rotate right


distance A becomes smaller


Rotate left


distance A becomes greater


10 

1.  Hold the assembly base plate horizontally. 

2. Slide the right mount laterally into the suspension 

and hang the left side into the top of the lug. 

All measurements are 
approx. values in mm 

Electrical Connection


The electrical connection to the warm air generator is 
made via a standardised 7-pole plug connection whose 
socket is attached to the burner. 

1.  Make sure to observe the “OBEN“ (top) label on the 

burner. 

2.  Tighten the upper screws 2 firmly. 

3.  Turn the lower screws 4 manually but not so that 

they are completely tight initially. 

The sliding flange still has to be tightened

4.  Push the flame pipe into the burner chamber until it 

clicks into place. 

5.  Connect the flame pipe to the flange 3 by slightly lifting 

the burner (3° incline). 

To do this, use a 6 mm Allen wrench. 

6.  Finally, tighten the lower screws 4. 

Oil Connection


The supplied oil lines are connected to the oil pump and 
fastened into place with the clamp. The shut-off and fil-
ter fittings have to be arranged in such a way that the 
hoses can be properly guided. The hoses may not be 
bent! 

Prior to operation


After removing the burner cover and loosening the 4 
housing screws, the assembly base plate is removed 
from the housing and suspended to the side. 

The most important functional components for service 
and maintenance in accordance with respective re-
quirements are immediately freely accessible. 

For maintenance as well as installation and nozzle re-
placement, the assembly base plate can also be sus-
pended horizontally. 

1.  Attach the the stabilising disk 5 in such a way that 

the inspection window 6 of the photo cell is vertical 
and at the bottom.  

The optimum setting must be adjusted to the local 
conditions and the exhaust-side conditions. 

2.  After a setting the distance, retighten the adjustment 

screw with the knurled nut 10. 

Содержание WKL 20 INOX

Страница 1: ...REMKO powerful like a bear REMKO WKL 20 INOX Oil compact heating system Edition GB P11 Operation Technology Spare Parts...

Страница 2: ......

Страница 3: ...Oil Burner Assembly 16 Initial Operation 16 Service and Guarantee 17 Maintenance Log 18 Stationary Warm Air Heating System REMKO WKL 20 INOX Read these instructions carefully before setting up operati...

Страница 4: ...connect the units to an exhaust system approved by the state building authorities The units are equipped with a 1 speed radial fan with drive motor that runs quietly and requires little mainte nance a...

Страница 5: ...bend the capillary tubes near to solder points When installing the capillary tubes be careful not to damage or bend them too sharply The sensors may only be mounted in the mounting brackets supplied b...

Страница 6: ...tup room but not close to hazardous areas Air Supply for Combustion An adequate supply of air for combustion must be en sured by meeting the relevant building requirements Excerpts from the German fir...

Страница 7: ...e units the regional provisions and regulations must be observed The units may only be operated with accessories that have either been approved by the manufacturer or sup plied with the units Proceed...

Страница 8: ...f the burner sup plied by the manufacturer If burners from other manufacturers are used they must be checked for compatibility with the unit Fan Motor Connection The units are completely wired at the...

Страница 9: ...If the unit is not set to its rated heat load or it is too large for the necessary heat requirements the burner only runs in cyclical operation Because the required operating temperature is not reache...

Страница 10: ...er Combustion residue in the com bustion chamber and in the heat exchanger must be removed Parts that wear out e g flue gas brakes oil nozzles oil filter inserts seals etc must be checked cleaned and...

Страница 11: ...and capillary pipes of the safety temperature limiter STB and the temperature moni tor TW for damage and ensure that the sensor has been properly positioned Check whether the red control light burner...

Страница 12: ...max unit without burner kW 0 17 Power consumption max for manufacturer supplied burner kW 0 28 Sound pressure level LpA 1m without burner dB A 58 Waste gas connection mm 130 Weight Unit without burne...

Страница 13: ...ture limiter TH Optional Room thermostat or day night regulator TR Fan control thermostat TW Temperature monitor WS Wieland plug We reserve the right to make modifications in dimensions and constructi...

Страница 14: ...Exploded View 4 1 2 5 3 13 8 9 12 11 7 3 4 10 16 15 20 18 19 17 21 22 23 26 25 27 14 24 6 We reserve the right to make modifications in dimensions and construction in the interests of technical progre...

Страница 15: ...ction grille 289109 16 Fan cpl 1108606 17 Seal for inspection cover 1103156 18 Inspection cover with waste gas connection 1103155 19 Waste gas suppressor set 6 piece 1103157 20 Fan control thermostat...

Страница 16: ...manually but not so that they are completely tight initially The sliding flange still has to be tightened 4 Push the flame pipe into the burner chamber until it clicks into place 5 Connect the flame p...

Страница 17: ...the guarantee to be valid the customer must com pletely fill out the guarantee certificate enclosed with all heating units and send it back to REMKO GmbH Co KG in a timely manner after purchasing of t...

Страница 18: ...damage Maintenance burner Test run Model Model No Burner Burner No Maintenance work may only be performed by authorised personnel settings must comply with legal specifications A corresponding test lo...

Страница 19: ......

Страница 20: ...REMKO GmbH Co KG Klima und W rmetechnik D 32791 Lage Im Seelenkamp 12 D 32777 Lage PO Box 1827 Phone 49 5232 606 0 Fax 49 5232 606 260 E Mail info remko de Internet www remko de...

Отзывы: