Reimo 93539 Скачать руководство пользователя страница 5

5

    DER LUFTKAMMER-RAHMEN 
 

•  Der Rahmen besteht aus 3-lagigen Luftschläuchen, welche sich in Reißver-

schluss-Schutzhüllen befinden. So sind diese sicher, geschützt und lassen 
sich bei Bedarf einfach austauschen.


•  Der innere Luftschlauch besteht aus einem extra stabilen TPU-Material, 

welches robust und wetterbeständig ist und lange halten wird.


•  Die Schutzhüllen bestehen aus einem robusten, stichfesten PE-Material. Die 

Schutzhüllen werden an Hülsen an der Innenseite des Zeltes per Reißver-
schluss befestigt.

 • 

 Die Reißverschlüsse von Schutzhülle und Hülse müssen mit Verbindern 
(z.B. Kabelbindern) aneinander befestigt sein. Diese Verbinder sollten 
bei normaler Nutzung niemals entfernt werden. Die Reißverschlüsse 
dürfen Sie nicht öffnen. Entfernen Sie diese nur, wenn Sie einen Luft-
schlauch entfernen, ersetzen oder reparieren müssen. Wenn Sie die 
Verbinder entfernen, muss dies geschehen bevor Sie das Zelt aufpum-
pen, da Sie sonst die Luftschläuche beschädigen oder auch durchste-
chen könnten, was nicht durch die Garantie abgedeckt wird.


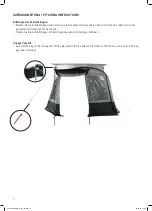
•  Um sicherzustellen, dass sich das aufblasbare Gestänge in der richtigen Po-

sition befindet, achten Sie bitte darauf, dass der Klettverschluss der Kammer 
mit dem Klettverschluss am Zeltboden verbunden ist. 


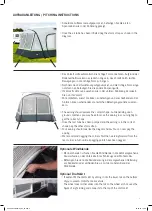
ABOUT THE INFLATABLE FRAME


•  The frame is made up of air tubes which are placed inside zipped protective 

covers making them secure, protected and easy to replace if required. 


•  The air tubes themselves are made of very strong TPU material which is 

strong, resistant to weather and will last for years.


•  The protective covers are made from a strong, puncture resistant PE materi-

al. The protective cover is zipped inside the sleeve on the awning.


•  

The zips on the sleeve and protective cover are locked together with ties. 
These ties should never be removed under normal use. They are only to 
be removed,if you need to remove, replace or repair your air tube. 
If you do remove the ties then you must replace them before inflating 
your awning otherwise you could cause damage to the air tube, even 
puncturing it which is not covered under your warrranty.


•  To ensure the air tube frame is in the correct position, please check that the 

protective cover is located on the velcro pads at all times.

 !!ACHTUNG!! 


 Die Reißverschlüsse von Schutzhülle und Hülse müssen mit Verbindern 
(z.B. Kabelbindern) verriegelt werden. Diese Verbinder sollten bei norma-
ler Nutzung niemals entfernt werden.  Die Reißverschlüsse dürfen sich 
nicht öffnen können. Wenn  dieser Verbinder entfernen wurde, können 
die Luftschläuche und auch ihr Zelt beschädigt oder durchstochen  
werden, was nicht durch die Garantie abgedeckt wird. 
Pumpen Sie die Luftschläuche niemals auf, wenn einer der beiden Reiß-
verschlüsse geöffnet ist.

 !!ATTENTION!


 The zips on the air tube sleeve and protective cover are locked together 
by a plastic tie. Never remove this plastic tie under normal use. If this tie 
is removed then it could cause damage to your air tubes or awning and 
is not covered by the warranty. 
Never inflate the air tube if either of the zips are undone.
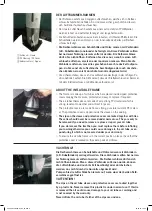
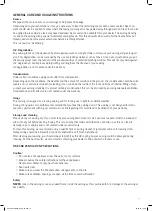
a

c

b

a

 Schlauch / Sleeve

b

 PE Überzug / PE Cover

c

 Reißverschluss / Zipper

93539_OneBeamAir_A4_bs.indd   5

20.08.18   10:24

Содержание 93539

Страница 1: ...One Beam Air 93539 Aufbauanleitung Assembly Instructions 93539_OneBeamAir_A4_bs indd 1 20 08 18 10 24...

Страница 2: ...URCHASING YOUR ONE BEAM AIR AWNING If used correctly your awning shoud give you years of trouble free use We recommend that your awning is insured against accidental and storm damage as this is not co...

Страница 3: ...adder TPU Reparaturflicken TPU repair patch Au enzelt Flysheet Aufstellstange f r T r Canopy Poles Kit Windblende Radabeckung Draft Skirt Wheel Cover 935392 Metall und Plastikheringe Metal and Plastic...

Страница 4: ...uche k nnen sich mit der Zeit lockern wenn sie nicht benutzt werden Versichern Sie sich vor dem Aufblasen das die Ventile dicht sind RECOMMENDATIONS Please lay down a groundsheet in advance to prevent...

Страница 5: ...h is strong resistant to weather and will last for years The protective covers are made from a strong puncture resistant PE materi al The protective cover is zipped inside the sleeve on the awning The...

Страница 6: ...IGEN AUFPUMPEN Um die Luftschl uche aufzupumpen l sen Sie die Abdeckkappe und verbinden sie das Ventil der Luftpumpe mit dem Lufteinlass wie unten abgebildet Sie k nnen nun die Luftschl uche aufpumpen...

Страница 7: ...warranty and could damage your awning INFLATION To inflate your air tube unscrew the top cap and attach the pump nozzle to the air inlet as shown below You are now ready to pump your air tube up If yo...

Страница 8: ...van pulling the awning as close to the caravan as possible Sie sind nun bereit ihr Vorzelt aufzupumpen Bevor Sie mit dem Aufpumpen des Vorzeltes beginnen stellen Sie sicher dass Sie die Hinweise und A...

Страница 9: ...ch die richtige Form annehmen Aufgrund der Bodenverh ltnisse kann es jedoch n tig sein das Vorzelt durch leichte Bewegungen in die richtige Form zu bringen Nachdem das Zelt vollst ndig aufgepumpt ist...

Страница 10: ...und richten die T r damit auf Fixieren Sie die Aufstellstangen mit den Abspannseilen und Heringen im Boden Canopy Pole Kit Assemble the leg of the canopy and fit the pole head onto the eyelet on the...

Страница 11: ...HL SSE MIT EINEM NEUEN VERBINDER ODER HNLICHEM Nichtbeachtung kann beim Aufpum pen Sch den an Ihrem Vorzelt verursachen und wird nicht durch die Garantie abgedeckt REPLACING OR REPAIRING AN AIR TUBE D...

Страница 12: ...ang der Innenseite des Daches herablaufen sowie an Einrichtungsgegenst nden heruntertropfen kann Wenn Sie vermuten Ihr Vorzelt sei undicht ist dies in den meisten F llen durch Kondenswasser begr ndet...

Страница 13: ...t certainly condensation this can be improved by ensuring adequate ventilation Condensation and its effects are not covered under the warranty Usage This awning is designed as a touring awning and for...

Страница 14: ...14 93539_OneBeamAir_A4_bs indd 14 20 08 18 10 24...

Страница 15: ...15 93539_OneBeamAir_A4_bs indd 15 20 08 18 10 24...

Страница 16: ...www reimo com 2018 REIMO REISEMOBIL CENTER GMBH 63329 EGELSBACH BOSCHRING 10 GERMANY WWW REIMO COM 93539_OneBeamAir_A4_bs indd 16 20 08 18 10 24...

Отзывы: