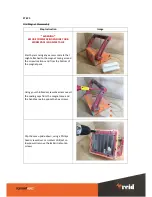
background image


STEP 2. 

Magnet Pack Inspection & Cleaning 

Step Instruction 

Image 


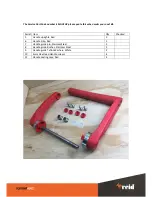
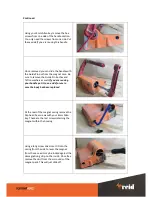
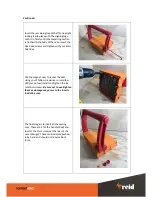
The magnet pack needs to be checked for 
damage. Severe damage to the Rear Pivot 
screw locaters will render the magnet pack 

unserviceable

 and a new magnet will need 

to be purchased. 


The kidney guides need to be checked for 
wear and tear. These will wear over time 
and excessive wear will reduce the magnets 
engagement/disengagement capabilities. 

There should be a distinct “bump” if there is 

not then the magnet handle engagement 
will be severely affected. 


The skirting between each magnet element 
should be checked. Slight wear and tear is 
acceptable however if several of the rubber 
strips are missing or broken this can slightly 
reduce the magnets effectiveness in shear 
and needs to be considered when returning 
to service in the yard. 


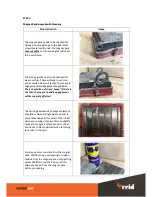
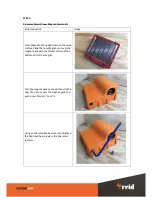
Scrub any excess concrete from the magnet 
pack. WD40 can be used sparingly to clean 
residue from the magnet pack. Avoid getting 
excess WD40 around the Kidney section. 
Wipe any excess from the magnet pack 
before proceeding. 


Содержание Spartan Titan 3

Страница 1: ...ment Required The following items will ensure your able to disassemble your old magnet case without causing further damage and will allow for a fast reassembly with your new service kit These items ca...

Страница 2: ...y Please ensure all items are present and you can check them off this will ensure your service runs smoothly and quickly The Service Part Code number is MAG1BK please quote this when order your next k...

Страница 3: ...rder your next kit Serial Item Qty Checked 5 Handle uprights Red 2 6 Handle Grip Red 1 7 Handle guide pin Stainless Steel 1 8 Handle guide Bushes Stainless Steel 2 9 Handle guide Teflon Washers White...

Страница 4: ...ight attached to the magnet casing around the screw locations and from the bottom of the magnet pack Using your thin blade screwdriver remove all the sealing caps from the magnet case and the handle a...

Страница 5: ...hers as well If you are reusing your handle put it to one side for use in once the body has been replaced At the rear of the magnet casing remove the Cap head hex screws with your 6mm Allen key These...

Страница 6: ...ere should be a distinct bump if there is not then the magnet handle engagement will be severely affected The skirting between each magnet element should be checked Slight wear and tear is acceptable...

Страница 7: ...ce Slide the new Magnet skirt over the magnet pack with the thicker section at the bottom end of the magnet Turn the magnet pack over and then slip the new Titan 3 case over the magnet pack and push d...

Страница 8: ...g it through These enable smooth function of the handle and prevent wear against the handle arm and the guide bushes Press the magnet pack up inside the case so it engages with the Demagnetising strip...

Страница 9: ...Flip the magnet over to reveal the skirt Using your Phillips screwdriver or cordless drill set on low install and tighten the 8 x retention screws Be sure not to overtighten these as damage may occur...

Страница 10: ...ter service in your yard Be sure to service me every 12 months to prolong my lifespan If you have any issues with this guide or are missing any components please contact your Account Manager or the Na...

Отзывы: