background image

CONTENTS

User 

Safety 

     2

Introduction and ARL516G™ Accessories 


3

ARL516G™Diagram     4
Operating 

Instructions 

    6

 Batteries 

    6


Power and Rotation Speed 


7


Scan Modes & Site Layout 


8

 Laser 

Receiver 

LRG715   9

Calibration Self Check & Technical Specifications   


10

Care & Maintenance, Trouble Shooting   


11

Warranty 

      12

User Safety

• 

Laser output sign lies near the output aperture.

• 

Do not stare directly into laser beam.

• 

Do not disassemble the instrument or attempt to  


perform any internal servicing. Repairs and service 


should be performed only authorised service  


centres of Redback Lasers. 

• 

This instrument complies with the safety


Classification standards of laser radiation.

2

CAUTION: Class 3R laser <5mW at 

522-542nm.

Do NOT stare into laser beam or aim at 

another person.

Follow relevant Australian Standards

Copyright © CMI LasersTM RedBack lasersTM and Level1LasersTM . All rights reserved CMI Industries Pty Ltd 2010

No artwork or photographs produced by CMI Industries Pty Ltd may be used copied or reproduced without the written consent 

from CMI Industries Pty Ltd

Содержание ARL516G

Страница 1: ......

Страница 2: ...strument or attempt to perform any internal servicing Repairs and service should be performed only authorised service centres of Redback Lasers This instrument complies with the safety Classification standards of laser radiation 2 CAUTION Class 3R laser 5mW at 522 542nm Do NOT stare into laser beam or aim at another person Follow relevant Australian Standards Copyright CMI LasersTM RedBack lasersT...

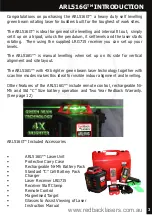
Страница 3: ... up on its side for vertical alignment and site layout The ARL516G with 4X brighter green beam laser technology together with scan line modes makes this ideal for visible indoor alignment and levelling Other features of the ARL516G include remote control rechargeable Ni Mh and Std C Size battery operation and Two Year Redback Warranty See page 12 www redbacklasers com au ARL516G Included Accessori...

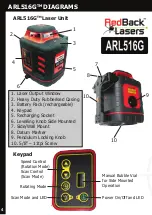
Страница 4: ...rechargeable 4 Keypad 5 Recharging Socket 6 Levelling Knob Side Mounted 7 Side Wall Mount 8 Datum Marker 9 Pendulum Locking Knob 10 5 8 11tpi Screw 2 4 6 9 Power On Off and LED Manual Bubble Vial for Side Mounted Operation Rotating Mode Speed Control Rotation Mode Scan Control Scan Mode 10 10 Keypad Scan Mode and LED 8 ...

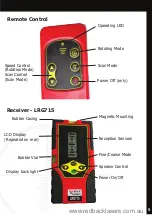
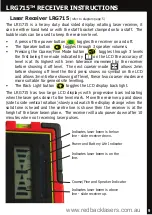
Страница 5: ...Reception Sensors Fine Coarse Mode Speaker Control Power On Off Rubber Casing LCD Display Repeated on rear Bubble Vial Display back light Magnetic Mounting Power Off only Scan Mode Rotating Mode Speed Control Rotation Mode Scan Control Scan Mode Operating LED ...

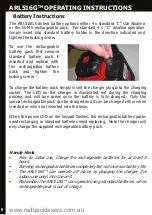
Страница 6: ...plied rechargeable battery pack Handy Hints Prior to initial use charge the rechargeable batteries for at least 8 hours Running rechargeable batteries completely flat will increase battery life The ARL516G can operate off mains by plugging the charger for indoor use only into the unit Remember the ARL516G can operate using standard batteries when rechargeable pack is out of charge The ARL516G has ...

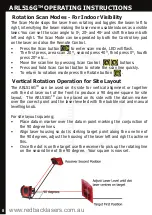
Страница 7: ...16GTM starts by default in rotation mode and so the rotation button only needs to be pressed when switching from scan mode back to rotation Whilst rotating the speed of rotation can be changed by pressing the up and down arrow buttons on the keypad or remote Rotation speed will effect receiver performance at different distances and also help visibility of the laser beam when used indoors Turning L...

Страница 8: ...ft and right to achieve this Once the dot is on the target use the receiver to pick up the rotating line on the second line of the 90 degree Your square is now set Rotation Scan Modes For Indoor Visibility The Scan Mode stops the laser from rotating and toggles the beam left to right intensifying the beam making the laser more usable indoors as a visible laser You can set the scan angle to 0o 20o ...

Страница 9: ...15TM RECEIVER INSTRUCTIONS Indicates laser beam is below line slide receiver down Indicates laser beam is above line slide receiver up Indicates laser beam is on the line Power and Battery Life Indicator Coarse Fine and Speaker Indicator www redbacklasers com au A press of the power button toggles the receiver on and off The Speaker button toggles through 3 speaker volumes Pressing the Coarse Fine...

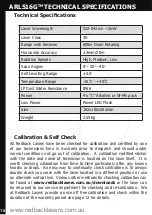
Страница 10: ...ustralia prior to despatch and should under normal conditions not go out of calibration A calibration certified sticker with the date and name of technician is located on the laser itself It is worth checking calibration from time to time particularly after any known knocks or drops An easy way to continually check calibration is to always double check you work with the laser located in a differen...

Страница 11: ...power up in normal Horizontal mode A Check the pendulum lock has been unlocked ON position for horizontal rotation operation Q The Laser does not power up A Check the rechargeable batteries are charged and connected correctly and or replace standard C size Alkaline batteries and check they are inserted correctly Q Using the receiver I get multiple heights showing as level A This is a common proble...

Страница 12: ... Warranty CMI warrants that our products will be free from defects in material and workmanship for the warranty period CMI promises to repair or replace free of charge the product or part of product if found to be faulty due to defective workmanship or materials within the duration of the warranty as long as the following terms and conditions are met Product must not have been misused or abused mu...

Отзывы: