background image

3D LUT

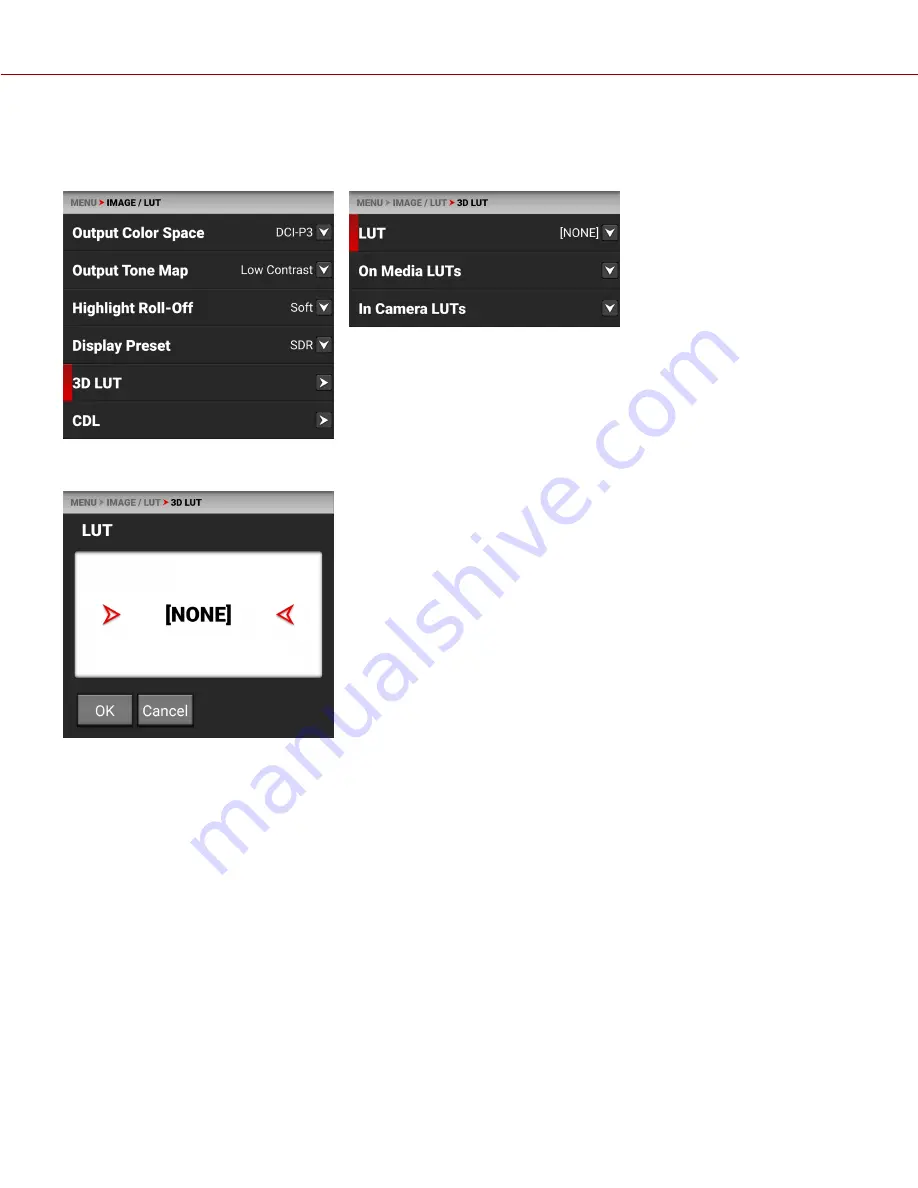
Use the 3D LUT menu to apply and manage the camera's Look-Up Tables (LUTs).

SELECT LUT

If you are recording to a ProRes codec you can chose to irreversibly encode (bake) the 3D LUT into the recorded file.
For more information, refer to the

ProRes Baked-In Settings

section.

To apply a 3D LUT, follow the instructions below:

1. Go to

MENU

>

IMAGE / LUT

>

3D LUT

>

LUT

.

2. Select a LUT from the

LUT

list.

COPYR IGHT © 2 0 2 0 R E D.COM , LLC

9 5 5 -0 1 9 0 , R E V -B E TA 1 .0 | 4 5

KOMODO OPERATION GUIDE

BETA

Содержание KOMODO 6K ST

Страница 1: ...KOMODO 6K S35 V1 0 BETA RED COM KOMODO OPERATION GUIDE...

Страница 2: ...3 HIGHLIGHT ROLL OFF 43 DISPLAY PRESET 44 3D LUT 45 CDL 47 COPYRIGHT 2020 RED COM LLC 955 0190 REV BETA 1 0 ii TABLE OF CONTENTS PROJECT SETTINGS MENU 54 FORMAT 54 PROJECT TIME BASE 55 FILE FORMAT 56...

Страница 3: ...EAKING MODE 137 PEAKING PEAKING MODE 138 TIMECODE 138 TIME OF DAY 138 EDGECODE 139 ZEBRA MODES 141 ZEBRA OVERVIEW 141 CALIBRATING THE SENSOR 142 WHEN TO CALIBRATE SENSOR 142 UPGRADING THE FIRMWARE 142...

Страница 4: ...a registered trademark of Canon U S A Apple Macintosh Final Cut Pro and QuickTime are registered trademarks of Apple Inc in the U S and other countries Windex is a registered trademark of S C Johnson...

Страница 5: ...s equipment NOTE This device complies with Part 15 of the FCC Rules Operations subjected to the following two conditions 1 this device may not cause harmful interference and 2 this device must accept...

Страница 6: ...This symbol on the product and accompanying documents means that used electrical and electronic products should not be mixed with general household waste For proper treatment recovery and recycling t...

Страница 7: ...4 F Storage range 20 C to 50 C 4 F to 122 F COPYRIGHT 2020 RED COM LLC 955 0190 REV BETA 1 0 vii If there are any performance issues with your camera or accessories when operating within this temperat...

Страница 8: ...batteries in extreme hot or cold temperatures DO NOT store batteries in direct sunlight DO NOT disassemble or modify the battery DO NOT overcharge batteries Overcharging may increase internal temperat...

Страница 9: ...6K S35 global shutter sensor This sensor breaks new technical ground by retaining wide dynamic range and delivering unmatched RED imagery without compromising creative or technical features KOMODO inc...

Страница 10: ...ocessing presets This information is stored as reference metadata so that these color processing choices can be the default values used in post production GLOBAL SHUTTER This camera employs Global Shu...

Страница 11: ...party developers must use the most recent R3D SDK to offer compatibility with the latest RED firmware POST PRODUCTION WITH REDCINE X PRO REDCINE X PRO is a professional one light coloring tool set equ...

Страница 12: ...to prepare for recording refer to the System Settings Menu CONFIGURING THE SETTINGS Configuring the camera system settings Upgrading the Firmware Calibrating the camera using the Calibrate option For...

Страница 13: ...lens mount on the body CAMERA BODY CONTROLS AND FEATURES This section describes the controls and features of the camera FRONT Figure Camera Body Front Controls and Features ITEM DESCRIPTION 1 Lens mou...

Страница 14: ...avigates down in the menu and locks unlocks the UI when pressed along with the other Lock button 5 Select FN Button Selects the highlighted menu item and enables the Function buttons 6 Right Arrow But...

Страница 15: ...output 3 Media Bay CFast 2 0 media bay 4 CFast LED CFast status indicator refer to Camera Body LEDs 5 EJECT Button Left battery release button 6 M4 Mounting Holes Two 2 M4 mounting points for accessor...

Страница 16: ...Wireless Antenna WiFi antenna with SMA connector Supports 2 4 GHz and 5 GHz 5 REC button Press and release the PWR REC button to toggle between record start and stop 6 Record LED Displays the camera r...

Страница 17: ...3 9 Pin Extension Port 9 pin 0B ODU port refer to KOMODO Expander Module 4 12G SDI port Full size 12G SDI BNC port for SDI monitor connection 5 2 pin DC Input port 2 pin 0B ODU for DC IN with wide in...

Страница 18: ...1 1 4 20 mounting hole and one 1 3 8 16 mounting hole refer to KOMODO Expander Module 2 Registration Points Indented alignment points for the KOMODO Expander Module 3 Service Port For RED service only...

Страница 19: ...ont ITEM COLOR DESCRIPTION 1 Tally Indicator LED Red When enabled this LED is ON when the camera is recording For information about enabling this LED refer to Indicators COPYRIGHT 2020 RED COM LLC 955...

Страница 20: ...with 10 of media space available Amber Recording finalizing or playback mode Amber flashing slow Formatting media Red flashing slow Media mounted with 5 and 10 of media space available Red flashing f...

Страница 21: ...ed Camera shutting down 2 Record Status REC Off No media present Green Ready to record Red Recording Amber Finalizing Red flashing slow Media mounted with 5 and 10 of media space available Red flashin...

Страница 22: ...LED ITEM COLOR DESCRIPTION 1 DC IN Green DC IN is present and or the battery is fully charged Amber Charging connected batteries Red Error charging the batteries COPYRIGHT 2020 RED COM LLC 955 0190 R...

Страница 23: ...7800 mAh typical 7350 mAh 55 Wh minimum Dimensions Width 1 504 Height 2 773 Depth 2 45 Weight 11 3 ounces 4 LEDs indicate the remaining battery life As much as 50 more recording time than the BP 955 4...

Страница 24: ...s and camera mount cap Figure Camera with mount cap installed Incompatible lenses do not register on the camera UI and they will not show any UI lens information or menu controls The camera can contro...

Страница 25: ...t the full weight of the lens is never directly on the camera or lens mount Mount the lens to the support system first and then carefully mount the lens to the camera COMPATIBLE MOUNT ADAPTORS RED tes...

Страница 26: ...attached to both ends KOMODO OUTRIGGER HANDLE The KOMODO Outrigger Handle offers a low profile 360 adjustable ergonomic pistol grip and integrated Record Start Stop button Mounted to the Top Handle Po...

Страница 27: ...tension Port CONNECTOR CONNECTOR TYPE DETAILS 1 Module cable 9 pin 0B ODU Attaches to the back of the Camera Body 2 GPI BNC Connection for remote trigger 3 Genlock BNC Connection for external Genlock...

Страница 28: ...uchscreen will not sleep while the camera is recording The LCD Touchscreen home page contains the following features STATUS BAR The Status Bar contains the button for displaying the Home screen and Me...

Страница 29: ...gle button RED logo the camera toggles the display between the menu page and the home page When you tap the Status bar icons the Status Page displays COPYRIGHT 2020 RED COM LLC 955 0190 REV BETA 1 0 2...

Страница 30: ...olor exposure levels with clipping indicators image histogram and audio VU meters Tap this area to toggle between this display and the Color Audio Media display For more information refer to Histogram...

Страница 31: ...ccess button to close the selection screen BUTTON NAVIGATION Pressing the Menu button next to the LCD touchscreen opens the main menu page You can select the desired menu items by using the Up Down an...

Страница 32: ...e Internal Audio External Audio Headphone Volume Mute Headphone Timecode Display Mode Monitoring Menu Top Port SDI Tools Frame Guide Video Media Menu Eject Media Info File System Secure Format Autofoc...

Страница 33: ...ttings menu System Status Displays the camera temperature status and a link to the System Status menu Project Settings Menu Displays the project status and a link to the Project Settings menu Lens Dis...

Страница 34: ...the Histogram display and the Color Audio Media display The Histogram section of the LCD home page displays the following RGB Exposure Histogram Audio VU Meters COPYRIGHT 2020 RED COM LLC 955 0190 RE...

Страница 35: ...els and indicates when a channel is underexposed or overexposed This meter measures the raw image data regardless of the ISO and LUT settings Overexposed Example Underexposed Example Balanced Example...

Страница 36: ...ft the midtones in the middle and the lightest image elements at the far right This gives you a fast way to determine your overall image exposure levels Overexposed Example Underexposed Example COPYRI...

Страница 37: ...s Refer to the Audio TC Menu section for more information about the audio channels Maximum VU Meter Example PLAYBACK When you press on the Playback button the LCD Touchscreen displays the Playback scr...

Страница 38: ...rs Clip Information Playback Screen Buttons CLIP SLIDER Use your finger to move forward and backward through the frames by swiping the image to the left and the right The Clip Slider shows where in th...

Страница 39: ...SO and LUT settings HISTOGRAM The histogram displays the darkest image elements at the far left the midtones in the middle and the lightest image elements at the far right This gives you a quick way t...

Страница 40: ...ard and move one clip forward CLIP LIST The Clip List button displays the list of clips recorded on the media card Each clip displays the first frame of the clip the clip information and the clip file...

Страница 41: ...3D Quality ProRes Codec Slate Audio TC Menu Audio Source Internal Audio External Audio Headphone Volume Mute Headphone Timecode Display Mode Monitoring Menu Top Port SDI Tools Frame Guide Video Media...

Страница 42: ...sensitivity of the sensor to light Shutter Adjusts the amount of light exposed to the sensor White Balance Adjusts the colors to compensate for the light source temperature Output Color Space Adjusts...

Страница 43: ...yback occurring at a different frame rate than the original recording and will also not record audio RECORDING FRAME RATES FOR TIME BASE 23 98 FPS FORMAT 6K 17 9 6K 2 4 1 6K 16 9 5K 17 9 4K 17 9 2K 17...

Страница 44: ...29 97 FPS 29 97 FPS 29 97 FPS 39 96 FPS 49 95 FPS 39 96 FPS 47 95 FPS 59 94 FPS 59 94 FPS 89 91 FPS 119 88 FPS RECORDING FRAME RATES FOR TIME BASE 30 FPS FORMAT 6K 17 9 6K 2 4 1 6K 16 9 5K 17 9 4K 17...

Страница 45: ...Range is ISO 250 to ISO 12 800 The default ISO is ISO 800 Higher ISO values create brighter images in the monitor path and lower ISO values create darker images in the monitor path When you record us...

Страница 46: ...objects SHUTTER ANGLE Enter the exposure value as a shutter angle xx The shutter angle range is 0 to 360 The default shutter angle is 180 EXPOSURE CONVERSIONS The table below lists common shutter angl...

Страница 47: ...RT SHUTTER ANGLE TO SHUTTER SPEED Shutter Speed 1 Frame Rate x 360 Angle Example 1 23 98 x 360 180 1 47 95 WHITE BALANCE Use the White Balance menu to adjust the Color Temperature and the Tint Use the...

Страница 48: ...g the camera to a cooler temperature The color temperature range is 1 700 K to 10 000 K The camera s default color temperature is 5600 K COLOR TEMPERATURE PRESETS Use Color Temperature Presets to sele...

Страница 49: ...ng To compensate for any residual colorcast the Tint setting adjusts the RGB color balance with a compensating magenta green color component Tint range is 100 000 to 100 000 The default Tint setting i...

Страница 50: ...tint settings OUTPUT COLOR SPACE Use Output Color Space to select the desired Color Space to use when displaying the camera output The Output Color Space selections include DCI P3 Digital Cinema Initi...

Страница 51: ...ROLL OFF Use Highlight Roll Off to select the desired highlight compression to use when displaying the camera output The Highlight Roll Off selections include Very Soft The lightest compression is ap...

Страница 52: ...need for metadata This allows HLG to display well on SDR and HDR monitors BACKGROUND NHK and the BBC developed HLG in a joint effort to create a more compatible signal for a wide variety of televisio...

Страница 53: ...can chose to irreversibly encode bake the 3D LUT into the recorded file For more information refer to the ProRes Baked In Settings section To apply a 3D LUT follow the instructions below 1 Go to MENU...

Страница 54: ...Ts must be saved on the root path of your media in a folder titled luts From On Media LUTs you can Import the selected 3D LUT from the media to the camera Import all 3D LUTs from the media to the came...

Страница 55: ...ed 3D LUT from the camera Export a selected 3D LUT from the camera to the media Export all 3D LUTs from the camera to the media CDL The Color Decision List CDL allows you define the look of the camera...

Страница 56: ...mple metadata without the need to re transfer the image data CDLs are very common in VFX workflows because the VFX artist needs both the ungraded shot and the intended look The ungraded shot allows th...

Страница 57: ...LM GRADE AND VIDEO GRADE With Slope and Offset you can produce both a Film Grade Exposure and Contrast and a Video Grade Lift and Gain Exposure is achieved by Offset Contrast is achieved by a combinat...

Страница 58: ...fines the image settings for the red green and blue channel The three CDL tone curve parameters are Slope Offset and Power These algorithms allow the camera to modify the recorded image The CDL Slope...

Страница 59: ...r the red green and blue channel The three CDL tone curve parameters are Slope Offset and Power These algorithms allow the camera to modify the recorded image The CDL Offset settings control the offse...

Страница 60: ...URATION The CDL defines the image settings for the red green and blue channel The three CDL tone curve parameters are Slope Offset and Power These algorithms allow the camera to modify the recorded im...

Страница 61: ...the media to the camera or import all of the CDLs from the media to the camera IN CAMERA CDLS Use In Camera CDLs to copy CDLs stored on the camera and store them on the media You can also select which...

Страница 62: ...ured by the sensor Project Time Base Image playback rate File Format R3D or ProRes file formats R3D Quality Data rate of the recorded image file ProRes Resolution ProRes SDI recording data rate ProRes...

Страница 63: ...he dimensions of the sensor area in Pixels and in Millimeters used by each format FORMAT DIMENSION PIXELS DIMENSIONS MM WIDTH HEIGHT WIDTH HEIGHT DIAGONAL 6K 17 9 6144 3240 30 7 16 2 34 7 6K 2 4 1 614...

Страница 64: ...arison to Apple ProRes REDCODE RAW data does not bake in image settings like ISO saturation or LUTs allowing more flexibility in post processing workflows without reducing image quality or dynamic ran...

Страница 65: ...selected in the ProRes Codec menu The field of view is maintained in the QuickTime file the image is not cropped If recording 4K Apple ProRes and the resolution is less than 4K the image is scaled to...

Страница 66: ...binations MQ Medium Quality For VFX extreme detail scenes and stills from motion we recommend HQ For Cinema non VFX TV online content documentary and interviews we recommend MQ PRORES RESOLUTION When...

Страница 67: ...ETTINGS When you enable ProRes as the File Format you can select the ProRes Baked In settings The ProRes Baked In Settings include RWG Log3G10 REDWideGamutRGB color space and Log3G10 gamma curve 3D LU...

Страница 68: ...ormatting media Camera Position also populates in the Media menu when formatting media CAMERA ID Use Camera ID to assign a camera ID to the clip NOTE You can also change the Camera ID by using Secure...

Страница 69: ...ect Audio TC Use the Audio TC menu to configure the audio and Timecode settings for the camera ITEMS DETAILS Audio Source Audio input source Internal Audio Left and Right internal microphone levels Ex...

Страница 70: ...gather additional data such as lens metadata or camera orientation which Timecode can later use for merging the data back together in post processing The camera provides two separate Timecode concepts...

Страница 71: ...nly enabled when the Audio Source is set to Internal Microphone The Internal Microphone is represented as Channels 1 and 2 on the UI VU Meters refer to Playback for more information The left channel i...

Страница 72: ...ternal Microphone is represented as Channels 3 and 4 on the UI VU Meters refer to Playback for more information The left channel is channel 3 and the right channel is channel 4 You can adjust the exte...

Страница 73: ...just the headphone volume You can enable and disable the headphone audio jack by tapping the Enable toggle to the right green and to the left red You can adjust the headphone volume from 0 to 100 COPY...

Страница 74: ...AY MODE Use Timecode Display Mode to configure the Timecode display type that the camera applies to the recordings You can set the Timecode Display Mode as Time of Day TOD or Edge TOD DISPLAY MODE Tim...

Страница 75: ...onitoring settings ITEMS DETAILS LCD LCD Touchscreen settings SDI SDI port frequency and resolution Live Stream Enable or disable WiFi live streaming Tools Various monitoring tools including False Col...

Страница 76: ...ew look Guides Enable or Disable the camera guides Tools Enable or Disable the camera tools BRIGHTNESS You can adjust the camera s top LCD brightness from 10 to 100 LOOK You can select the look of the...

Страница 77: ...e SDI port settings you can configure include ITEMS DETAILS Resolution Select the SDI port resolution Frequency Select the SDI port frequency Look Set the look of the playback between RWG Log3G10 or 3...

Страница 78: ...r 4K UHD while capturing in a 17 9 format the entire 17 9 image will be down scaled to the 16 9 aspect ratio of 1080p or 4K UHD Small black bars will only appear on the top and bottom of the frame in...

Страница 79: ...g3G10 3D LUT GUIDES Use Guides to enable or disable the viewing of guides Tap the switch to toggle between enabled and disabled TOOLS Use Tools to enable or disable the viewing of tools Tap the switch...

Страница 80: ...ed on the back of the camera body For more information about the SDI standard refer to the SMPTE Society of Motion Picture and Television Engineers standard SMPTE ST 2082 LIVE STREAM Use Live Stream t...

Страница 81: ...g tools The monitoring tools that you can use include ITEMS DETAILS False Color Enable and configure the False Color Exposure Mode and the False Color Video Mode Peaking Enable and configure focus ind...

Страница 82: ...or tool mode ENABLE Use Enable to enable or disable the False Color tool FALSE COLOR MODE False Color Modes include ITEMS DETAILS False Color Exposure Mode Use false colors to determine an optimal bal...

Страница 83: ...ons then the image is very likely overexposed If there aren t any red overlays then the exposure is likely OK and could even be increased If purple is overlaid on key image detail that isn t in the sh...

Страница 84: ...False Color Exposure Mode use the purple and red indicators to adjust your lighting or lens aperture Use this strategy to achieve an optimal balance between clipping from overexposure and image noise...

Страница 85: ...ings can change the appearance of the selected color overlay The Peaking Peaking mode indicator is applied after the image is scaled to a monitor making the indicators appear differently on various mo...

Страница 86: ...bra Modes Zebra 1 is disabled by default The Zebra 1 mode includes ITEMS DETAILS Enable Enables red zebra stripes to indicate highlight exposure Low IRE Sets the lower threshold for the indicator High...

Страница 87: ...HIGH IRE Provides a keypad that allows you to set the high threshold for the Zebra stripe The default setting is 100 IRE NORMAL VIEW ZEBRA 1 VIEW ZEBRA 2 Use Zebra 2 to display a second set of diagona...

Страница 88: ...enable or disable the Zebra 2 stripes LOW IRE Provides a keypad that allows you to set the low threshold for the Zebra stripe The default setting is 40 IRE HIGH IRE Provides a keypad that allows you t...

Страница 89: ...e following ITEMS DETAILS Enable Enables the Frame Guide Mode Select aspect ratios User and Absolute modes User Aspect Ratio Enabled by selecting User mode Scale Percentage of the screen the Frame Gui...

Страница 90: ...pect ratios from Full to 2 4 1 User and Absolute The User and Absolute modes enable settings that are specific to those modes USER ASPECT RATIO This item is enabled when the User mode is selected Use...

Страница 91: ...enter the percentage of the image the Frame Guide contains OFFSET X Y Use offset to configure the X and Y offset of the Frame Guide Use the keypad to enter the percentage of offset from center you wa...

Страница 92: ...ixels for X Y offset and for the width and height of the Frame Guide The Absolute items are only enabled when you select Absolute Mode LINE STYLE Use Line Style to select the type of line the Frame Gu...

Страница 93: ...r the Frame Guide Black Green Cyan Red Yellow Dark Gray Blue Magenta White OPACITY Use Opacity to select how transparent the Frame Guide line appears Use Opacity to select the percentage of opacity fo...

Страница 94: ...Center Guide Type Select Center Guide type dot or cross Color Select a color for the Center Guide Opacity Percentage of opacity of the guide color TYPE Use Type to select the type of Center Guide to d...

Страница 95: ...or the Center Guide Black Green Cyan Red Yellow Dark Gray Blue Magenta White OPACITY Use Opacity to select how transparent the Center Guide appears Use Opacity to select the percentage of opacity for...

Страница 96: ...Eject Eject the CFast media card Media Info View the CFast media card information Secure Format Performs a secure format of the CFast media card EJECT Use Eject to safely eject the CFast media card WA...

Страница 97: ...umber Displays the CFast media card serial number Firmware Version Displays the CFast media card firmware version Available Displays the CFast media card s remaining storage Time Remaining Displays th...

Страница 98: ...formatting process For more information refer to Secure Format CAMERA ID Use Camera ID to assign a camera ID letter to the media The Camera ID letters you can assign range from A Z For more informatio...

Страница 99: ...Use Edgecode to assign an edge code to the media Use the keypad to enter a unique edge code number to the media Edge Code is a SMPTE Timecode track that by default starts at 01 00 00 on the first fram...

Страница 100: ...FORMAT Use Format to execute a secure format of the media For more information refer to Secure Format COPYRIGHT 2020 RED COM LLC 955 0190 REV BETA 1 0 92 KOMODO OPERATION GUIDE BETA...

Страница 101: ...isable the autofocus feature Mode Select the autofocus mode Size Select the size of the autofocus area Position Select the position of the autofocus area Start AF Button that you tap to start the Auto...

Страница 102: ...ODE Use Continuous mode to continue to change focus to keep a moving subject in focus SIZE Use Size to choose what size area you want the camera to use for the Autofocus BETA Menu feature The lens mus...

Страница 103: ...F type autofocus for the camera to use this feature The Position selections include Left Center Top Top Right Upper Left Center default Lower Right Lower Left Center Bottom Right The Autofocus Positio...

Страница 104: ...cation settings ITEMS DETAILS Camera Setting for the camera name WiFi Settings for WiFi communication Serial Settings for the Extension Port serial connection CAMERA Use the Camera Communication menu...

Страница 105: ...u to configure the camera s WiFi settings ITEMS DETAILS Mode Disable WiFi or select the camera WiFi settings Ad Hoc Configure the camera as a WiFi hot spot Infrastructure Settings for existing WiFi in...

Страница 106: ...nfigure the WiFi hot spot settings ITEMS DETAILS SSID Enter the name of the WiFi network the camera generates Passphrase Enter the password for the WiFi network Band Select the WiFi frequency band Cha...

Страница 107: ...ID Use the keypad to enter the camera s WiFi network name PASSPHRASE Use the keypad to enter the camera s WiFi passphrase COPYRIGHT 2020 RED COM LLC 955 0190 REV BETA 1 0 99 KOMODO OPERATION GUIDE BET...

Страница 108: ...e default Use 2 4 GHz for long range remote control when not utilizing wireless video streaming CHANNEL Select the optimal channel for the selected band one which receives the least interference from...

Страница 109: ...ction status The Ad Hoc status can include Offline Online IP ADDRESS When connected to a network the camera displays an IP address NETMASK When connected to a network the camera displays the Netmask f...

Страница 110: ...ttings to connect to an existing WiFi infrastructure ITEMS DETAILS SSID Enter the name of the WiFi network Passphrase Enter the passphrase for the WiFi network Connect Button to connect the camera to...

Страница 111: ...ra s WiFi network name SSID PASSPHRASE Use the keypad to enter the WiFi infrastructure password Use the Eye icon to hide the characters or make them visible COPYRIGHT 2020 RED COM LLC 955 0190 REV BET...

Страница 112: ...existing WiFi infrastructure STATUS Displays the connection status of the camera to the WiFi infrastructure DHCP When connected to WiFi this allows you to enable or disable DHCP COPYRIGHT 2020 RED CO...

Страница 113: ...WiFi this displays the IP address NETMASK When connected to WiFi this displays the Netmask GATEWAY When connected to WiFi this displays the Gateway COPYRIGHT 2020 RED COM LLC 955 0190 REV BETA 1 0 105...

Страница 114: ...Enter the IP address for the PPP protocol BAUD RATE The Baud rate controls how fast data is transmitted over the serial connection The higher the speed the more likely that errors can occur The Baud...

Страница 115: ...ime Date and time settings Lens View lens status information and access the Aperture menu Fan Control Adaptive and Quiet fan settings Power DC and Battery status Indicators Enable or disable the camer...

Страница 116: ...era uses the 24 hour clock convention military time For example enter 2 35 p m as 14 35 00 The Date Time menu items include ITEMS DETAILS Date Date in YYYY MM DD format Time 24 hour format Timezone Gl...

Страница 117: ...mat using the touchscreen keypad TIMEZONE Use Timezone to select the local timezone for where the camera is located LENS Use Lens to view information about the attached lens COPYRIGHT 2020 RED COM LLC...

Страница 118: ...nce Displays the lens focal distance value Iris Lens Iris menu Image Stabilization Displays the lens image stabilization status IRIS Use the Iris menu to select the camera lens f stop Tap Edit to open...

Страница 119: ...mperature sensor warm up time fan speed and resulting fan noise Regardless of the fan setting you select you will get the best image quality by calibrating the sensor at the temperature of your shoot...

Страница 120: ...1 slot this displays the battery Amps BAT 2 Voltage When a battery is connected in the right 2 slot this displays the battery Voltage BAT 2 Remaining When a battery is connected in the right 2 slot th...

Страница 121: ...menu display unit Aperture Increments Select 1 4 or 1 3 f stop increments Focus Distance Select the focus distance units Metric or Imperial SHUTTER DISPLAY MODE Use Shutter Display mode to select the...

Страница 122: ...third increments for the camera f stop settings The default is 1 3 Stop FOCUS DISTANCE Use Focus Distance to select Imperial or Metric units for the Lens Focus Distance display The default is Imperia...

Страница 123: ...information Temperature Camera temperatures CAMERA INFO The camera information you can view includes ITEMS DETAILS Camera Type Displays the camera description Camera PIN Displays the camera personal...

Страница 124: ...ys the Celsius temperature of the power IC board STM Displays the Celsius temperature of the power STM IC Sensor Displays the Celsius temperature of the sensor MAINTENANCE MENU The Maintenance menu co...

Страница 125: ...settings Factory Reset Restores the camera to the factory settings Upgrade Updates the firmware CALIBRATE Use Calibrate to start the camera calibration process Only calibrate the camera after it reach...

Страница 126: ...e Calibration to select the camera calibration process you want to perform The Calibration type you select here is the calibration type the camera performs when you Calibrate SAVE LOG Use Save Log to...

Страница 127: ...to the factory default settings NOTE Resetting the camera will delete all of your menu settings NOTE The camera turns off and then back on to complete the reset process Tap Yes on the touchscreen to...

Страница 128: ...your settings and remove all imported files The camera turns off and then back on to complete the reset process Tap Yes on the touchscreen to reset the camera to the factory settings UPGRADE Use Upgr...

Страница 129: ...requency RF interference that may be present You can select a wireless frequency of 2 4 GHz or 5 GHz For optimal performance do not obstruct the antenna with any accessory mounting plate or mounting r...

Страница 130: ...3 From the Infrastructure option enter the SSID COPYRIGHT 2020 RED COM LLC 955 0190 REV BETA 1 0 122 KOMODO OPERATION GUIDE BETA...

Страница 131: ...4 Enter the Passphrase 8 characters minimum 5 Tap the Connect OK button The camera connects to the WiFi infrastructure COPYRIGHT 2020 RED COM LLC 955 0190 REV BETA 1 0 123 KOMODO OPERATION GUIDE BETA...

Страница 132: ...While the batteries are charging the DC Power LED will blink amber REMOVING THE BATTERIES You can hot swap a dead battery when you have another charged battery attached and you can continue recording...

Страница 133: ...This means that if all power sources are removed and the Power Switch is set to ON then when a power source is attached the camera turns on POWER CONSUMPTION The camera draws approximately 37 Watts o...

Страница 134: ...NG ON THE CAMERA 1 Attach a power source Batteries or DC Input to the camera 2 Slide the Power Switch up to the ON position COPYRIGHT 2020 RED COM LLC 955 0190 REV BETA 1 0 126 KOMODO OPERATION GUIDE...

Страница 135: ...ts exFAT as the file system for the media card to accommodate larger files and data rates exFAT is supported both on macOS and MS Windows EJECTING MEDIA IMPORTANT To ensure data integrity media must a...

Страница 136: ...ce to eject the media when possible before removing or disconnecting Ejecting the media provides the following benefits Protects the integrity of your recorded data Mounts clips instantly to your work...

Страница 137: ...the media door 2 Insert the CFast media card in the slot with the top of the card facing toward the front of the camera Insert the card until it is firmly seated 3 Close the media door and make sure...

Страница 138: ...s on go to Menu Media and select Eject 2 Slide the media door latch back and open the media door 3 Press the card eject button above the CFast media card 4 Let the CFast media card cool before gently...

Страница 139: ...card Data erased during formatting cannot be recovered WARNING The media can get extremely hot Use caution when removing media To perform a secure format follow the instructions below 1 Go to MENU MED...

Страница 140: ...ays the CFast media card serial number Firmware Version Displays the CFast media card firmware version Percentage Remaining Displays the CFast media card s remaining storage Time Remaining Displays th...

Страница 141: ...ibility of duplicates 6M RDC Clip folder extension RDC For example a sequence of clip folders within a media folder on Camera A may look like this A001_C001_12046M RDC A001_C002_1204CE RDC A001_C003_1...

Страница 142: ...t card While the CFast card mounts DO NOT remove the CFast card or turn off the camera during this process After the CFast card successfully mounts perform a secure format to remove the hidden files F...

Страница 143: ...MPLE OF OVEREXPOSURE WITH HISTOGRAM EXAMPLE OF UNDEREXPOSURE WITH HISTOGRAM EXAMPLE OF A BALANCED EXPOSURE WITH HISTOGRAM COPYRIGHT 2020 RED COM LLC 955 0190 REV BETA 1 0 135 KOMODO OPERATION GUIDE BE...

Страница 144: ...pping in the highlights red and low lights green refer to False Color Exposure Mode EXAMPLE OF OVEREXPOSURE WITH EXPOSURE MODE EXAMPLE OF BALANCED EXPOSURE WITH EXPOSURE MODE FALSE COLOR VIDEO MODE Th...

Страница 145: ...the desired image focus refer to Peaking FOCUS PEAKING MODE The Focus Peaking mode applies a sharpening filter to the image that emphasizes edges of the subject in focus EXAMPLE OF FOCUS PEAKING MODE...

Страница 146: ...cessing KOMODO provides two separate Timecode concepts Time of Day TOD and Edgecode Both TOD and Edgecode are stored in the R3D file The user can select which Timecode displays on the LCD Touchscreen...

Страница 147: ...o the camera s internal clock The camera displays the Timecode on the LCD Touchscreen NOTE The timecode is reset when the camera is turned off unless an external power source remains connected and pow...

Страница 148: ...ENU AUDIO TC 2 Swipe the touchscreen up to scroll down to Timecode Display Mode 3 Select Timecode Display Mode The Timecode Display Mode menu opens 4 Tap OK to select Edge to use Edgecode The camera d...

Страница 149: ...tomized overlays with arbitrary IRE ranges Unlike the other two modes Zebra indicators appear as diagonal stripes they are fully configurable and they have the advantage of preserving a full color bas...

Страница 150: ...the most recent firmware Unless otherwise specified in the release notes you do not need to upgrade to any firmware in between your current version and the most recent version available online NOTE Yo...

Страница 151: ...use soaps detergents ammonia acetone alkaline cleaners abrasive cleaning compounds or solvents These substances may damage lens coatings and electronic circuitry WARNING DO NOT use an excess of clean...

Страница 152: ...the screen without removing solid particles increases the risk of scratching the screen PROHIBITED LCD SCREEN CLEANERS DO NOT use any of the items listed below to clean the built in LCD screen These p...

Страница 153: ...es are properly attached Remove all accessories and then re attach them one by one This process may help you identify whether the issue is specific to a particular accessory Reset the camera to its de...

Страница 154: ...COPYRIGHT 2020 RED COM LLC 955 0190 REV BETA 1 0 146 7 MECHANICAL DRAWINGS NOTE Dimensions are shown in mm FRONT VIEW Figure Camera Front View KOMODO OPERATION GUIDE BETA...

Страница 155: ...BACK VIEW Figure Camera Back View RIGHT SIDE VIEW Figure Camera Side View Right COPYRIGHT 2020 RED COM LLC 955 0190 REV BETA 1 0 147 KOMODO OPERATION GUIDE BETA...

Страница 156: ...LEFT SIDE VIEW Figure Camera Side View Left COPYRIGHT 2020 RED COM LLC 955 0190 REV BETA 1 0 148 KOMODO OPERATION GUIDE BETA...

Страница 157: ...TOP VIEW Figure Camera Top View COPYRIGHT 2020 RED COM LLC 955 0190 REV BETA 1 0 149 KOMODO OPERATION GUIDE BETA...

Страница 158: ...BOTTOM VIEW Figure Camera Bottom View COPYRIGHT 2020 RED COM LLC 955 0190 REV BETA 1 0 150 KOMODO OPERATION GUIDE BETA...

Страница 159: ...mating connector is 9 Pin 0L Straight Plug Connector SX0L0X P09MCC0 0001 9 PIN 0B ODU AUXILIARY PORT PINOUT PIN NAME DESCRIPTION 1 5 V AUX 5 Volt AUX 500 mA Max enabled using the Power menu 2 Timecod...

Страница 160: ...nnot charge batteries while it is turned on SPECIFICATIONS The 2 Pin 0B connector accepts unregulated 7 to 17 Volts V Direct Current DC power Power consumption for the camera alone is approximately 27...

Страница 161: ...When used as a record tally the rising edge of the pulse indicates the start of record and the falling edge represents the end of record For more information about controlling the camera using RS 232...

Страница 162: ...COPYRIGHT 2020 RED COM LLC 955 0190 REV BETA 1 0 154 8 MENU MAP KOMODO OPERATION GUIDE BETA...

Страница 163: ...COPYRIGHT 2020 RED COM LLC 955 0190 REV BETA 1 0 155 KOMODO OPERATION GUIDE BETA...

Отзывы: