background image


15 

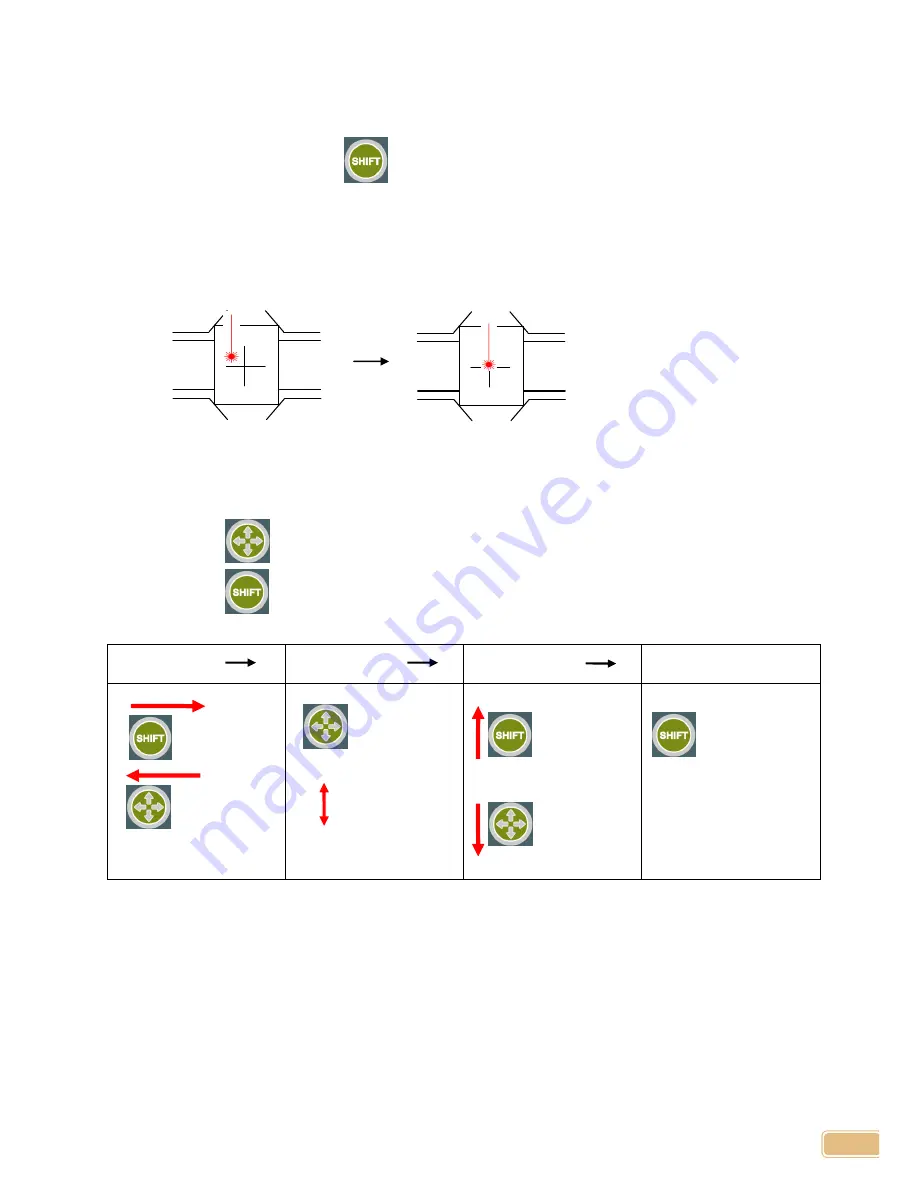
Laser Pointer Calibration 

1.  Change the tool to dragging tool. 

2.  Turn power ON pressing 

, and then release the button as soon as machine beeps. 

3.  Tool  will  move  to  center  of  vise,  then  draw  cross(+)  mark  on  the  material.  And  red  laser 

pointer will be lit. 


4.  Move the red laser pointer to the center of the cross using button. 


Button Use: 

Short  each  button  press  moves the  pointer  to  the  left (  or  bottom)  or right (or  top)  depending  on  its 

mode. 

Long press of 

  button will change mode to left/right movement or top/bottom movement. 

Long press of 

  button saves pointer calibration and return home. 


Short Press 

  Long Press 

Short Press 

Long Press 


Left/Right 


Top/Bottom   


Mode 

Change 

Up 

Move 

Down 

Move 

Save Calibration 

and return home. 

Left 

Move 

Right 

Move 

Содержание MAGIC-2

Страница 1: ......

Страница 2: ...1 REV 100602 RED TECHNOLOGY http www redt magic engraver com 3F 1314 Gwanpyeong dong Yuseong gu Daejeon Republic of Korea 305 509 TEL 82 70 7011 0905 FAX 82 42 673 0905...

Страница 3: ...ation 6 Program Installation 7 Machine Installation 9 MAGIC 2 10 How to Use Vise 13 Calibration 14 Changing Tool 17 2 How to Use Program 18 Tool Bar 20 Object Properties 22 Rotation Properties 23 Tool...

Страница 4: ...do not touch electric plug with wet hands In the case of not using plug for a long time please pull it out During usage if there is smoke please immediately switch engraving machine off and then conta...

Страница 5: ...machine s each axis moves and scratched by engraving blade Body part or materials may be stuck in the route along which engraving machine s each axis moves and sharp engraving blade scratches them whi...

Страница 6: ...mark character or image on metal surface Additional Clamp 1 SET Used to grip thick material like bottle Adapter 1 EA Used to supply power to machine 5 5mm x 2 1mm T Wrench 1 EA Used to change tool 2 5...

Страница 7: ...Hz Power consumption 60W External Dimension 260mm W 233mm H 325mm D Workspace Size 123mm X x 90 mm Y x 30mm Z Resolution 0 005mm X Y 0 00125 Z Weight 18Kg Feed Rate 1 36mm sec XY 1 18mm sec Z Temperat...

Страница 8: ...nished USB driver installation window is popped up After pulling off USB cable confirm it and press YES 6 Press NEXT 7 By pressing Finish installation is completed and computer is re booted When insta...

Страница 9: ...nstallation Select Machine Model in Use window will be popped up Select proper model in the list If serveral different models are being used select all the models from the list This option can be open...

Страница 10: ...nd only when it is connected with PC and used together with program it can engrave USB cable which is provided as part is inserted to USB port of engraving machine s left side and PC back or front sid...

Страница 11: ...graving material C Vise Handle Tightens or loosens vice D Power Switch Turns engraving machine on off E Operation Key Moves engraving position and stop engraving F USB Communication Port Connects mach...

Страница 12: ...ine is in engraving area positioning state press this button for more than 1 second to start engraving VISE IN OUT in stand by state I f the machine is in stand by state press this button to pull the...

Страница 13: ...tected by sensor it moves itself out of detection area 2 Check Z axis sensor and return to origin 3 Check X axis sensor and return to origin 4 Check Y axis sensor and return to origin 5 Conformation s...

Страница 14: ...ze When you turn vise handle to the left vise is widened and otherwise it is tightened Auxiliary Vise Auxiliary vise is proper for fixing thick material like liquor bottle etc Auxiliary vise consists...

Страница 15: ...p beep is heard Tool will be moved onto center of vise with Z axis lowered 3 Place a flat material on the vise and fasten Loose tool fastening bolt and make tool touch the material surface then fasten...

Страница 16: ...aser pointer to the center of the cross using button Button Use Short each button press moves the pointer to the left or bottom or right or top depending on its mode Long press of button will change m...

Страница 17: ...se then red laser pointer will be lit Button Use Short each button press moves the pointer to the left bottom or right top depending on its mode Long press of button will change mode to left right mov...

Страница 18: ...ol loosing tool fastening bolt and fasten it after new tool is inserted Tool length is not so important but 10 20mm is recommended EXCHANGING TOOL When the bolt is loosed take care not to drop the too...

Страница 19: ...ram window is differently shown for each case of selecting object and not selecting object and at this time each part name is as following Program Screen When Selecting Object Menus Template Directory...

Страница 20: ...19 When Rotating Object When Selecting Tool Path Rotation information registration Object Tool path registration information Tool pass...

Страница 21: ...king area Arrangement to working area s vertical center Arrangement to working area s horizontal center Arrangement Arrangement to base object s left Arrangement to base object s center Arrangement to...

Страница 22: ...Hatching tool path generation Generate tool path by object s side Single line tool path generation Generate tool path to the center line of object Tool path process simulation Shown as tool path proce...

Страница 23: ...s left and right Vertical arrangement top center bottom both sides top and bottom Vertically and horizontally move selected character Width of selected character character ratio Selected character s r...

Страница 24: ...Rotate and add new object as much as input angle Depth It shows pulled pressure instead of real engraved depth in which dept is deeper pressing pressure is larger XY axis speed Indicate speed of XY ax...

Страница 25: ...ting tool path for the left drawing tool path is produced as follows according to each type Outline Cutting Engrave character frame Hatching Engrave character surface Single line Engrave character s c...

Страница 26: ...ect engraving option value appointed in advance is automatically set up You can change it in engraving option setup window by pressing Edit or Add button on value set up in advance Tool Engraving tool...

Страница 27: ...the depth it cuts gradually each time For example when set Z Pitch value 0 3mm for 1 0mm thick plate it will cut 4 times varying the depth to 0 3mm 0 6mm 0 9mm and 1 0mm each time This can protect th...

Страница 28: ...Measure material size 2 Fix material to vice s center 3 Select engraved material s shape from template list and input template size And then click OK TOOL CLAMP Dragging Tool Basic Clamp Vertical siz...

Страница 29: ...n input your wanted sentence 5 When character input is finished press tool bar selection and enter object selection mode And then select input character string and edit object s size font size etc In...

Страница 30: ...ing is finished click Hatching Tool path like the below figure 7 When Hatching Tool path window is shown like the below figure appoint tool hatching interval and depth click Create Tool Path Brief Vie...

Страница 31: ...object is generated like the below 9 Click button for tool path data transmission to start engraving 10 Output window is shown appoint communication port and how to measure material and then click St...

Страница 32: ...ptly start engraving 12 Machine will move to the material center position illuminating laser beam on material surface Using and keys check and adjust marking area Whenever this key is pressed laser be...

Страница 33: ...32 13 Once position is set press key for 2 seconds to start engraving Marking Area...

Страница 34: ...button and select a image to load then click Open button 2 Once the image is loaded click button then select Monochrome 1bit 3 On pop upped window adjust slider to produce most suitable image to engra...

Страница 35: ...34 4 Color image is converted to monochrome image that is most suitable to engrave Now engrave it...

Страница 36: ...strator CorelDraw supports saving as SVG file format A drawing saved as SVG in illustrator or CorelDraw can be imported from File Import to cut or engrave Illustrator 1 Select File Save As in Illustra...

Страница 37: ...36 RED TECHNOLOGY http www redt magic engraver com 3F 1314 Gwanpyeong dong Yuseong gu Daejeon Republic of Korea 305 509 TEL 82 70 7011 0905 FAX 82 42 673 0905...

Отзывы: