background image

g. After a while they will both go out indicating that the GSM Smart Control has connected with the GSM network.  
The signal LED light will light up every 10 seconds to indicate the GSM Smart Control is linked to the GSM 
network. 
h. Enroll GSM Smart Control with a Smart Panel.  Please refer to section 3.2 for enrolling the GSM Smart 
Control into a Smart Panel.  
i. Replace and secure cover for the battery compartment. 
j. Mount at intended location. 
 

3.2 Enrolling GSM Smart Control with the Smart Panel 

In order to use the GSM Smart Control with the Smart Panel you will need to enroll the components.  This will 
allow the Smart Panel to recognize and interact with the GSM Smart Control.   

The enrolling procedure must be completed in order for the GSM Smart Control to work properly.  If the 
procedure is not completed then the GSM Smart Control will not respond to system input.


IMPORTANT: 

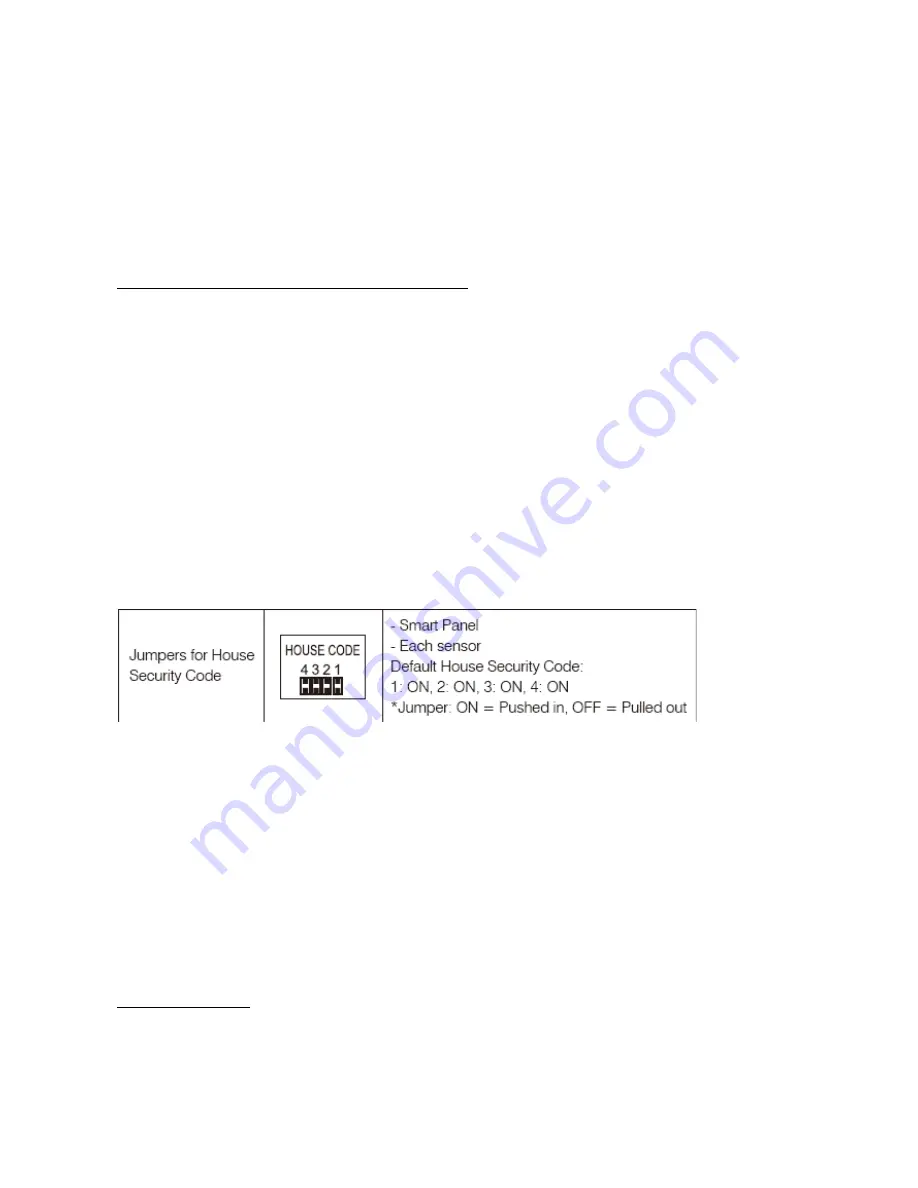
In most cases the factory settings of the House security Code will NOT need to be changed.  However if the 
Smart Panel and sensors activate intermittently or are unresponsive this may be due to interference with other 
radio frequency systems.  You may wish to change the house codes ensuring that they are identically arranged 
in both the Smart panel and Smart Control.   

There are 4 jumpers/dip-switches on each device.  They can be found when you remove the battery 
compartment cover.  When the jumpers are present the circuit is ‘ON’.  If absent the circuit is ‘OFF’.  Ensure that 
these settings are identical if you need to make modifications 

to

 the panel, sensors and any remote control 

device. 


a. Enter the 4 digit pin on the Smart Panel and press the SETTING button and ‘2’ (Enrollment mode).   
b. Simultaneously hold down the RECORD and RESET button on the back of the GSM Smart Control for two 
seconds 
c. Several beeps from the Smart Panel will indicate that the enrollment is successful 
d. Press ENTER on the Smart Panel to exit the enrollment mode 


3.3. Voice messages 

Содержание WS210B

Страница 1: ...ndividuals using GSM network to manage the system Listen to immediate vicinity using built in microphone Activate deactivate or home security system from afar Applicable for universal 850 900 1800 190...

Страница 2: ...ces and accessories laid out before mounting them You will need following devices to complete the set up 1 x GSM Smart Control 1 x AC Adaptor 2 x series of screws WS210B GSM Smart Control Smart Panel...

Страница 3: ...lder backwards as illustrated and then unfold the slot forwards c Insert the SIM card Push the SIM card holder back again upwards d Replace and secure both covers e Insert batteries ensuring that they...

Страница 4: ...put IMPORTANT In most cases the factory settings of the House security Code will NOT need to be changed However if the Smart Panel and sensors activate intermittently or are unresponsive this may be d...

Страница 5: ...otely interact with their Red Shield Security system across long distances Search for RedShield to find the app on your Apple App store or Android Google Play to download the app to your iPhone or oth...

Страница 6: ...s well as the power status of any associated Smart Panel After every CHECK SETUP command the associated device will enter HOME mode which allows for a combination of ARM and ALERT pre assigned zones Y...

Страница 7: ...e continued compliance any changes or modifications not expressly approved by the party responsible for compliance could void the user s authority to operate this equipment Example use only shielded i...

Страница 8: ...control in terms of remote management of the Red Shield Security system Also its automated functions can direct a short message to specific individuals or the emergency services and thus allow a more...

Страница 9: ...specific radio frequency There may be a case of false activation by neighbours who also use Red Shield products but your system can be modified to eliminate these by changing the House code Where can...

Страница 10: ...io LAN device is in compliance with the essential requirements and other relevant provisions of Directive 1999 5 EC Estonian Eesti K esolevaga kinnitab Smart Technologies Investment Ltd seadme Radio L...

Страница 11: ...ra li dan Radio LAN device jikkonforma mal ti ijiet essenzjali u ma provvedimenti o rajn relevanti li hemm fid Dirrettiva 1999 5 EC Polish Polski Niniejszym Smart Technologies Investment Ltd o wiadcza...

Страница 12: ...H rmed intygar Smart Technologies Investment Ltd att denna Radio LAN device st r I verensst mmelse med de v sentliga egenskapskrav och vriga relevanta best mmelser som framg r av direktiv 1999 5 EG T...

Отзывы: