background image


Nov 27 2008 

Copyright RED Digital Cinema 


55 

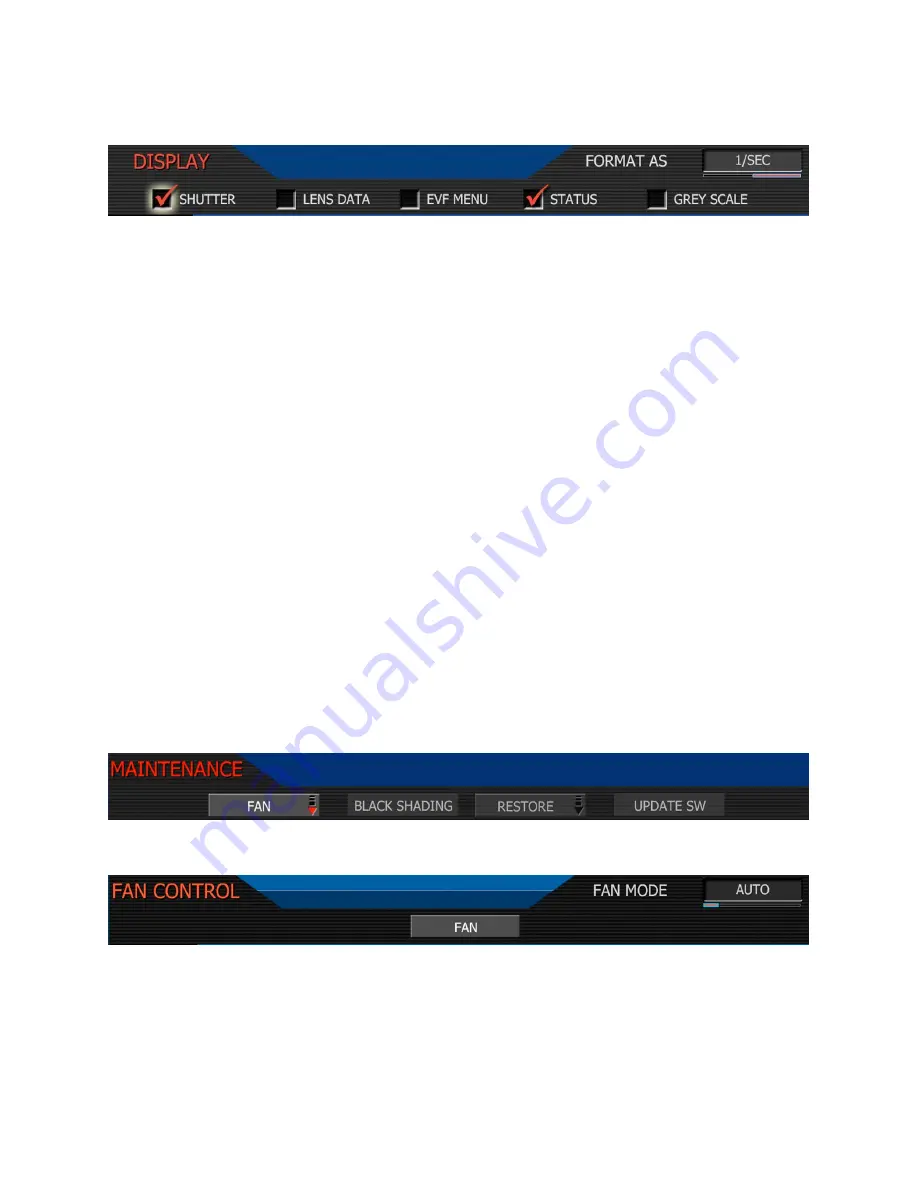
DISPLAY:

 This menu permits specific elements of the GUI to be disabled.  


Selections are – SHUTTER, LENS DATA, EVF MENU, STATUS and GREY SCALE 

Shutter

: When checked, displays frame rate and sensor status on GUI upper edge. Also allows 

the user to choose if camera shutter value is reported in Degrees or 1/Seconds format. 

Note: Shutter values are always input in 1/seconds format, irrespective of this choice.


Lens Data

: When checked displays focus / zoom / iris data on GUI mid-upper edge. Also al-

lows the user to choose if Distance is reported in Feet or Meters. 

EVF Menu

: When checked displays EVF menus data on left edge of camera GUI 

Status

: When checked, displays media, exposure and audio status on GUI lower edge. 

Grey Scale

: When checked, displays an 11 step grey scale on GUI right edge. 


Note: Disabling a GUI element disables it on all monitor outputs, and disabling the EVF 
Menu display also disables the EVF menu controls. 


MAINTENANCE 

This sub-menu defines how the cooling fan behaves, and enables software updates.  


Fan Sub Menu: 

specifies how the cooling fan operates.  


The camera's fan speed can be changed depending on the ambient air temperature and re-
cording application. The default setting is AUTO 

Auto

: This setting combines VARIABLE speed fan operation while not recording, with SILENT 

mode when in record. This mode is recommended for extended duration dialog recordings. 

Содержание RED ONE

Страница 1: ...You Start 2 2 Camera Assembly 3 3 Physical Controls 5 4 Theory of Operation 9 5 Basic Operation 16 6 Sensor Menu Controls 23 7 Audio Video Menu Controls 31 8 System Menu Controls 39 Appendix A Upgrading camera firmware 60 Appendix B Digital Media Management 62 Appendix C Input and Output Connectors 66 Appendix D Post Production 75 ...

Страница 2: ...al path ensure the lens cap is used at all times a lens is not mounted to the camera Additional lens mounts and adaptors are available for use with non PL mount lenses In addition to capturing 12 bit resolution digital RAW images the RED ONE camera supports four channels of 24 bit audio The RAW images may be captured at a variety of frame rates including single frame still timed interval animation...

Страница 3: ...Attaching the RED LCD or RED EVF The RED LCD and RED EVF cables are interchangeable but the outputs are not The RED EVF should be connected to the upper output a RED LCD should be connected to the lower output If using RED DRIVE place it into the RED CRADLE and secure it with the four thumbscrews Then connect the RED e SATA cable to the RED DRIVE and to the e SATA input on the rear of the camera b...

Страница 4: ...e lens Finally tighten the butterfly locks to maintain that position The shoulder pad wedge plate adap tor is also designed to slide within the RED RAIL base plate until you lock it in place You won t need to remove it to mount the camera on a tripod Power up Press the On Off switch to power the camera The rear status display will illuminate and after approximately 60 seconds it will display the c...

Страница 5: ...verter The PL mount includes a 4 pin S4 i data interface This allows the camera to gather lens meta data from lenses supplied by RED and Cooke Optics Ltd using the S4 i protocol On the left side of the camera body are a RECORD key and two User Keys User Key 1 is pre assigned to AUTO WB and User Key 2 is pre assigned to 1 1 FOCUS CHECK however these assignments can be changed in the KEYMAP preferen...

Страница 6: ...d controller a 5 pin mini XLR audio output a 5 pin timecode input output and four three pin mini XLR audio inputs Finally there are two 16 pin push lock LEMO connectors that provide video communications and power for a RED EVF and RED LCD and a 10 pin push lock LEMO connector supporting the Aux RS232 port that can interface to a variety of B4 lenses and lens motor control devices One 6 inch length...

Страница 7: ... programmed by the user if desired to provide quick access to other functions Below the LCD status display are the Joystick and Exit Undo alternate action and RECORD buttons plus the Sensor Audio Video and System menu buttons The camera control menus are logically grouped under these last three buttons to provide streamlined camera operations The status display reports key camera status values and...

Страница 8: ...ut defaulted to Single Frame Record and a Frame Recorded Tally output The DRIVE interface supplies power and data over e SATA protocols to record REDCODE RAW compressed video data metadata and audio to RED DRIVE or RED RAM digital media Power Up To power the camera up from a RED BRICK battery press the power on off switch once To power the camera up from a RED CHARGER connect it via the supplied p...

Страница 9: ...RAW 2048 x 1152 pixel progressive scan Mysterium Sensor The Mysterium sensor has been specifically designed for use with the RED ONE camera and provides variable frame rate imaging over 1 60fps in 4K or 3K resolution and 1 120fps in 2K resolution record modes Native color balance for the Mysterium sensor is 5 000 degrees Kelvin but may be electroni cally compensated for any color temperature in th...

Страница 10: ...vel equivalent to Full Scale is 3 dBu 1 1 Volts RMS At 54 dB the microphone input level equivalent to Full Scale is 36 dBu 0 013 Volts RMS Line Input Levels Recorded levels follow the level of the incoming signal The input level equivalent to Full Scale is 18 dBu 6 5 Volts RMS To achieve 14 dB of input headroom set the nominal input to 4 dBu 1 3 Volts RMS Video Monitoring Outputs In its default co...

Страница 11: ...jority of DVI based SXGA computer monitors To select between these modes press the SYSTEM menu key and then MONITOR Press the joystick in and then push the joystick to the right to highlight PREVIEW Rotate the joystick to select VIDEO 720p or MENUS DVI The default is VIDEO 720p Press the EXIT key to return to the main camera menu The Preview Output setting will be held in camera memory Once it is ...

Страница 12: ...view HD SDI output providing remote camera monitoring up to 200 ft away Digital Magazines REDCODE RAW compressed video time code audio and metadata may be recorded to on board or attached digital media devices including RED FLASH RED record speed verified 8GB or 16GB Compact Flash cards RED DRIVE A hard disk media based Digital Magazine of 320GB capacity RED RAM A solid state flash media based Dig...

Страница 13: ...record Metadata which is data that describes the precise characteristics of the picture and sound data in each frame of footage This may include camera specific setup information project and clip management information Edge code Time code date and GMT lens parameters audio settings and any video image processing information Clip Naming Conventions When you push record the camera names the clip bei...

Страница 14: ...media It is a sequential code that is continuous from frame to frame and also between clips Edge Code is equivalent to RUN RECORD as used on broadcast cameras Time Code is a SMPTE timecode track that syncs to the camera s clock or if operated in Jam Sync mode syncs to an externally supplied SMPTE master timecode signal It is therefore a sequential code that is continuous from frame to frame but di...

Страница 15: ...tage draw requirements In general avoid batteries rated at less than 7Ah and 90Wh Battery status is provided in the camera s user interface GUI when using REDBRICK batteries Other battery types will report as D C Operating the camera from the RED CHARGER Plug the RED CHARGER into an AC power source between 120 240V Plug one end of the supplied 6 pin power cable into the Aux power output of the RED...

Страница 16: ...l Exit and Undo keys D Joystick The joystick is a multi axis controller used to navigate camera menus E Record Record Stop Start key The five buttons above the display control clip playback From left to right the keys are Clip Start Previous Clip Play Reverse Clip Play Pause Fast Fwd and Clip End Next Clip Note Quick Access keys may be re programmed if desired Enter the menu that you wish assigned...

Страница 17: ...rts the project frame rate 24 00 fps in this example Timecode reports timecode lock status White Balance reports current color temperature Media reports remaining media capacity in Battery reports remaining battery capacity or connection to AC power Shutter Speed reports current exposure time Format reports video recording format 4K RAW in this example Note The timecode value reported is Edge Code...

Страница 18: ...en 23 98 24 00 25 00 or 29 97fps The time base establishes the base frame rate for a project and so should not be adjusted Use Varispeed if shooting above or below this base frame rate for slow motion effects Note 2K and 3K record resolutions also support 50 00 and 59 94 fps Project Time Bases 4 Next select the project RESOLUTION Resolution Choose 4K 3K or 2K or 2 1 variants Use 2K or 2K 2 1 for S...

Страница 19: ...ecommend storing digital media that contains your footage in a secure location and backing up the data on another digital media such as data tape or a hard disk drive Each clip is recorded to the digital media in a separate folder and with a unique clip name To copy the clip from the digital media to a Macintosh or Windows computer just drag and drop its folder to the computer s storage device If ...

Страница 20: ... key again will cue to the Start Frame of the next clip recorded on the digital media if one exists Note It is not necessary to exit Playback mode prior to the next recording To exit play back mode either press the RECORD key or press the EXIT key to the left of the joystick When in playback all cursors will be disabled and the camera provides a clean feed of the re corded video signal at 1280 x 7...

Страница 21: ...e stop lights and RAW sensor data exposure meter RED LCD Controls The top of the RED LCD provides two round and two triangular keys On the left is User Key 5 whose function can be defined the USER KEY preferences menu The two triangular keys in the center are used to increase or decrease backlight intensity The key on the right switches the display between Video plus Frame Guides and Menus to Vide...

Страница 22: ...sts Varispeed frame rate ISO adjusts Sensitivity rating of monitoring OFF EVF control Active Disabled The fixed function button located closest to the focus ring selects 1 1 FOCUS CHECK mode When selected this shows the central region of the Mysterium sensor in native 4K resolution Note This function is not available during RECORD The central pair of buttons is User Keys 3 and 4 In their default s...

Страница 23: ...ault sensitivity value is ISO 320 adjustable in 1 3rd stop increments from ISO 100 to ISO 2000 When sensitivity is adjusted the camera metadata logs the change and the monitor path reacts accordingly Color Temperature Color Temperature adjusts the purity of white reproduction of the RGB monitoring paths at different Color Temperatures of ambient light Factory default is 5 600 degrees Kelvin Preset...

Страница 24: ...djusts exposure time of each frame captured by the Mysterium sensor Shutter speed presets are available for all common speeds and corresponding angles at 24 25 fps and 50 60 fps Preset shutter speeds may be adjusted using the RELATIVE and SYNCRO shutter parameters Genlock references Shutter scan start time phase to an external Tri Level Sync genlock sig nal For 3D and multi camera permits scan tim...

Страница 25: ...eases less light falls on the sensor decreasing exposure and motion blur on objects moving within the frame Speed Exposure times presets include 1 24 1 25 1 30 1 32 1 33 1 40 1 48 1 50 1 60 1 96 1 100 1 120 1 125 1 192 1 200 1 250 1 384 1 400 1 500 1 696 1 800 1 1 000 1 1 200 1 2 000th sec When operating at 23 98 or 24 00fps these equal common shutter angles of 1 32nd 270 deg 1 96 90 1 48 180 1 19...

Страница 26: ...ay be adjusted over the range 45 to 45 degrees Default value is 0 Note To Convert Shutter Speed to Angle Equivalent Equivalent Degrees Shutter Speed x Frame Rate x 360 E g 1 48 x 24 x 360 8640 48 180 Shutter Degrees Shutter Degrees 1 32 270 1 120 72 1 48 180 1 192 45 1 50 172 8 1 348 22 5 1 60 144 1 696 11 1 96 90 1 1000 8 6 Note To Convert an Angle to an Equivalent Shutter Speed Equivalent Shutte...

Страница 27: ...ed REDCODE RAW data has valid and sequen tially incrementing timecode for use by non linear editing devices Note In Varispeed the frame rate display turns yellow the audio panel reports VARISPEED Varispeed Before recording enable this function by checking the Varispeed checkbox Ramp enables a speed ramp a transition over Time from the Frame Rate to an End Rate On Record On recording start the capt...

Страница 28: ...s 2K 16 9 100 fps 100 fps 100 fps 100 fps 3K 2 1 50 fps 60 fps 60 fps 60 fps 3K 16 9 30 fps 50 fps 60 fps 60 fps 4K 2 1 25 fps 30 fps 30 fps 30 fps 4K HD 25 fps 30 fps 30 fps 30 fps 4K 16 9 25 fps 30 fps 30 fps 30 fps REDCODE 36 RED 8GB CF RED 16GB CF RED DRIVE RED RAM 2K 2 1 75 fps 100 fps 120 fps 120 fps 2K 16 9 75 fps 75 fps 100 fps 100 fps 3K 2 1 30 fps 30 fps 50 fps 60 fps 3K 16 9 30 fps 30 f...

Страница 29: ...tter Mode to Relative this is a fixed angle setting Timelapse The Timelapse menu supports single frame image capture and step frame recording under the control of an internal Intervalometer side RECORD key or an external GPI trigger Enable After making any adjustments in the Timelapse menu check the Enable box to enter these values and enable the Timelapse record mode The UI indicates by changing ...

Страница 30: ... to 1024 seconds Default setting is 5 seconds Burst Type Specifies the type of burst recording either Repeat or Unique Default is Unique Repeat Specifies that each frame captured during the burst record be repeated That is for each Timelapse event a single frame is repeated N times where N is the Step print value Unique Specifies that each frame captured during the burst record is unique That is f...

Страница 31: ...image processing uses SMPTE REC 709 tonal response curve RAW monitor path image represents the RAW sensor data bypassing the color matrix Video Menu The four available submenus are LOOK COLOR GAIN and TONE Note Color and Gain and Tone values used by the monitor path are stored as metadata for use in REDCODE RAW compatible image processing applications They can be used to visual ize a specific colo...

Страница 32: ...rious image processing parameters that may be applied to the monitor path They do not affect the actual REDCODE RAW data being recorded Saturation adjusts color saturation Range is 0 0 monochrome to 2 0 super color Exposure adjusts exposure compensation Available exposure range is 2 0 to 4 0 Brightness adjusts brightness without crushing highlights Available range is 10 to 10 Contrast adjusts the ...

Страница 33: ...ee or White Each control point comprises two independent values one each for X and Y axis locations X Adjusts the location of a control point along the X axis on the tonal response curve Y Adjust the location of a control point along the Y axis on the tonal response curve Viewfinder Menu This menu permits the operator to adjust operation of the viewfinder Color When checked forces the RED EVF and ...

Страница 34: ...ve to stops of exposure and 0 108 IRE Note the green and pink bars that allow quick exposure setup for 18 ND and skin tones This is the corresponding white balanced but otherwise unprocessed source image captured at late morning at exposure index A320 24fps 1 48th sec shutter and no filtering ...

Страница 35: ...er is selected a red rectangular box will appear centered on the center cursor of the image The size of this sample box can be adjusted by rotating the Joystick and its loca tion can be adjusted by moving the joystick in X and Y directions Press the joystick to fix the sample box The average IRE value of the pixels in the sample box is shown in the lower sec tion of the full camera display If Luma...

Страница 36: ...Joystick and its height can be adjusted by moving the joystick left or right Press the joystick to fix the sample box The average focus value of the pixels in the sample box are shown in a full width graph restricted to the lower section of the camera dis play Focus Assist or overlaid in the lower section of the active video Focus Overlay Zebras To adjust Zebras highlight the ZEBRA label and then ...

Страница 37: ...le for 50 00 or 59 94 Project Frame Rates Video Genlock may not be available when operating in Open Gate 360 degree shutter is not available when operating in Open Gate Note When deselecting Open Gate mode it is normal to observe up to a 3 second dis ruption in the RED EVF display Audio This sub menu allows microphone input levels to be adjusted via a high quality pre amplifier Audio is sampled at...

Страница 38: ...nput headroom set the nominal input to 4 dBu 1 3 Volts RMS Note Input Gain may also be set to 10dB if working with consumer line level equipment Headphone The sub menu provides controls for headphone output volume channel mixing Master Volume Adjusts the overall headphone volume Range is 18dB to 0dB in 1dB steps Default is 6dB Volume Left Volume Right Adjusts volume for the left and right sides in...

Страница 39: ...iguration and management This sub menu allows each audio channel to be enabled to do so press REC ENABLE Once enabled an input type may be selected either Line or Microphone Phantom power may be independently enabled for any inputs selected as Microphone Note the 48V Phantom Power output is disabled each time the camera is power cycled Media Menu This menu provides various media management functio...

Страница 40: ...pond to the pre record and the eleventh file corresponds to the normal record period All have the same clip name Note On playback either on camera or in the RED Alert REDCINE or any QuickTime application these eleven individual R3D files are seen as a single continuous video clip To enable Pre Record Enter SYSTEM menu then the MEDIA submenu Check the Pre Record checkbox and select duration of 10 s...

Страница 41: ...sed as the reel number e g if the last used reel number was 56 the change num ber suggested by the camera will also be 56 Reset select this function if you wish to reset the reel number counter used by the camera to allocate reel numbers when the media is formatted Choose any reel number between 1 999 and then press FORMAT If the magazine is not empty a warning and conformation screen will appear ...

Страница 42: ...ironment The default camera identifier is A When you push record the camera names the clip being recorded on the digital media E g A001_C001_0515A6 RDC Where A camera A 001 reel 001 C001 clip 001 and 0515 May 15 and A6 is a two digit alphanumeric random number generated by the camera This number helps avoid dupli cate file names if two cameras are inadvertently named A on the same project Configur...

Страница 43: ... 30 fps 50 fps 60 fps 60 fps 4K 2 1 25 fps 30 fps 30 fps 30 fps 4K HD 25 fps 30 fps 30 fps 30 fps 4K 16 9 25 fps 30 fps 30 fps 30 fps REDCODE 36 RED 8GB CF RED 16GB CF RED DRIVE RED RAM 2K 2 1 60 fps 60 fps 60 fps 60fps 2K 16 9 60 fps 60 fps 60 fps 60fps 3K 2 1 30 fps 30 fps 50 fps 60 fps 3K 16 9 30 fps 30 fps 50 fps 60 fps 4K 2 1 25 fps 30 fps 30 fps 30 fps 4K HD 25 fps 30 fps 30 fps 4K 16 9 25 f...

Страница 44: ...a to replace its internal Time of Day value with external time code read from the 5pin LEMO connector This value is updated at the first frame of each re cording provided a valid external timecode source is present If the external source is not pre sent the camera auto increments the timecode until the external source is re connected Time Code Output when un checked timecode is disabled on the 5 p...

Страница 45: ...will be used in the QuickTime reference movies and the primary timecode track in HD SDI outputs If Edge Code is selected E precedes the value shown in the status display If Time Code is selected T precedes the value shown in the status display Default setting is Time Code Timezone Applies a time offset to the SET CLOCK value established for the camera If camera date and Time are set to GMT and the...

Страница 46: ... and safe action and safe title guides User definable safe action and safe title guides may be saved as a USER PREF ERENCE thereby permitting the camera guides to be fully customized for any application Frame Guide displays film projection areas with 1 85 or 2 40 aspect ratios and television dis play areas with 16 9 or 4 3 aspect ratios Frame Guide color can be set to White Black Blue Yellow or Re...

Страница 47: ...e Center Safe Action or Safe Title cursors Press User Action or User Title to program new User Action or Title areas Cursors enables Center Safe Action Safe Title and Image Center cursors Cursor Enables disables image center cursor Action Enables disables guide Style may be specified as a corner marker or a rectangle Title Enables disables User guide Style may be specified as a corner marker or a ...

Страница 48: ...ues X POSN Adjusts the horizontal center position of the guide Y POSN Adjusts the vertical center position of the guide Set Press SET to save these parameters to non volatile memory and exist this menu User Title enables the user to program a custom Safe Title area Operation is the same as for USER ACTION areas See above description Preview This sub menu selects the operating mode of the HD Previe...

Страница 49: ...ed 720p or 1080p HDTV displays If both a RED EVF and RED LCD are present the HD SDI and HDMI outputs will be forced to 1280 x 720 with Surround View irrespective of the Preview Output parameter setting Note The video format of the HD SDI Preview output will also be affected by the HD SDI refresh rate and PLAYBACK resolution selections described elsewhere in this guide To select between 720p and 84...

Страница 50: ...era includes a standard HDMI connector on its right side panel This output provides a HDTV compatible 1280 x 720 video signal or P C monitor compatible 1280 x 848 pixel signal Note If the PLAYBACK resolution is set to 1080p in the PLAYBACK menu the HDMI output is 1280 x 720 pixels when in preview and record but switches to 1920 x 1080 pixels in playback EVF Refresh EVF Refresh permits the operator...

Страница 51: ...after exiting MAGNIFY mode when in 4K record resolution after changing between certain Varispeed frame rates Setup This menu permits a variety of system maintenance tasks to be accomplished Selections are PREFERENCES MAINTENANCE SET CLOCK WRITE LOG and REMOTE Preferences permits the user to define system preferences Selections are USER PROFILE KEYMAP GPIO PLAYBACK and DISPLAY USER PROFILE provides...

Страница 52: ... User 3 When checked USER 3 key is enabled and its function is defined in the associated list Default is enabled Assist User Key 3 is the upper user key on the RED EVF User 4 When checked USER 4 key is enabled and its function is defined in the associated list Default is enabled Meter User Key 4 is the lower user key on the camera side User 5 When checked USER 5 key is enabled and its function is ...

Страница 53: ...er Decreases camera Shutter Speed GPIO selects the GPIO Preferences sub menu This menu permits the function of GPI A and B defined as either Record starts standard mode video and audio record Subsequent trigger stops record Pre Record activates Pre record Subsequent triggers start stop record Timelapse activates Timelapse Subsequent trigger activates one shot or burst recording Ramp initiates vari...

Страница 54: ...mits the video format used by the camera on playback to be specified 720p Video output is 1280 x 720 pixels For 4K images the monitored image width corre sponds to 4 096 pixels scaled down to 1280 pixels This signal is available on the HD Preview HD SDI and HDMI HD Program Dual Link HD SDI RED EVF and RED LCD outputs 1080p Video output is 1920 x 1080 pixels For 4K images the monitored image width ...

Страница 55: ...hen checked displays EVF menus data on left edge of camera GUI Status When checked displays media exposure and audio status on GUI lower edge Grey Scale When checked displays an 11 step grey scale on GUI right edge Note Disabling a GUI element disables it on all monitor outputs and disabling the EVF Menu display also disables the EVF menu controls MAINTENANCE This sub menu defines how the cooling ...

Страница 56: ...is most useful when the ambient temperature is below 60 F 15 C In silent mode the fan runs at its minimum speed when in record Black Shading allows the camera to self calibrate sensor output for optimum black levels Note before starting a Black Shading calibration ensure that you place a lens cap that blocks all light on your lens Insert a formatted CF card into the camera or attached a formatted ...

Страница 57: ...nstalling Installation of the new data takes about 3 minutes The camera will then report Black Shading Calibration was successful Please reboot the camera for the new settings to take effect O K Press the joystick and power cycle the camera This completes the Black Shading procedure Restore permits camera configuration and setup data to be reset to factory default values System Allows all camera c...

Страница 58: ...r Range 2007 2020 Month allows the operator to enter a new value for the month Range 1 12 Day allows the operator to enter a new value for the day Range 0 31 Hours allows the operator to enter new value for hours 24 hour format Range 0 23 Minutes allows the operator to enter new value for minutes Range 0 59 Seconds allows the operator to enter new value for seconds Range 0 59 Set Clock loads the s...

Страница 59: ...n the camera At this time there is a single selection S4 I S4 i Check the S4 i box to enable communication between the RED ONE and an S4 i compatible lens and to enable recording of the lens data as metadata in the RED ONE R3D files To enable the display of Focus Zoom Iris data from the S4 i lens also check the LENS DATA checkbox located in SYSTEM SETUP PREFERENCES DISPLAY menu Note S4 i communica...

Страница 60: ...fore the download starts you will be prompted to enter your account and password or the camera s P I N Once the firmware is downloaded you will see a new folder on your desktop Open that folder and verify you see a read me file containing installation instructions and a folder called Up grade Now take either an SD Card or a CF card that has been formatted by the camera and use your computer to cop...

Страница 61: ...eral minutes Do not power down during this process A blue highlight bar will animate on all monitor outputs to indicate an upgrade is in progress After about 5 minutes the upgrade will have completed All monitor outputs will report back Upgrade Compete Power cycle the camera to continue Power cycle the camera to return to normal operation During the camera power up process the camera will display ...

Страница 62: ...ding RED RAM media is currently available with a capacity of 128GB Record duration is depend ent on resolution quality and frame rate but a RED RAM will typically provide 64 minutes of 24fps 4K RAW 112 minutes of 24fps 3K RAW or 256 minutes of 24fps 2K RAW recording During a recording the rear status screen and monitor outputs will display the of remaining media capacity At 10 remaining capacity t...

Страница 63: ...ompt with a message such as this Unformatted and or Media X In the camera GUI display and on the rear LCD Status Display To format the media From the camera back press SYSTEM menu Then press the MEDIA label Then press FORMAT If the media is blank the camera will respond that it is Formatting the Internal External Digital Magazine Once completed the following screen will appear The Magazine was Suc...

Страница 64: ...ver the FORMAT label and press the joystick to confirm media formatting Erasing media on a Macintosh personal computer On a Macintosh computer connect the CF card via a CF card reader or the RED DRIVE or RED RAM via a standard FireWire 400 800 cable and then open Disk Utility Carefully choose the drive from the list and select the Erase tab Then choose MS DOS FAT as the Volume Format You can add a...

Страница 65: ... status LCD you may remove the CF card and or disconnect the RED DRIVE magazine Note Un mounting the digital media takes a few seconds protects the integrity of your recorded data and helps clips mount instantly to your workstation once in postproduc tion so it s a recommended habit to develop If you don t un mount the media the cam era will offer a warning your files may not be damaged but you wi...

Страница 66: ...T Battery pack I2C bus bi directional data Note It is very important that both pairs of the VBATT and GROUND pins are wired up DO NOT fabricate power cables with just one each of VBATT and GROUND pins wired as this may cause damage to the camera s power supply Drive Interface The Drive Interface is a custom e SATA and power connection for RED DRIVE and RED RAM media Due to the data integrity natur...

Страница 67: ...Ground 2 GPI Input Trigger 3 GPO Tally 4 VOUT Auxiliary power output Functions of the GPI and GPO pins can be configured by the operator however the default setting for the upper connector is Pin 2 Record Start Stop and Pin 3 Record Tally For the lower connector the default setting is Pin 2 Record Next Frame and Pin 3 Record Com pleted This preset is suitable for animation or motion control applic...

Страница 68: ...wo inputs labeled SW1 and SW2 are GPI signals that activate Record Start Stop and Playback of the last recorded clip respectively These are typically triggered by the B4 lens or by a controller such as Preston MDR 2 using an appropriate adaptor cable Note Do not attempt to power a cinema lens motor from this connector Depending on your max current requirement extract power from either one of the t...

Страница 69: ...ature of this interface the pin out is not published Contact RED technical support for details of available RED EVF cable lengths RED LCD Interface The RED LCD interface is a custom digital video and power interconnection between the camera and a RED LCD Due to the data integrity nature of this interface the pin out is not published Contact RED technical support for details of available RED EVF ca...

Страница 70: ...e is 3 dBu 1 1 Volts RMS At 54 dB the microphone input level equivalent to Full Scale is 36 dBu 0 013 Volts RMS Note Cameras shipped prior to Sept 15 2008 should use RED supplied XLR to mini XLR adaptor cables to achieve equivalent input signal level compliance Note Cameras shipped prior to Sept 15 2008 may generate excessive noise when paired with low sensitivity 48V phantom powered microphones F...

Страница 71: ... s four audio channels may be monitored in user selectable pairs either channels 1 2 or 3 4 or a quad mix of both pairs based on the Headphone MIX parameter The headphone output signal level may be adjusted via the HEADPHONE menu Pin Signal Description Direction TIP LEFT Left channel audio Out RING RIGHT Right channel audio Out SLEEVE GND Camera ground Headphone Output Connector Note Cameras shipp...

Страница 72: ...BR 29 97 fps 1D 2D 3U 4D 5U 6U 7U AR BR When operating at 50 00 or 59 94 Project Time Bases set the genlock signal generator to SMPTE 296 progressive scan format at the same frame rate as the project TIME BASE Using an Ambient ACL202CT set dip switches as follows D down U up R right L left Frame Rate 50 00 fps settings not verified at this time 59 94 fps 1D 2D 3U 4U 5U 6D 7U AR BR Connect the came...

Страница 73: ... PVW provides a high definition video preview output Pin Signal Description Direction Center HD SDI SMPTE 292M HD SDI Out Shield Screen GROUND Camera ground Preview HD SDI Output Note If PREVIEW type is set to MENUS DVI the PVW output is disabled In record the Preview output provides a 1280 x 720p 10 bit 4 2 2 progressive scan video at 59 94 or 50 00 Hz In playback if PLAYBACK is set to 720p the P...

Страница 74: ...review video output Note In this mode if PLAYBACK is set to 1080p the HDMI output will provide a 1080p 10 bit 4 2 2 progressive scan video signal with 4 channel embedded audio at 23 98 24 00 25 00 or 29 97 Hz when the RED ONE camera is placed into playback The alternative mode is MENUS DVI In this mode the HDMI output is compatible with most DVI based SXGA or higher resolution computer monitors Us...

Страница 75: ...ed film laboratory telecine and one light color corrector They convert recorded REDCODE RAW data to RGB video and provide basic one light image processing and color correction Using REDCINE footage can also be cropped resized or repositioned These functions lessen the amount of time required for color correction or re framing of shots after the final cut has been completed RED Alert can generate Q...

Страница 76: ...higher Render performance of computers will vary based on CPU speed number of cores and disk speed The RED ONE camera RED Alert and REDCINE offer QuickTime reference movies at _F full _H half _M medium and _P proxy resolution Choose the resolution that is most appropriate to your requirement for playback frame rate on your specific computer If the footage is to be viewed at distant location e g da...

Страница 77: ...on about the levels in the selected clip Expo sure and White Balance may be altered R G and B digital values may be sampled from the im age and a Zebra exposure indicator can be selected A composite RGB histogram is available which appears below the main display area This pro vides a view of the exposure distribution for the Red Green and Blue channels A one light color correction panel permits ad...

Страница 78: ...ed across multi ple clips or alternative color treatments may be made for the same clip Note Looks may be transferred to the camera by entering RED Alert values into the UI The image may be displayed in a variety of color spaces For most applications select RED space For special effects select Linear and for Digital Intermediates select a Log The timeline control plays the selected clip and marks ...

Страница 79: ...on 10 bit DPX or 16 bit TIFF files REDCINE can also render clips as standalone QuickTime movies using specific HD video codecs As RED ONE shoots progressive scan images all QuickTime movies created by REDCINE are also progressive scan Tutorial video as are available at the following locations http red cachefly net redcine interface_overview mov http red cachefly net redcine project_settings mov ht...

Отзывы: