background image

TonerRefillKits.com


RechargX™ RX201X v1

Mon - Fri  8am - 5pm ET                     © 1995-2011 ReChargX™, EmptyX, TonerRefillKits and TonerRefillKits.com, the TonerRefillKits logo, the  

2012.01.10

800.527.3712 or 352.343.7533                 ReChargX™ and EmptyX logos are trademarks owned by TonerRefillkits, LLC. All rights reserved. 

Page 3 of 9

Step 6: Empty the Toner Hopper

You must remove any toner that is still in the 

toner hopper before refilling.

NOTE:

 This step does not need to be repeated 

the next time you refill.

NOTE:

 This toner cannot be used again, the new 

toner being added cannot mix with the residual 

OEM  toner.  Failing  to  remove  the  toner  before 

refilling will result in significant hazing on some 

or all of the printed page that will not go away 

with further printing.

Open the plastic bag, included in the ReChargX™ 

RX201X  Toner  Refill  Kit,  and  lower  the  toner 

cartridge so the toner hopper hole is in the bag. 

Carefully  pour  out  as  much  of  the  remaining 

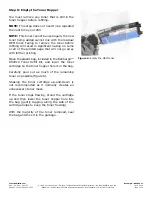
toner as possible (figure 6).

Shaking  the  toner  cartridge  up-and-down  is 

not  recommended  as  it  normally  creates  an 

unnecessary toner mess.

If the toner stops flowing, stand the cartridge 

up and then lower the toner hopper hole into 

the  bag  (gently  tapping  along  the  side  of  the 

cartridge helps to keep the toner flowing).

With  the  majority  of  the  toner  removed,  seal 

the bag and toss it in the garbage.

Figure 6:

 Empty the OEM toner

Содержание RX201X

Страница 1: ...artridges are quite easy to refill using our ReChargX RX201X Premium Print Toner Refill Kit Within these ReChargX RX201X Premium Print Toner Refill Kit instructions we will be adding new toner and resetting the flag gear Step 1 Orient the Toner Cartridge Orient the cartridge on your work surface so the developer roller of the cartridge is away from you and the handle is toward your chest figure 1 ...

Страница 2: ... 3 The toner hopper plug will be located underneath the white label of the cartridge Step 4 Score the Cartridge Label Using the edge of a flat blade screwdriver slice through the label at the top and side figure 4 Step 5 Remove the Toner Hopper Plug Wedge the edge of a flat blade screwdriver down between the lip of the cartridge and the toner hopper plug then pry the plug up and out figure 5 Do no...

Страница 3: ...toner Failing to remove the toner before refilling will result in significant hazing on some or all of the printed page that will not go away with further printing Open the plastic bag included in the ReChargX RX201X Toner Refill Kit and lower the toner cartridge so the toner hopper hole is in the bag Carefully pour out as much of the remaining toner as possible figure 6 Shaking the toner cartridg...

Страница 4: ... it with the plastic dispenser spout from the ReChargX RX201X Toner Refill Kit To make the adding of the toner to the toner hopper as easy and dust free as possible tilt the end of the cartridge with the hole in it up at a 45 degree angle and slowly angle the dispenser spout on the bottle of toner to meet up with the hole as shown in figure 7 Tilting the bottle up a little more will start the tone...

Страница 5: ... 8 NOTE Only use the toner grabber cloth on the exterior of the toner cartridge around the toner hopper hole area Do not use the cloth to clean any of the internal components or the cartridge developer roller Step 9 Plug the Toner Hopper Hole Remove the new plug from your ReChargX RX201X Premium Toner Refill Kit and place the plug over the hopper hole press firmly around the entire perimeter of th...

Страница 6: ...gure 11 Using a phillips head screwdriver remove the screws holding the end cap in place Step 12 Remove the Gear End cap With the screws removed lift the gear end cap up and off of the toner cartridge and set it aside for future use figure 12 Step 13 Locate the Flag gear In the cartridges current orientation the flag gear is the large black or gray gear on the right side of the toner cartridge sho...

Страница 7: ...tting the Flag gear You ll need to rotate the flag gear counter clockwise just far enough so the tab in the seven o clock position is now in the five o clock position The path from the seven o clock to the five o clock is shown by the red arrow in figure 15a Using the thumb of your left hand hold the metal spring in place so it doesn t pop off while the other hand grabs and lifts up slightly makin...

Страница 8: ...unter clockwise just far enough so the tab in the seven o clock position is now in the five o clock position The path from the seven o clock to the five o clock is shown by the red arrow in figure 17a Using the thumb of your left hand hold the metal spring in place so it doesn t pop off while the other hand grabs and lifts up slightly making sure not to remove the flag gear from the cartridge figu...

Страница 9: ...igure 18 This piece of paper can now be discarded Congratulations You re Finished Congratulations You have successfully refilled your Brother TN315 toner cartridges Enjoy your savings You ve just saved 84 00 by refilling your black toner cartridge and or 91 00 by refilling each of your color toner cartridges End of ReChargX RX201X Instructions Customer Service Technical Support To further help you...

Отзывы: