


25
24
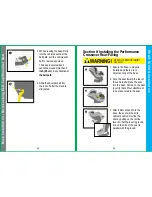
Base Installation - Locking Lap/Shoulder Belt
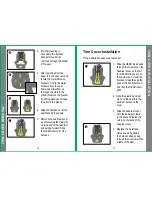
Locking Lap/Shoulder Belt Base Installation
1. Position the base on the
forward-facing vehicle seat
with belt path against the back
of the seat.
2. Route the lap/shoulder belt
through the openings in the
base as shown. Make sure the
belt is not twisted, then buckle
the seat belt.
*NOTE: The lap/shoulder belt
is
routed over the stored LATCH
strap.
3. If necessary, switch the retractor
or the latch plate to locked
mode according to your vehicle
manual.
4. While pressing the base firmly
into the vehicle seat near
the belt path, pull the vehicle
seat belt to remove any slack.
The base is secure when it
cannot be moved more than
1
inch (2.5 cm)
in any direction
at
the belt path
.
WARNING!
DEATH or SERIOUS INJURY
can occur
1
2
4
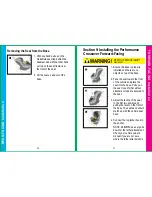
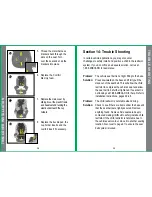
Lap Belt Only Installation
Cannot use this method of installation with an emergency locking
retractor with latch plate system.
1. Position the base on the
forward-facing vehicle seat
with the belt path against the
back of the seat.
2.
Route the lap belt through
the openings in the base as
shown. Make sure the belt is
not twisted, then buckle the
seat belt.
NOTE: The lap belt is routed
over the stored LATCH strap.
3.
While pressing base firmly
into the seat, pull the end
of the seat belt strap to
tighten or feed back into the
automatic locking retractor.
The base is secure when it
cannot be moved more than
1
inch (2.5 cm)
in any direction
at the belt path.
WARNING!
DEATH or SERIOUS INJURY
can occur
1
2
3
Base Installation - Lap Belt


