


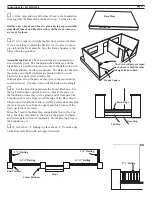


Pre-assembly page 5
Instructions for kit #HB-1900
A Railing Assembly demo is available online at dhbuilder.com
□
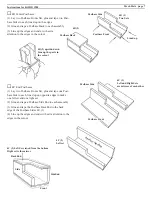
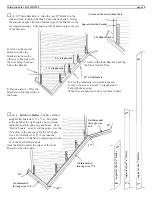
1. Rail Assembly
A. 1. Paint (the fi rst coat) and sand the Rails before assembly.
Wipe any paint out of the grooves, and do not paint the Rail ends at all (wipe
the ends to eliminate paint that sneaks around the corner).
Paint the Ballusters.
B. Assemble the Railing:
1. Set one Rail on the assembly diagram, lined up on each end;
tape it in place so it won’t move. Put a dab of glue on a Balluster
end, and push it into the groove at a balluster locator on the dia-
gram. Straighten and adjust the Balluster to exactly line up with the
diagram, then put in the next Balluster.
Repeat until all the Ballusters are in place. Do a fi nal inspection
and adjustment, and let the glue dry for a few minutes.
3. Squeeze the Rails together so the Ballusters are fully in the grooves.
4. Hold the Railing set on the drawing; make the Rail ends exactly line
up. Adjust the Ballusters - - straight and square. Tape together Dividers
to form a square inside corner, and lay the Railing in the corner as the
glue dries - keep the ends square!
C. Paint (second-coat) the Railing
2. Support the Ballusters with a piece of stripwood; dab a little glue onto
each Balluster end. Hold the second Rail over the Balluster’s ends at an
angle.
Push down and scoop the Ballusters’ ends into the groove.
2. Sand (320 grit) the Rails and Ballusters. Sand the
Rail’s grooves with a folded piece of sandpaper.
Balluster
Paint (one coat) and Sand
the Rails and Ballusters
Diagram
Rail
Tape
Support stripwood