


Assembly Notes /Getting Started (A) page 4
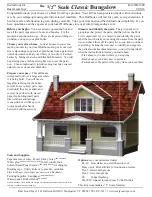
Instructions for Kit #HB-1900
Assembly Notes:
A large, clutter-free, well-lighted work area is helpful dur-
ing assembly, but a fl at work surface is essential.
Read the instructions
carefully; look at each of the il-
lustrations.
!With the parts in your hands!
, think the
assembly through before you proceed.
Test fi t each time you are ready to glue a piece in
place...then you’ll know you have it right.
If more tape or a helper is needed, it’s good to know
that before the parts have glue on them.
Don’t be stingy with glue or tape; use generous amounts.
Always wipe off excess glue immediately.
Keep one damp rag and one dry rag handy all the time.
Have weights available
for holding things tight as glue
joints dry (stacks of books, gallons of pure Vermont
Maple Syrup - anything heavy)
Glue the body of your dollhouse together
with white,
water clean-up glue that dries clear. Do not use instant-
bond (super glue), fast-tack, rubber cement, silicone, or
hot melt glues. They are all used in some wood appli-
cations, but they all have some characteristic that makes
them un-desirable for the body of your dollhouse.
Carpenter Glue works well, but glue-smear dries yel-
low or tan; many of the things you glue onto the house
are pre-painted – extra glue will show. I use Aleene’s
Tacky Glue® for all house body assembly.
Make sure everything is straight and fl at as glue dries...
That’s the shape that will be permanent.
Glue the shingles on
with glue that doesn’t have any
water in it! If the glue says ”water clean-up”, it will curl
the wooden shingles. Look carefully at the glue you in-
tend to use to be sure it is solvent-based, or use hot-melt
glue (and watch out for the burns). I use Liquid Nails
#LN-601® glue which comes in a caulking-gun tube
at the hardware or building supply store (note – Liquid
Nails® also makes glues that are “water clean-up” and
will curl the shingles). Check ingredients and warnings!
If you Wallpaper
, use Yes® craft paste (for bookbind-
ing or collage) or methylcellulose paste.
Brush paste on the wallpaper, then the wall, and fi nally
smooth the wallpaper into position.
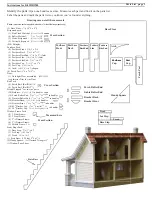
When glue is drying, skip ahead to up-coming assembly
steps and prepare the parts that will be used
Before you begin, read the “Finish the Inside” section
on the last page.
A: Getting Started:
Do these things before the house assembly
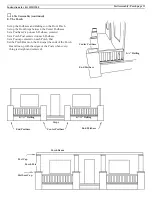
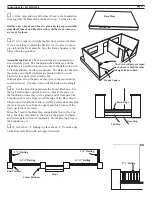
Make two cuts in each
corner from the outside (one
from each direction), then
cut from each direction on
the inside to cut away the
rounding in the corner so
the window, door, or stairs
will fi t.
Stain the Shingles
: Our pro uses Real Good Toys’ Shingle
Dye (available through your Real Good Toys miniature
dealer) when dying the shingles for this house.
Square the corners
of the window, door, and stair holes with
a utility knife - each cutout has a rounded corner left over
from the tool that made it.
Batch dye or stain the shingles
several days ahead of time so
they will be dry when the time
comes to use them (instruc-
tions are with the shingle dye).
B: Painting:
The order of assembly and painting is a back-
and-forth process of test-assembly, marking, painting, and fi nal
assembly. There are three things to keep in mind as you do this:
1.
Glue doesn’t stick to paint.
It does, however, stick to a part
that has been fi rst-coated and sanded. For this reason, parts that
will be the same color can be glued together after one coat and
sanding, but before the second coat of paint is applied.
2.
The quality of your paint job depends on sanding
after the
fi rst coat, and sanding is easiest and best while the parts are un-
assembled. Sand until the wood begins to show thru.
3.
Where two colors of paint will be next to each other,
the neatest result will be achieved if the parts are marked and
painted to just cover the mark, leaving the rest of the joint un-
painted. That way, when they are glued together, the glue joint
will have wood for strength, and the joint between colors will
be perfect (impossible to achieve with masking for painting)
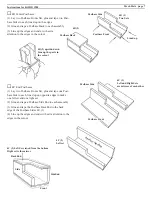
The assembly steps in these instructions will be focused on the
above issues. For this house, the easiest and best way to do this
is to assemble the Porch Rails, the Foundation, the Porch Posts,
and the Rear Roof assembly, and then to tape together the whole
house to
mark-for-paint.
Doing this will save time and give the
best result in your paint job.
OnLine Support:
There are many photos of this
house under construction as well as tips, techniques,
and extra help with your dollhouse project at:
www.dhbuilder.com
It is very important to paint (
fi
rst coat) the clapboard walls before
sanding, building, un-necessary handling, or any other thing is
done with them. The
fi
rst coat of paint
fi
lls and supports the
wood’s grain, and protects it from damage.
Paint the
fi
rst coat on the clapboard walls now.