Real Good Toys B-1920 Скачать руководство пользователя страница 17

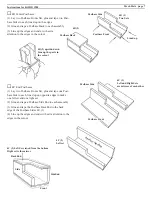
Glue a Bracket Cap to each Bracket - make:
 5) 45o Brackets Left
 5) 45o Brackets Right 
 2) 30o Brackets Left
 2) 30o Brackets Right


Instructions for  kit #HB 1900


 page 17

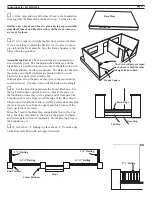
23.  Tape together the Cricket Roofs at the peak. Lay the 

Cricket Triangle into the roof set spaced evenly from the front 
edges and set back so that the bottom edge of the Cricket Tri-
angle exactly matches the bevels on the Cricket Roof edge.

Paint the Cricket Set parts.
Glue and tape the Cricket set together.
When the glue is dry, glue the Cricket to the Porch Roof, lined 

up on the front edge and centered side-to-side.  

Let the glue dry. 

If you intend to use copper 

fl

 ashing in the valleys, 

visit www.dhbuilder.com for guidance.

Cricket Roofs

Bevel

Cricket Triangle

Spaced evenly

Lined up with 
the bevel

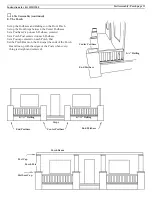
24.  Arrange a backstop that makes a right angle (90

o

) with 

the work surface.  Protect the work surface with waxed paper.

Glue together 14 pairs of  Bracket Back + Strut.  Clean up the 

glue excess (a paint brush and cup of water); let the glue dry 
a bit.

Brackets

The pre-cut bracket parts are in bundles and, if they haven’t 
been painted, do so now. The easiest and strongest bracket 
construction is with fi rst-coated parts that have been sanded.

Strut

45o Bracket Left

45o Bracket Right

30o Bracket Left

30o Bracket Right

Attach the Cap

Bracket Strut

Bracket Cap

Base

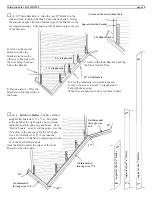
Glue and tape the Dormer Roof to the house.
Let the glue dry.

Strut

Bracket Back

Backstop

Содержание B-1920

Страница 1: ...tility knife or coarse file yardstick Fine tooth saw razor saw like X Acto or a hacksaw Painting Supplies Sandpaper especially 320gr Waxed paper Rubber Bands 8 and 32 PostIts Aleene s Liquid Nails and...

Страница 2: ...Strut 3 32 x 1 4 13 16 angled in bundles 10 45o Bracket Cap 1 4 x 1 4 angled 13 16 4 30o Bracket Cap 3 16 x 3 16 angled 13 16 Window Frame Pack 8 3 Front Frame 8 2 Front Frame 4 33 4 Dormer Frame 4 2...

Страница 3: ...8 angled door cutout 1 Divider 1 4 41 2 x 65 8 door cutout 1 Porch Beam 3 8 x 5 8 153 4 1 Mid Floor 3 8 151 8 x 101 16 stair hole 1 Porch Roof 1 4 171 8 x 41 4 bevel pr Dormer Roofs L R 1 4 65 16top...

Страница 4: ...ing Started Do these things before the house assembly Make two cuts in each corner from the outside one from each direction then cut from each direction on the inside to cut away the rounding in the c...

Страница 5: ...epeat until all the Ballusters are in place Do a final inspection and adjustment and let the glue dry for a few minutes 3 Squeeze the Rails together so the Ballusters are fully in the grooves 4 Hold t...

Страница 6: ...glue dries Foundation page 6 Instructions for kit HB 1900 3 Rear Roof Glue and tape together the Rear Roof and Eaves lined up on the outside edge 4 Porch Posts A Sort the Postbases into these 5 categ...

Страница 7: ...he parts in the cutout 4C End Postbases 1 Lay two Postbase Fronts flat glue and tape one Post base Side to each lined up on opposite edges to make one left set and one right set 2 Glue and tape a Post...

Страница 8: ...e Triangle lined up on the out side edge test the spacing with the Dormer Base Glue the Dormer Base to the Dormer Fronts lined up on the outside edge Lined up on the inside Bevel faces back Clapboard...

Страница 9: ...ver hang on each end Tape the Porch Roof to the bottom edge of the Front Roof lined up side to side and at the bottom Tape Attic Dividers to the Front Roof lined up with the edges of the cutout Use th...

Страница 10: ...Roof Mark every 5 8 down both sides of the Front Roof the Porch Roof and the Rear Roof set The guidelines themselves may be easiest to draw after the roofs are removed and they are flat on the table...

Страница 11: ...d on each Postbase Set a Postcap centered on each Porch Post Set the Porch Beam on the Postcaps the ends of the Porch Beam line up with the edges of the Posts when every thing is straight and centered...

Страница 12: ...f the paint away I first coat and sand every thing then glue together anything that is the same color usually the Posts PostCaps and the Postbase Caps but not the Porch Beam so the layers of paint don...

Страница 13: ...are sanded The Rails the Post sets the Arches and the Porch Beam are painted with two coats Stucco texture paint is mixed and ready Without glue set up the parts as they were in the test setup ex cept...

Страница 14: ...tbase to the Floor and Foundation and to the Railing it is still there with wet glue on the ends Dab glue on the Side Railing s ends Push the End Postbase against both sets of railings leaving 4 dots...

Страница 15: ...e up the wall with the stair cutout Tape the Cricket Roofs to the floor if necessary to straighten the Attic Endwalls Hold the back edges of the Attic Endwalls square Glue the Porch Triangles in place...

Страница 16: ...r Side Lined up on top 20 Glue and tape the Attic Dividers into the attic lined up with the cutout straight and square Let the glue dry Attic Dividers Line up with the edge Porch Roof Front Roof 21 Gl...

Страница 17: ...u intend to use copper flashing in the valleys visit www dhbuilder com for guidance Cricket Roofs Bevel Cricket Triangle Spaced evenly Lined up with the bevel 24 Arrange a backstop that makes a right...

Страница 18: ...er the Window Frames 26 Assemble two sets of 21 2 x 33 4 Window Frames When the glue is dry Tape the 21 2 x 33 4 Window Pane to the back side of one Frame lined up around the lip Turn the set over and...

Страница 19: ...end of the Middle Floor then again from left to right measured from the other end of the floor This will give you pairs of marks 1 8 apart for locating the Porch Rafter Ends Glue the Porch Rafter End...

Страница 20: ...nt 31 2 clapboards to help with the spacing When they are spaced evenly glue them in place E Repeat steps A D for the Brackets on the other side of the house 45o Left Brackets 45o Right Bracket 45o 17...

Страница 21: ...ckets 30o Left Brackets 29 B 30o Dormer Rafter Ends Glue two 30o Rafter Ends to the underside of the Dormer Roof spaced an inch apart 30o Rafter End Dormer Roof 30o Rafter Ends 29 C Dormer Eave Rafter...

Страница 22: ...gle into the line of glue squeezing out the excess Hold the first Shingle and press another Shingle into the adhesive tight to the first Hold the next Shingle and press in another etc all the way acro...

Страница 23: ...im from the Horizontal Stripwood The Eave Trim uses the same angles as the Rafters pages 20 and 21 but attaches to the edge of the Roofs lined up at the bottom Horizontal Trim Eave Trim DormerEave Tri...

Страница 24: ...erial into Treads The Top Stair Tread fits in the Stair hole Cut the rest of the treads 1 16 wider than the Stair Base to overhang on the edge away from the wall Glue the Treads to the Stair Base Glue...

Страница 25: ...Layout Diagram 5 5 8 8 spacing for Shingle Guidelines spacing for Shingle Guidelines 4 2 1 9 16 1 Layout diagrams These diagrams may print slightly differently from the way they were drawn Keep the R...

Отзывы: