P a g e
| 7
Bee9 User's Manual
Reach/BTX
7.
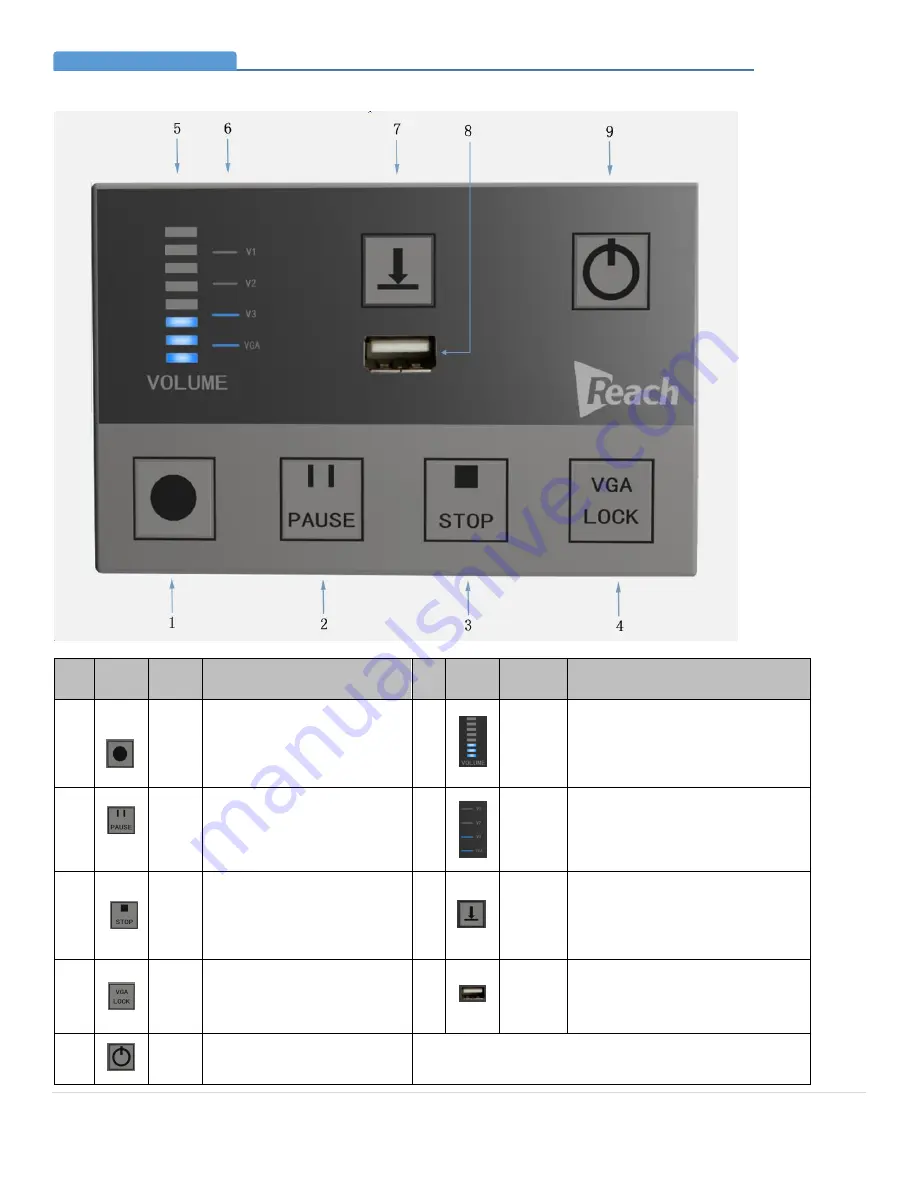
Remote Controller
No.
Image
Item
Description
No
.
Image
Item
Description
1
Record
Press this button to start recording, or
to resume recording when recording is
paused. After recording is started,
related scrolling messages will show on
the LCD screen on Bee9 front panel.
The button LED is off in default.
5
Volume
Bar
Dynamic display of peak audio volume.
2
Pause
Press this button to pause a recording;
press Record button again to resume
recording.The button LED is off by
default.
6
Video
Signal
Lamp
V1: Presenter Close-up signal.
V2: Classroom Wide view signal.
V3: Presenter Wide view signal.
VGA: Computer Presentation Content Signal.
3
Stop
Press this button to stop recording. The
LED will flash on and off, indicating the
file recording is done. The LCD Screen
is switched to the scrolling message
display to confirm the action. The
button LED is off in default.
7
File
Download
When a USB storage device is connected,
press this button to download the last
recorded file. The button will flash during the
download, and stays on when the download is
complete.
4
VGA
Lock
When the Bee9 is in auto mode, and
this button is pressed, the computer
presentation content will be displayed
full screen until the button is pressed
again. The button LED is off by default.
8
USB Port
Used to connect storage device. Supported
Device: USB flash disk, USB hard disk
9
Power
Switch
This LED blinks during start-up, and
stays illuminated after start-up.
Please note that even though connectivity of this remote controller is through
an Ethernet cable, the signals are RS-485. Be particularly attentive not to
connect the remote control cable to the analysis camera port, or vice versa.
Bee9 Connectivity Detail (Remote Controller)
Section 4


