background image

2

Electromagnetic compatibility and low-voltage guidelines: 

RCS

 leaves all devices and products, which are subject to the CE guidelines by certified test laboratories test. 

By the fact it is guaranteed that you may sell our devices in Germany and in the European Union domestic market without additional checks.

Elektromagnetische Verträglichkeit und Niederspannungsrichtlinien: 

RCS

 läßt alle Geräte und Produkte, die den CE-Richtlinien unterliegen durch zertifizierte Prüflabors 

testen. Dadurch ist sichergestellt, dass Sie unsere Geräte in Deutschland und im EU-Binnenmarkt ohne zusätzliche Prüfungen verkaufen dürfen.

WICHTIGE SICHERHEITSHINWEISE

Bitte  lesen  Sie  die  Sicherheitsanweisungen,  bevor  Sie 
das Gerät in Betrieb nehmen.

1.   Installation nach folgenden Richtlinien:

•  Stellen Sie das Gerät immer auf eine ebene und stabile 

Unterfläche.

•  Wählen Sie eine trockene Umgebung und vermeiden Sie 

Aufstellungsorte mit geringer Luftzufuhr.

•  Vermeiden Sie die direkte Nähe zu Heizungen und ande

-

ren Hitzequellen.

•  Bei  Einbau  in  einen  19˝  Gestellschrank  ordnen  Sie  die 

Geräte so an, daß eine ausreichende Belüftung gewähr-
leistet wird.

2.   Bitte beachten Sie folgendes, wenn Sie das Gerät       

anschließen:

•  Um Bedienfehler zu vermeiden, lesen Sie bitte zuerst die 

Anleitung sorgfältig.

•  Öffnen Sie niemals das Gehäuse, ohne vorher den Netz

-

stecker zu ziehen.

•  Schließen Sie das Gerät nur an 230 V Netzspannung und 

an die 24 V Notstromversorgung (DC).

SAFETY INSTRUCTION

Please read all safety instructions before operating the 
Device.

1.  Installation according to the following guidelines:

•  Install the device always on a flat and even surface.
•   The  device  should  not  be  exposed  to  damp  or  wet 


surroundings. Please keep away from water.

•  Please avoid using the device near heat sources, such as 

radiators or other devices which produce heat.

•  To install the device in a 19” rack please note that the ap

-

pliance should be situated, that the location or position 

does not interfere with an adequate ventilation. 

2. Keep in mind the following when connecting the  

device: 

• 

Connect the amplifier after reading the manuals.

•  To prevent electric shock, do not open top cover.
•  Connect only to 230 V and 24 V Emergency power (DC).

CAUTION / ACHTUNG

Caution: to reduCe the risk of eleCtriC shoCk do not remove 
Cover (or BaCk) no user-serviCeaBle parts inside refer ser-

viCiing to qualified personnel.

aChtung:  Zur  vermeidung  von  stromsChlägen  gehäuseaB-
deCkung  oder  rüCkseite  niCht  entfernen.  keine  vom  Benut-
Zer Wartenden teile im inneren. Wartung nur durCh qualifi-

Ziertem personal. 

19˝-TUNER 

TU-110B

INSPECTION AND INVENTORY OF THE PRODUCT

Check unit carefully for damage which may have occurred 
during  transport.  Each  RCS  product  is  carefully  inspected 
at  the  factory  and  packed  in  a  special  carton  for  safe 
transport.

Notify the freight carrier immediately if you observe any 
damage to the shipping carton or product!

Return: 

Repack the unit in the carton and await inspection 

by the carrier’s claim agent. Notify your dealer of the pending 

freight  claim.  Returning  your  unit  for  service  or  repairs. 

Should your unit require service, contact your dealer.

AUSPACKEN UND KONTROLLE DES PRODUKTS

Bitte überprüfen Sie das Gerät sofort auf evtl. Transportschä

-

den. Jedes RCS Produkt wird vor dem Verpacken sorgfältig 

überprüft und in einem speziell dafür vorgesehenen Karton 
geliefert.

Alle Transportschäden müssen sofort bei der Transport-
firma reklamiert werden!

Rücksendung: 

Wenn es nötig sein sollte ein defektes Gerät 

zurückzusenden, nehmen Sie bitte Kontakt mit Ihrem Händ

-

ler auf. Bitte versenden sie alle Rücksendungen in der Origi-
nalverpackung.

Содержание TU-110B

Страница 1: ...OPERATING INSTRUCTIONS BEDIENUNGSANLEITUNG ENGLISH DEUTSCH TU 110B 19 TUNER ...

Страница 2: ...ay from water Please avoid using the device near heat sources such as radiators or other devices which produce heat To install the device in a 19 rack please note that the ap pliance should be situated that the location or position does not interfere with an adequate ventilation 2 Keep in mind the following when connecting the device Connect the amplifier after reading the manuals To prevent elect...

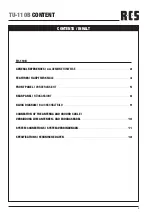
Страница 3: ...AUPTMERKMALE 4 FRONT PANEL VORDERANSICHT 5 REAR PANEL RÜCKANSICHT 8 BLOCK DIAGRAM BLOCKSCHALTBILD 9 CONNECTION OF THE ANTENNA AND GROUND CABLE Verbindung zum Antennen und Erdungskabel 10 SYSTEM CONNECTIONS SYSTEM VERBINDUNGEN 11 SPECIFICATIONS TECHNISCHE DATEN 12 CONTENTS INHALT ...

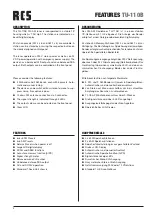
Страница 4: ...rolled on the front panel Please consider the following features 3 FM bands and 2 AM bands each with 6 presets Auto matic and manual tuning The device can be switched from stereo to mono to sup press noise if reception is poor 75 ohms FM antenna connection via F connector The signal strength is indicated through 5 LEDs The output volume can be adjusted on the front panel Clear LCD BESCHREIBUNG Der...

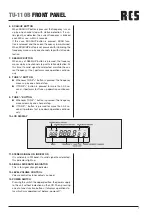
Страница 5: ... is stored to corresponding memory area READ Operation One of the M1 M6 button is pressed for less than 2 seconds read the corresponding preset memory When write operation it performs 0 5 sec mute opera tion These buttons are invalid when AMEMO operation 2 BAND BUTTON Band change over is performed through the cyclic me thod with the band button NOTE If the rear panel frequency selector switch is s...

Страница 6: ...ory function descriptions During SEEK UP operation with station detection if any station is detected then this detected station is automatically stored to the corresponding preset me mory area in regular frequency Current receiving frequency is preset memory From current channel to M6 Current receiving frequency is not preset memory From M1 to M6 During auto store memory output signals are mu ted ...

Страница 7: ...00 m sec within 5 seconds If this case SCAN UP button is pressed SCAN func tion is released and the current frequency in maintained When SCAN UP button is not pressed with in blinking the frequency moves up by one channel step with station de tection 7 SEEK UP BUTTON When any of SEEK UP button is pressed the frquency moves up by one channel step with station detection At this time if a valid signa...

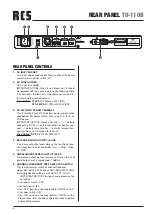
Страница 8: ...tery con nect polarity terminal after polarity terminal con nection So as not to make a fault of unit Fuse Rating DC 24 V T1AH 250V 55T 4 BALANCED MONO OUTPUT JACKS It increases output by level volme control on the front pa nel output level is balanced 0dBm Tip Ring Slee ve GND 5 UNBALANCED STEREO OUTPUT JACKS It increases output by level volume control on the front panel output level is unbalance...

Страница 9: ...low discharge until the unit will be in stalled To activate the back up battery place the switch from OFF position to ON position 8 ANTENNA TERMINALS FM You can connect a 75ohm coaxial cable antenna to this terminal AM You can connect the AM loop antenna to this termi nal GND Used as a grounding terminal for AM reception to protect the unit in a thunder storm and to reduce back ground noise Tu 110...

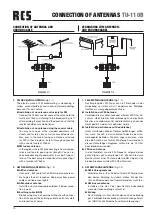
Страница 10: ...oor Earthing cable GND Broadcasting may be heard well without earth connec tion But connect the earthing cable to earth for safety and reduction of noise 1 FM EMPFANGSANTENNE Fig 1 1 Der Empfang des FM Funks kann in Tälern oder in der Umgebung von Häusern mit eingelassenen Metallge flechten ein wenig abgeschwächt sein Installation der FM Antenne Verbinden Sie das Antennenkabel mit dem 300 Ohm An s...

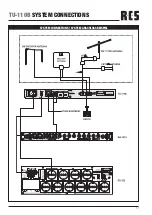
Страница 11: ...11 TU 110B SYSTEM CONNECTIONS RCS AUDIO SYSTEMS RCS AUDIO SYSTEMS System Connections System Anschlussbeispiel ...

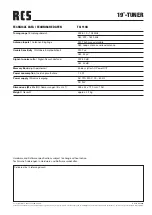
Страница 12: ...erung durch 19 TUNER RCS22 08 2008 Technical Data Technische Daten TU 110B Tuning range Empfangsbereich FM 87 5 108 MHz AM 522 1620 kHz Antenna Inputs Antennen Eingänge FM 75ohm coaxial cable AM Loop antenna and lead antenna Usable Sensitivity Nutzbare Empfindlichkeit FM 2µV AM 4 5µV Signal to noise ratio Signal Rauschabstand FM 60 dB AM 45 dB Memory Back up Speicherzeit 45 days after AC Power Off...

Отзывы: