background image

Connections and Setup

Chapter 1


9

OOFER

AUDIO/VIDE

OUTPUT

ARIABLE

UDIO OUTPUT

G-LINK

DIGITAL

AUDIO

OUTPUT

(OPTICAL)

OOFER

R

AUDIO/VIDE

OUTPUT

ARIABLE

E

UDIO OUTPUT

G-LINK

DIGITAL

AUDIO

OUTPUT

(OPTICAL)

CABLE INPUT

Choose Your Signal

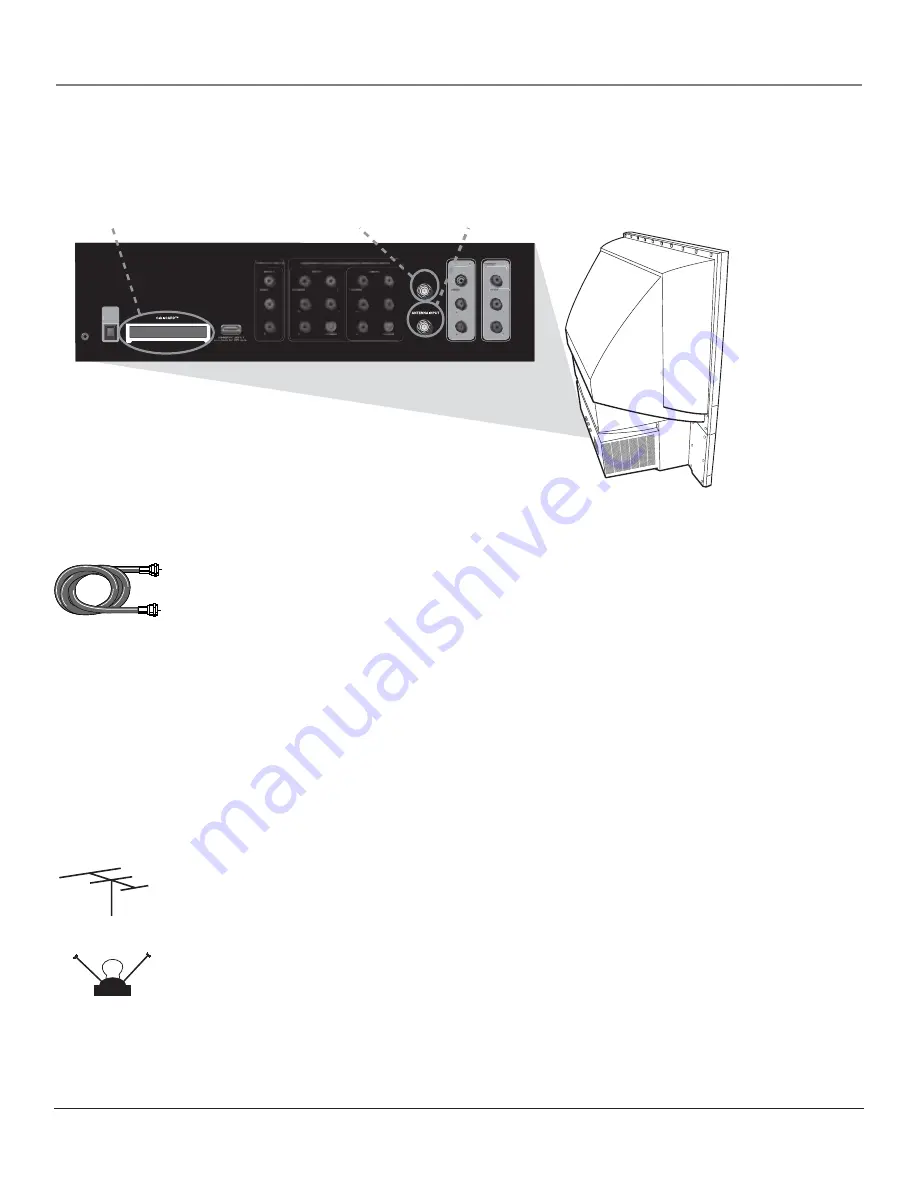
The fi rst part of connecting your TV is to get a signal. The back panel of your TV allows you to 
connect cable by using the CABLE INPUT; off-air antenna by using the ANTENNA INPUT; and a 
digital cable card by using the CableCARD slot. See below for these locations. 

Using the Cable Input

Connect a coaxial cable from the wall outlet to the CABLE INPUT on the back of the TV to 
receive cable channels. 

Coaxial cable

CableCARD Slot

CABLE INPUT

ANTENNA INPUT

What You Need 

Coaxial cable

What You Need To Know

•  If you have cable connected and you want to record programs, go to the connection on page 14 

for more information. 

•  When you get to the 

Channel Search

 screen in the Assisted Setup, place a check mark in the box 

next to 

Cable Input

. To complete a channel search now, go to page 21. 

•  When you are ready to watch channels, make sure you are tuned to the Cable Input. Press the 

ANT•CAB button to tune to the Cable Input.

Using the Antenna Input

Connect a coaxial cable from an off-air antenna to the ANTENNA INPUT to receive off-air 
channels and local digital channels.

What You Need

Indoor or outdoor antenna

What you Need to Know

•  Visit www.antennaweb.org to get help deciding what type of antenna to use to receive the local 

digital channels available to you. By entering where you live, this mapping program tells you what 
local analog and digital stations are available using a certain antenna. Once you determine what 
type of antenna you need, go to rca.com or go to the accessories on page 86.

•  When you get to the 

Channel Search

 screen in the Assisted Setup, place a check mark in the box 

next to 

Antenna Input

. To complete a channel search now, go to page 21.

•  When you are ready to watch channels, make sure you are tuned to the Antenna Input. Press the 

ANT•CAB button to tune to the Antenna Input.

Outdoor antenna

Indoor antenna

Содержание SCENIUM HD50LPW166PK

Страница 1: ...Find Inside t The DLP Experience page 1 t Connections page 9 t Remote page 34 t Features page 42 t Menus page 62 t FAQs page 78 t Troubleshooting page 79 HDTV User s Guide ...

Страница 2: ...e ground shall be connected to the grounding system of the building as close to the point of cable entry as practical Important This television is a table model and is designed to sit on a firm flat surface Don t place the TV on soft carpeting or similar surface because the ventilation slots on the bottom of the unit will be blocked resulting in reduced lifetime from overheating To assure adequate...

Страница 3: ...rning onto the screen permanently or convergence realigning the CRTs The diagram on the left illustrates the complex system Thin and Light The efficiency of DLP technology enabled our design team to create a high performance HDTV that is about 16 inches thin and weighs less than 100 pounds Lamp Replacement DLP technology uses a special lamp Eventually you ll need to replace this lamp which you can...

Страница 4: ... of more than 2 million pixels 1 920 x 1 080 2 073 600 More pixels equal more detail In summary HDTV is capable of resolution that is up to almost 10 times the resolution of the picture on a regular analog TV Aspect Ratio Aspect ratio is simply the width and height of the picture Regular TVs use a 4 3 aspect ratio which means the picture is a little wider than it is tall a screen that is 20 inches...

Страница 5: ... follows Go to Chapter 3 for more details on these and additional features Integrated HDTV Tuner with Digital Cable Ready QAM RCA Scenium was the first to offer an integrated tuner with its HDTVs which means there is no need for another box to receive digital programming Now we ve gone one better your HDTV s tuner is digital cable ready which means there is no need for a cable box to view unscramb...

Страница 6: ... how you watch TV and what s necessary to make the transition to HDTV seamless Picture Presets Picture Settings Go Back 2 1 0 Noise Reduction Color Warmth Auto Color 5 4 3 Green Stretch 6 Edge Enhancement 7 Contrast Expand 8 Advanced Settings 9 Press 5 or 6 to point to an option then press OK to select it Press 3 to return to the menu A change in this screen is applied to Input 3 Vibrant Day Natur...

Страница 7: ...l to Complete the Assisted Setup 20 Complete the Assisted Setup 21 Set the Menu Language 21 Complete Channel Search 21 The TV Guide On Screen System Setup 21 What To Expect 26 Watching TV 26 Next Steps 27 Explanation of Jacks 28 The Front of Your TV 31 Front Input Jacks 31 Front Panel 31 Chapter 2 Using the Remote Control The Buttons on the Remote Control 34 Programming the Remote to Operate Other...

Страница 8: ...esets 65 Auto Color 65 Color Warmth 65 Noise Reduction 65 Green Stretch 65 Edge Enhancement 66 Contrast Expand 66 Advanced Settings 66 Audio Menu 67 Equalizer Presets 67 Audio Processor 67 Sound Logic 68 Audio Mode 68 SAP Second Audio Program 68 Balance 68 Audio Connections 69 Connections Menu 70 Signal Strength 70 Channel Search 70 Signal Source 71 Auto Tuning 71 Special Features 71 Preferences M...

Страница 9: ...sider Before You Connect t Choose Your Signal t Choose Your Connection t Why You Should Connect the G LINK Cable t Plug in the TV t Put Batteries in the Remote t Turn on the TV t Use the Remote Control to Complete the Assisted Setup t Complete the Assisted Setup t What To Expect t Next Steps t Explanation of Jacks t The Front of Your TV ...

Страница 10: ... an audio receiver or amplifier place it on the top shelf so the heated air from it won t flow around other devices Position Cables Properly to Avoid Audio Interference Insert each cable firmly into the designated jack Use Indirect Light Don t place the TV where sunlight or room lighting will be directed toward the screen Use soft or indirect lighting CableCARD Service Details This digital televis...

Страница 11: ...k mark in the box next to Cable Input To complete a channel search now go to page 21 When you are ready to watch channels make sure you are tuned to the Cable Input Press the ANT CAB button to tune to the Cable Input Using the Antenna Input Connect a coaxial cable from an off air antenna to the ANTENNA INPUT to receive off air channels and local digital channels What You Need Indoor or outdoor ant...

Страница 12: ...l cable card can get a signal and receive channel information Once the digital cable card is authorized for a particular TV the card can t be used with any other TV unless it is re authorized to it You won t receive digital cable channels if you connect your cable to the ANTENNA INPUT Make sure you connect your cable to the CABLE INPUT Once inserted it is not recommended you remove the digital cab...

Страница 13: ... to install your electronic entertainment system and to instruct you in its operation For details about this service call 1 888 206 3359 For additional assistance while using your RCA Scenium product please visit www rcascenium com Jacks Used Cables Needed Go to Component video page 12 13 page 14 15 2 sets of Composite page 16 17 HDMI OR HDMI Y Pb Pr Audio R and L Video Audio R and L Audio Video O...

Страница 14: ...n TV mode 3 Press the INPUT button on the remote control to scroll through the Video Input Channels until you see INPUT 2 displayed in the channel banner See picture below for location Note You can set up the TV to automatically tune to the correct device you want to view This is called Auto Tuning See Chapter 3 for more information on Auto Tuning STOP PAUSE TV ON OFF AUX HD DVD SAT CABLE CC PRESE...

Страница 15: ...s to the INPUT 2 Y VIDEO PB PR jacks on the back of the TV and to the Y PB PR outputs on the DVD player 3 Connect your audio cables Connect the audio white and red cables to the INPUT 2 R and L Audio jacks on the back of the TV and to the Audio Output jacks on the DVD player Green Blue Red Component Video cables Y Pb Pr are color coded Green Blue and Red White Red Audio cables are color coded Red ...

Страница 16: ...ess the INPUT button on the remote control to scroll through the Video Input Channels until you see INPUT 1 in the channel banner See picture below for location Note You can set up the TV to automatically tune to the correct device you want to view This is called Auto Tuning See Chapter 3 for more information on Auto Tuning Input 1 Cable Input 16 9 Normal 1080i HD Listening to English in SRS MPAA ...

Страница 17: ...te audio video cables to the TV s output Connect composite audio video cables to the TV s AUDIO VIDEO OUTPUT jacks R and L Audio and Video and to the VCR s audio video input 4 Connect the supplied G LINK cable If you want to use one touch VCR recording and timed recordings you need to connect the G LINK cable Go to page 19 for more information Red Use one set of composite audio video cables to con...

Страница 18: ...ress the INPUT button on the remote control to scroll through the Video Input Channels until you see HDMI DVI displayed in the channel banner See picture below for location Note You can set up the TV to automatically tune to the correct device you want to view This is called Auto Tuning See Chapter 3 for more information on Auto Tuning HDMI DVI Cable Input 16 9 Normal 1080i HD Listening to English...

Страница 19: ...MI jack using an HDMI cable Connect an HDMI cable to the HDMI DVI INPUT jack on the back of the TV and to the HDMI Out jack on the back of the device OR Connect your device that has a DVI jack using an HDMI cable and an HDMI DVI adapter A Connect an HDMI cable to the HDMI DVI INPUT jack on the back of the TV B Attach an HDMI DVI adapter to the end of the HDMI cable then connect the adapter to the ...

Страница 20: ...onnection Connect the FIXED VARIABLE AUDIO OUTPUTS from the TV to an A V receiver using audio cables Be sure to go to the Fixed Variable Out screen in the Audio Connections menu and select whether you want the FIXED VARIABLE AUDIO OUTPUT jacks to send fixed or variable volume audio Go to page 69 for more information Variable Output provides variable level audio output Volume levels are controlled ...

Страница 21: ...t came with your TV but the one that came with the cable box and or VCR to which you re attaching the G LINK cable so that it is touching the front of the device 3 Slowly move the remote control across the front of the device VCR or cable box while you continually press the power button You must press and release the power button each time you move the remote holding down the button won t work Tip...

Страница 22: ...e turned on after the Power indicator goes off Put Batteries in the Remote Remove the battery compartment cover from the back of the remote by pushing down on the tab and lifting the cover Insert 2 fresh AA batteries Make sure the polarities and are aligned correctly with the polarities inside the remote Replace the cover Turn on the TV Press TV on the remote or press the Power button on the TV s ...

Страница 23: ...h this initial channel search can take several minutes it is important to complete in order for your TV to display channels and programming Make sure you have connected cable and or off air antenna to the corresponding inputs before you start channel search 1 Press the right arrow button to access the channel search screen then use the up and down arrow buttons to choose an option Press the OK but...

Страница 24: ...now if your TV is connected to cable Note If you re using a cable box always leave it on so you can receive program information 1 If your TV is connected to cable highlight Yes and press OK If your TV isn t connected to cable highlight No and press OK STEP 3 Configuring for Antenna appears go to page 24 2 If you have a cable box connected to this TV highlight Yes and press OK Note The next series ...

Страница 25: ...mote sensor on the cable box Go to page 19 for more information 7 Look at your cable box If it is still on and changed to channel 09 the test was successful Highlight Yes and press OK STEP 3 Configuring for Antenna appears If your cable box didn t change to channel 09 or turned itself off you have two choices No and Test this code again Test this code again If the G LINK wand is out of place posit...

Страница 26: ...here may be a slight delay before the setup screen appears Step 5 Configuring for a VCR 1 If your TV is connected to a VCR and you want the TV Guide On Screen system to work with your VCR for recording press OK a screen appears reminding you to connect your G LINK cable to your TV and VCR If you don t have a VCR or you don t want the TV Guide On Screen system to work with your VCR for recording hi...

Страница 27: ...e correct code for the VCR a list of troubleshooting instructions appear to help you before you try again Try VCR configuration again repeat VCR setup Test alternate codes tests selected brands and if this fails the test continues with all codes in the system Skip this step the TV Guide On Screen system won t be able to automatically schedule programs to record on your VCR Step 6 Confirming Your S...

Страница 28: ...e levels from your provider In most cases you will have at least two choices but in larger cities you may have several Selecting the provider and service level that you have allows the TV Guide On Screen system to download listings that precisely match the programming you receive If you aren t sure of your specific service you may need to repeat this procedure until you receive current program lis...

Страница 29: ...en displays Unusable signal You probably want to get rid of these so they no longer appear in your channel list Remove these in the Channel List menu Go to page 53 for more information Next Steps Now that you ve finished the Assisted Setup you re ready to watch TV This might be a good time to program your remote control The remote control that came with this TV can be programmed to operate other d...

Страница 30: ... s optical digital output jack fully complies with the international standard governing this type of jack IEC958 and is designed for connection to a Dolby Digital AC 3 or PCM receiver or decoder Older equipment some of which is not fully compliant with IEC958 may not be compatible with the Dolby Digital bitstream Such a connection using anything other than a Dolby Digital AC 3 or PCM receiver or d...

Страница 31: ...To ensure maximum picture quality use three video grade cables for the Y PB PR connections Accepts 480i 480p 720p and 1080i signals If you re connecting to a device with a Video jack instead you can still use the Y Video jack Note Also remember to connect the left and right audio cables because the Y Pb Pr cables carry only the picture signal not the sound S VIDEO Lets you connect an S Video cable...

Страница 32: ... is usually yellow Notes When recording from this output remember to tune to the channel you want to record If an unusual pattern appears when you connect a VCR to these jacks playing a tape or switching to the VCR s tuner removes the pattern FIXED VARIABLE AUDIO OUTPUTS SUBWOOFER Provides lower bass frequencies out from the TV to a powered subwoofer or audio receiver with a subwoofer jack Note Go...

Страница 33: ...panel layout The exact look may be different from the one on the front of your TV Front Panel If you cannot locate your remote you can use the front panel of your TV to operate many of the TV s features Note If you use the Front Button Block feature the front panel no longer provides access to the menus The Front Button Block feature disables all front panel buttons but not the jacks For more info...

Страница 34: ...This page left intentionally blank ...

Страница 35: ...nly 33 Chapter 2 Using the Remote Control Chapter Overview t The Buttons on the Remote Control t Programming the Remote to Operate Other Devices t How To Use the Remote After You ve Programmed It t Volume Punchthrough Feature t Using the INPUT Button t Remote Code List ...

Страница 36: ... battery power the light turns off after several seconds Backlight won t activate if batteries are low but blinks on and off quickly CC Closed Captioning Toggles closed captioning on and off if available for the channel you re tuned to When you change channels or inputs the default for Caption Display is restored CH or CH Scrolls up or down through the channel or input list Press once to change th...

Страница 37: ... temporarily changed and goes back to the original menu setting when you change channels or inputs or turn off the TV REVERSE PLAY FORWARD RECORD STOP PAUSE If programmed provides transport control for some remote controllable VCRs and CD and DVD players SAT CABLE Satellite Cable Places the remote in SAT CABLE mode If Auto Tuning is enabled turns on the TV and tunes it to the correct Video Input C...

Страница 38: ...te at the device 3 Press the corresponding device button in this example VCR 4 Press ON OFF to see if the VCR responds If the VCR doesn t respond you need to program the remote to operate it Programming the Remote There are two ways to program the remote control to operate other devices Automatic Code Search and Direct Entry Using Automatic Code Search Note The AUX HD button can only search VCR co...

Страница 39: ...ave either entered an invalid code or the button isn t programmable 5 Release the device button point remote at device and then press ON OFF to see if the device responds to the command If it doesn t try pressing the device button and then ON OFF again If you get no response repeat these steps using the next code listed for your brand until the device responds to the remote commands If you try all...

Страница 40: ...fter you ve successfully set up the Volume Punchthrough feature whenever the TV remote is in DVD mode press the DVD button and you want to adjust the volume you only have to press the VOL or VOL buttons Follow the instructions below to set up Volume Punchthrough 1 IMPORTANT First you must program the AUDIO button on the TV s remote control to operate your audio receiver or amplifier Go to page 36 ...

Страница 41: ... source Front Input DVD 4 3 Normal 480i SD Listening to English in SRS MPAA Not Rated 12 39 PM 12 30 AM 00 30 Acquiring Channel Remote Code List Audio Codes Programmable for the AUDIO and AUX HD buttons AUX Dimensia Lyra Wireless RCA 4004 Audio Cassette GE 4006 RCA 4006 Phono GE 4005 RCA 4005 Receiver Tuner AMP Aiwa 4008 4009 4010 4011 4012 4021 Denon 4027 GE 4003 Harman Kardon 4020 JBL 4020 JVC 4...

Страница 42: ...036 Curtis Mathes 2005 2009 2012 2014 2017 2018 2020 2060 2072 Daewoo 2011 2013 2015 2021 2022 2023 2056 Daytron 2056 Dimensia 2072 Electrohome 2010 2024 Emerson 2002 2008 2010 2011 2017 2020 2021 2022 2024 2025 2026 2027 2028 2039 2059 2061 2067 2069 2076 Fisher 2007 2019 2029 2030 Fuji 2003 2017 2062 Funai 2022 Garrard 2022 GE 2000 2001 2009 2017 2018 2060 2063 2072 Gradiente 2022 Harman Kardon ...

Страница 43: ...only 41 Chapter 3 Using the TV s Features Chapter Overview t About the Channel Banner t Digital or Analog TV Channels t About the TV Guide On Screen System t Parental Controls t How V Chip Works for the USA and Canada t Auto Tuning Feature t Emergency Alert System EAS ...

Страница 44: ...n SAP is playing for an analog channel For a digital channel displays the currently playing audio mode Also displays the audio processor in use SAP or Audio Mode changes with SOUND button 16 9 Normal 1080i HD Aspect ratio 4 3 or 16 9 original resolution of the broadcast not the resolution of the TV HD High Definition or SD Standard Definition For more information about aspect ratio and broadcast r...

Страница 45: ... and you want to enter subchannel numbers press the right arrow button to advance to the subchannel entry box 4 Enter the number of the subchannel This number appears in the subchannel entry box 5 Press OK to tune to the channel or wait a few seconds and the TV tunes to the channel Notes You can always use the channel up and down buttons on the remote control to change channels within the TV mode ...

Страница 46: ...e to turn on the TV You can turn off this feature by selecting Setup highlight Change default options and press OK Highlight General default options and press OK Press the down arrow button to highlight auto guide select off and press OK Also since the program information provided by the TV Guide On Screen system is based on your locale you will need to run Setup again if you move to a different Z...

Страница 47: ...ew highlight the program in the channel listings and press OK To quickly access a channel listing press the down arrow button to enter the channel listings area Use the number buttons to enter the channel The Shortcuts panel menu appears Press OK to view the channel To access an ATSC digital channel look for the subchannel under the channel in the Listings To use the Listings panel menu see the de...

Страница 48: ...or On time When start time is selected press the down arrow button to highlight end 4 Press the left or right arrow button to select a time you want recording to end The right arrow button goes forward in time the left arrow button goes back in time The time options are the same as in step 3 Press the down arrow button to highlight recorder 5 If you have more than one recording device press the ri...

Страница 49: ...s or choose No Press the down arrow button to highlight auto tune TV 4 For auto tuning to work the TV must be on at time of the reminder Press the right arrow button to choose Yes and the TV tunes to the channel with a set reminder or choose No Press the down arrow button to highlight when 5 Press the left or right arrow button to choose when you want the reminder screen to appear Choose an option...

Страница 50: ...on and the left or right arrow button if necessary to highlight Alphabetical 2 Press the down arrow button to access the letter area Use the arrow buttons while in the letter area to choose a letter to search 3 Press OK when you ve chosen a letter To search shows using a keyword 1 With Search highlighted press the down arrow button and the left or right arrow button if necessary to highlight Keywo...

Страница 51: ...on is available service Change your channel source Choose from options Cable Cable Box Over The Air or Antenna tune channel Change the channel number to the correct channel if your lineup is incorrect position Use the number buttons to enter where you want the channel to appear in the channel listings For example if you want channel 13 to be the first channel that appears in the listing enter 1 Ch...

Страница 52: ...mple Press the right arrow button to highlight the day option and use the same method as entering the month Press the right arrow button to highlight the year option Press the right arrow button when the date is entered to highlight start 3 Use the number buttons to enter the time you want the recording to begin If the time is 1 30 enter the hour by pressing 0 and 1 Press the right arrow button to...

Страница 53: ... and the TV tunes to the channel with a set reminder or choose No Press the down arrow to highlight frequency 5 Press the left or right arrow button to select a frequency Choose once to set a reminder one time weekly to set a reminder every time the show is on at the current day time and channel daily to set a reminder for the show every Monday Friday at that time and channel or off if you want to...

Страница 54: ...s off the rating limits the Locked List and blocking features The Unlocked List will be used instead of the Locked List Do you want to unlock the TV Point to Yes and press OK to unlock the TV Point to No and press OK to cancel Main Menu Parental Controls Video Input List Lock TV Go Back 2 1 0 USA V Chip Antenna Ch List Cable Channel List 5 4 3 Canada V Chip 6 V Chip Unrated 7 Front Button Block 8 ...

Страница 55: ...TV MA TV 14 etc and content themes Violence V Adult Language L etc If you have blocked the rating and or content themes that the program contains and the TV is locked and you tune to a program whose rating exceeds the rating limit you set you will receive a message telling you that the program is blocked from viewing Broadcasters are not required to provide content themes so programs received with...

Страница 56: ...sexual situations S or moderate violence V General Audience Most parents would find this program suitable for all ages It contains little or no sexual dialogue D or situations S no strong language L and little or no violence V Directed to Children 7 years and older Designed for children ages 7 and above It may be more appropriate for children who have acquired the developmental skills needed to di...

Страница 57: ... G 3 Press the OK button to toggle between Viewable and Blocked The status for the rating listed to the right and all higher ratings automatically change to Blocked and B 4 Select Lock TV from the Parental Controls menu Enter a password and re enter password a second time to confirm the password Blocking Specific Content Themes You can block programs based on their content When you block a content...

Страница 58: ...set movie MPAA rating limits by blocking movies rated above a specified rating How to block and view movie ratings is explained in the next two sections To access the V Chip Movie Rating menu 1 Press MENU on the remote control the Main Menu appears 2 Select Parental Controls 3 Select USA V Chip 4 Select V Chip Movie Rating Blocking Movie Ratings If you only want your child to watch movies that hav...

Страница 59: ...fanity or mildly suggestive language Could also contain brief scenes of nudity General Audience Programming considered acceptable for all ages groups While not designed specifically for children it is understood younger viewers may be part of the audience Violence guidelines will contain very little violence either physical or verbal or emotional Will be sensitive to themes which could frighten a ...

Страница 60: ...out ratings the Movie rating N A the USA TV rating None and the Canadian rating of Exempt E The TV must be locked for the V Chip Unrated feature to be enforced View Unrated and Exempt Programs Block Unrated and Exempt Programs Adults Programming is for adults only This program contains sustained violence or extremely violent scenes Viewers 16 and over Programming is not suitable for those under ag...

Страница 61: ...is if you don t have this particular device connected to the TV or if you don t want the TV to automatically tune to the correct channel when you press one of the device buttons on the remote Channel 2 3 or 4 Cable Input Device is connected to the CABLE INPUT jack on the back of the TV and you want the TV to tune to channel 2 3 or 4 when you press the corresponding button on the remote Reminder ma...

Страница 62: ...responding button Front Input Device is connected to the VIDEO IN jack on the front of the TV and you want the TV to tune to the front Video Input Channel when you press the corresponding button HDMI Device is connected to the HDMI DVI jack on the back of the TV and you want the TV to tune to this input when you press the corresponding button Emergency Alert System EAS The EAS works only if you ha...

Страница 63: ...s publication are for representation only 61 Chapter 4 Using the TV s Menu System Chapter Overview t Menus On Screen Help and Control Panels t TV Guide Menu t Picture Quality Menu t Audio Menu t Connections Menu t Preferences Menu ...

Страница 64: ...dio 3 Picture Quality 2 Go Back 0 Press OK or to access the TV Guide menu TV Guide On Screen See whatʼs on TV TV Guide Setup Set up the TV Guide On Screen guide TV Guide Label Turn the channel label logo on or off The TV Guide Menu has screens for accessing and adjusting the features of the TV Guide On Screen guide Main Menu TV Guide Menu 1 Not Connected Input 2 Not Connected Channel Search Signal...

Страница 65: ...he field 2 To enter time values such as the Wake Up Timer highlight the or field and press OK to change the time or simply use the number buttons To enter passwords you must use the number buttons On screen Menu Items The on screen menu items are used to access the information and or change the settings of the specific item highlighted Highlight the item with the up and down arrow buttons Then pre...

Страница 66: ...PUT button while in the Picture Settings menu until the correct Video Input Channel appears in the upper right corner 2 Press the right and left arrow buttons on the remote control to select the slider 3 Press the up and down arrow buttons to operate the slider The setting is changed and saved to the Input you re currently tuned Assisted Setup 7 6 Preferences Connections 5 4 Parental Controls Audi...

Страница 67: ...et picture settings Vibrant Day Natural Cinematic Night Videogame Professional and Personal Choose your setting based on the degree of lighting in your room After you select a preset the settings listed to the right are adjusted automatically If you choose Personal you can customize each picture quality setting to your desired level and a message appears asking if you want to save those settings A...

Страница 68: ... edge transitions in the video with steeper edges This creates a picture with sharper edges A change in this screen is applied to Input 2 Advanced Settings The Advanced Settings option lets you enhance picture performance and adjust picture position When you select Advanced Settings a submenu appears with options Film Mode Automatically detects video sources that were originally recorded on film a...

Страница 69: ...red in memory in case you switch from Fixed Output back to Variable Output Speakers On Note Equalizer Presets are stored for each input All other audio feature settings are stored globally across all inputs and not per input Audio Processor The Audio Processor displays a choice list of available audio modes which control the way the sound comes through your speakers when the TV is set to using the...

Страница 70: ...an option then press OK to select it Press 3to return to the menu Turning Sound Logic on will monitor a program s audio track and limit volume excursions to a minimum and maximum volume range from the current volume setting Acting like a dynamic range limiter it compresses the dynamic range to limit sudden volume increases for example the sudden increase in volume you sometimes hear when a commerc...

Страница 71: ... Output the TV s volume control graphic equalizer and mute are disabled This output is ideal when connecting to an audio receiver or amplifier that has its own remote control for controlling the volume Is an external subwoofer connected to the Subwoofer Output This option only appears when Variable Output Speakers On is selected Select Yes if you want the low frequency audio sent from the SUBWOOFE...

Страница 72: ...as screens for specifying and optimizing the connections inputs to the TV TV Guide Menu 1 Connections Menu The Connections menu specifies various ways to adjust the inputs to your television Items in the Connections menu are Signal Strength Channel Search Signal Source Video Input Setup Auto Tuning and Special Features Signal Strength This screen lists any antenna channel EVER added to the TV The ...

Страница 73: ...e OK button on the remote to read more text If more than one link appears use the arrow buttons to highlight the one you want To exit the screen press CLEAR on the remote CableCARD Reset If you experience problems with your digital cable try resetting your digital cable card Press the right arrow to select Reset and then press the OK button on the remote If problems persist contact your cable comp...

Страница 74: ...an independently control two RCA TVs that are near each other simply by changing the mode of the remote A third RCA TV can be added to the same location and controlled separately if it has this screen and is set up to respond to a remote mode that is different than the first two RCA TVs Diagnostic Info This screen allows cable and TV installers to view details helpful to them during installation a...

Страница 75: ...Display Go Back 5 4 3 2 1 0 Caption Style Caption Priority Digital Captions Main Menu4Preferences4Closed Captioning Use the digital captions if available otherwise use analog Use the analog captions at all times Press 5 or 6 to point to an option then press OK to select it Press 3to return to the menu A digital TV program may include analog TV captions and digital TV captions either one of the two...

Страница 76: ... the screen Caption Color Allows you to choose the font color White Black Red Green Blue Yellow Magenta and Cyan Background Color Allows you to choose the background color White Black Red Green Blue Yellow Magenta and Cyan Background Opacity Allows you to change the see through background options Solid Transparent Translucent and Flashing Caption Opacity Allows you to change the see through captio...

Страница 77: ... 4 3 Time Menu Screen Format 2 Closed Captioning 1 Go Back 0 Main Menu Preferences 7 Lamp Power You can select from one of four colors for the menu system and the channel banner Sky Blue Emerald Raspberry Plum Press or to point to an option then press OK to select it Press to return to the menu Menu Language Color Scheme 4 3 Time Menu Screen Format 2 Closed Captioning 1 Go Back 0 Main Menu Prefere...

Страница 78: ... life of the lamp as compared to the Brighter Picture setting Choose a selection that best fits your viewing environment and intended usage of the TV This TV uses Lamp Type __ Please make a note of it for future reference Longer life Brighter Picture Menu Language Lamp Power Your HDTV is equipped with a special lamp system Eventually the lamp like a light bulb will need to be replaced and you ll n...

Страница 79: ...presentation only 77 Chapter 5 Other Information Chapter Overview t Frequently Asked Questions t Troubleshooting t Lamp Replacement Information t HDTV Specifications t Accessory Information t Limited Warranty t Care and Cleaning t FCC Information t Index ...

Страница 80: ...he first channel search take a long time If you ve checked each box in the channel search menu the TV is looking for all available channels in the channel list If you do have digital channels the TV is also searching for each subchannel of that digital channel How do I control other devices I ve connected to the TV Because your TV came with a universal remote you can program your remote to the but...

Страница 81: ...nt of the TV If the TV turns on check the remote control solutions on page 82 Remote Setup might be set to the wrong option Press MENU OK on the front panel Select Connections then Special Features then Remote Setup Choose TV default Power indicator is blinking or flashing If the light blinks 5 times pauses and blinks again 5 times the lamp is trying to turn on If the TV doesn t turn on after 5 mi...

Страница 82: ...l down cycle the TV turns back on and you ll hear audio but the picture will take a few moments to be displayed Unusual sound quality Check the Graphic Equalizer SRS and Sound Logic settings Check if SAP is turned on Check that the Audio Mode is set to your language Humming or buzzing noise The TV is in its lamp cool down cycle To prolong the life of the TV s lamp system the TV must warm up and co...

Страница 83: ...more instructions TV Guide On Screen System Problems Every time I turn on the TV the TV Guide On Screen system is on the screen The TV Guide On Screen system automatically appears on the screen when you use the TV button on the remote to turn on the TV You can turn off this feature Go to page 49 for instructions TV Guide On Screen setup won t turn off tape for VCR setup and or channel 02 cable box...

Страница 84: ...DVI device is having trouble sending video information to the TV Re connect your device Reset the power by unplugging the power cord and plugging it back in Contact the manufacturer of the HDMI or DVI device for further assistance 480i signals aren t supported by the HDMI DVI input The Remote Control Doesn t Work Something might be between the remote and the remote sensor on the component Make sur...

Страница 85: ... blinks 5 times again If the TV doesn t turn on after 5 minutes and then the light blinks steadily for one minute the lamp may be dead If you have any concerns please contact us at 1 866 723 6486 or call an authorized servicer in your area Note The same symptoms occur if the lamp unit isn t seated correctly or lamp access door is ajar If you have recently accessed the lamp make sure the lamp acces...

Страница 86: ...lution Screen Yes Edge Enhancement Off Low High Green Stretch Off Low High Hybrid Lens System Yes Picture Presets Vibrant Day Natural Cinematic Night Videogame Professional Personal Light Engine Type DLP Light Engine Picture Screen Pitch Screen 155mm Scan Rate Converter Yes Vertical Viewing Angle Alpha V 20 Horizontal Resolution Picture Width 1280 Horizontal Viewing Angle Alpha H 80 Wide Band Vide...

Страница 87: ...em Yes Picture Reset Yes in Menu Picture Memory Presets for Video Inputs Yes Individual Memory Clock Time Sleep and Wake Up Timers Yes Front Panel Stereo Headphone Jack 3 5mm Stereo Mini jack Front A V Input Composite Back Panel Inputs Outputs Composite A V Inputs 1 Component video Syncroscan with Autodetect Composite S Video and L R Audio 2 sets Antenna Cable Inputs 2 RF HDMI DVI Input with Audio...

Страница 88: ... each end for connecting S Video devices to your TV VH976 6 ft 7 95 VH913 12 ft 14 95 HDMI Cable has HDMI connectors on each end for connecting HDMI devices to your TV PD12HDMI 12ft 84 95 HDMI DVI Adapter has one end the connects to an HDMI cable and the other end connects to a DVI cable DT2HDA 49 95 Subwoofer cable helps you connect to a device with an Subwoofer In jack such as a audio receiver P...

Страница 89: ...rized Service Center If not you must take your unit to the Service Center location at your own expense or pay for the cost the Service Center may charge to transport your unit to and from your home Proof of purchase in the form of a bill of sale or receipted invoice which is evidence that the product is within the warranty period must be presented to obtain warranty service For rental firms proof ...

Страница 90: ...er Connect the equipment into an outlet on a circuit different from that to which the receiver is connected Consult the dealer or an experienced radio TV technician for help This Class B digital apparatus complies with Canadian ICES 003 Limitation of Warranty THE WARRANTY STATED ABOVE IS THE ONLY WARRANTY APPLICABLE TO THIS PRODUCT ALL OTHER WARRANTIES EXPRESS OR IMPLIED INCLUDING ALL IMPLIED WARR...

Страница 91: ...et 71 Service Details 8 slot 28 Tools menu 71 CableCARD Tools 71 Cable box remote codes 39 Cable Channel List 52 CABLE INPUT jack 29 Canada English ratings 58 French ratings 58 V Chip unrated program 58 Canada V Chip 57 Captions Analog 73 Background color 74 Background Opacity 74 Color 74 Digital 73 Font 74 Opacity 74 Size 74 Caption display 72 Caption priority 73 Caption style 74 Care and Cleanin...

Страница 92: ...ver 18 Personal picture setting 65 Picture Quality menu 64 Picture quality menu Advanced Settings 66 Auto color 65 Color warmth 65 Contrast Expand 66 Edge Enhancement 66 Green Stretch 65 Noise reduction 65 Picture presets 65 Picture settings 64 Picture Settings 64 PLAY button 35 Power button 31 indicator 20 Power light flashing 83 Power surges 8 Preferences menu 72 Analog captions 73 Captions Prio...

Страница 93: ...chedule 50 Search 48 Setup 21 49 Set recording 46 Set Reminder 47 TV problems 79 U USA V Chip TV ratings 53 V V Chip 52 Age Based Ratings 53 Blocking age based 55 Blocking Movies 56 Canada 53 57 Content Themes 53 USA 53 USA TV ratings 53 Viewing age based rating 55 V Chip rating screen 54 V Chip unrated program 58 VCR button 35 VCR remote codes 40 Vertical Position 66 Vibrant picture setting 65 VI...

Страница 94: ...This page left intentionally blank ...

Страница 95: ...This page left intentionally blank ...

Страница 96: ...ed marks are trademarks of THOMSON S A used under license to TTE Corporation Printed in USA TOCOM 16577850 Please do not send any products to the Indianapolis address listed in this manual or on the carton This will only add delays in service for your product Visit the RCA Scenium website at www rcascenium com ...

Отзывы: