background image

16

2

1

4

Cassette deck controls and operations

RECORDING FROM the TV,
VCR or VIDEO

Your system is capable of recording audio from a TV program, VCR tape or
videotape.

1.

Insert a cassette into Deck 1.

2.

Choose the function - TV, VCR or Video.

3.

Choose the TV program or segment of  VCR or videotape you
want to record.

4.

Press RECORD on the tape deck to ready it and then PAUSE
on the tape deck.

5.

Press PLAY to release the tape whenever you are ready to begin
recording.

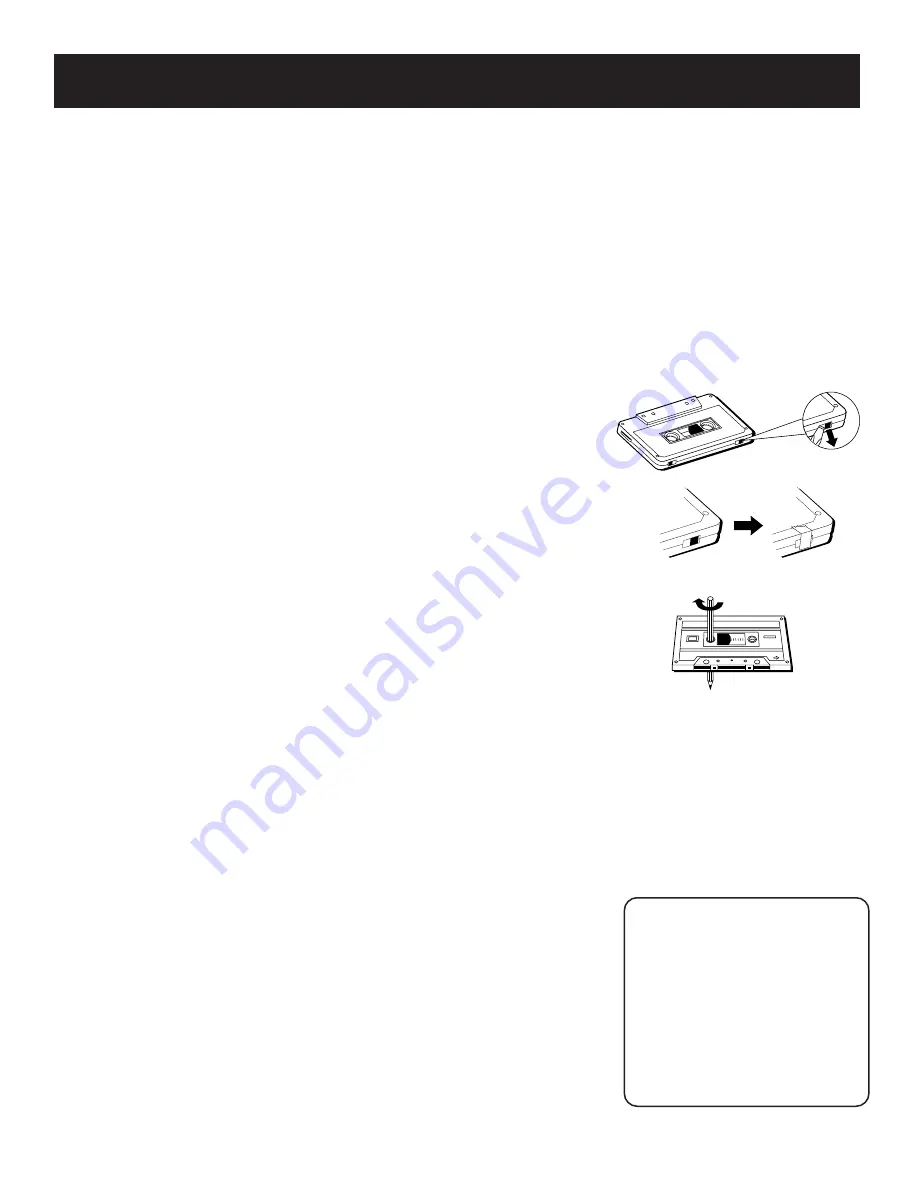
Erase Protection

When you record new material, the cassette deck records over whatever is on
a tape. To protect a tape from accidental erasure, break off one or both
plastic tabs - one for each tape side - on the top of the cassette tape. If you
decide later to record on the tape, seal the hole with a piece of cellophane
tape.

Quit Slacking

A little bit of slack in your tapes can cause scratches on the tape, or worse
yet, the tape could break. If you notice some slack in the tape, use a pencil
to tighten it up before you insert it.

We’re on the Level

The built-in Automatic Level
Control automatically sets the
input level for optimum
recording sound. You can
listen to and even adjust the
volume setting of the radio
without affecting the quality
of the recording - just don’t
change the station.

A

A

A

A

60

A

Содержание RP-9380

Страница 1: ...USER S GUIDE RP 9380 AUDIO SYSTEM ...

Страница 2: ...evision equipment that is receiving interference Move the unit away from the equipment that is receiving interference Plug the unit into a different wall outlet so that the unit and the equipment receiving interference are on different branch circuits If these measures do not eliminate the interference please consult your dealer or an experienced radio television technician for additional suggesti...

Страница 3: ...General Controls 11 Display Messages 12 LOADING DISCS 13 Playing Discs 13 Skipping Discs 13 cassette deck controls and operations 14 General Controls 14 Playing CASSETTE Tapes 14 Recording FROM THE RADIO 15 RECORDING FROM THE CD PLAYER 15 RECORDING FROM TAPE TO Tape 15 recording from the TV VCR or video 16 USING THE universal REMOTE control 17 Battery Installation 17 General Controls 17 programmin...

Страница 4: ...d locations subject to moisture mechanical vibrations shock or excessive heat Choose a location with adequate air circulation Good ventilation is essential to protect the system from internal heat build up central unit main speakers surround speakers center speaker remote FM antenna AM antenna Be a Pack Rat It is a good idea to keep the box and all of the packing materials your system came with in...

Страница 5: ...r speaker as close as possible to the same height as the left and right main speakers You should also try to align all three speakers or set the center speaker slightly behind the left and right mains Placing the center speaker forward of the left and right mains is not an option as this will distort the sound for those listeners not seated in the center of the room THE surround speakers Placement...

Страница 6: ...nnel and left and right rear channels simultaneously in that order 2 As the pink noise is generated go to the spot in the room where you are most likely to be when listening to your system The rear surround and center speakers should be adjusted to equal the level of output from the left and right main speakers 3 Make adjustments by pressing the REAR CTR button and then the button on your remote c...

Страница 7: ...e connection procedures as those for your speakers After connecting the antennas extend them to their full length and adjust their positioning for better radio station reception Antenna Hookup Setting up the system A SAMPLE SET UP FOR SURROUND SOUND ENJOYMENT Rear Left Main Right Center Opt Subwoofer Main Left Rear Right TV 45 degree angle surround speakers 300 ohm FM ANTENNA GND AM ...

Страница 8: ... use a video cable to connect the VIDEO OUTPUT jack on the back of your TV to connect to the MONITOR OUT jack on the back of your audio system Connecting for power Plug the power cord into an AC power outlet that accepts the polarized plug one blade wider than the other NOTE The STAND BY indicator light will come on to let you know the system is plugged in and ready to use This light will stay on ...

Страница 9: ...PE TV VCR 1 and VCR2 LD which corresponds to the VCR2 LD on the remote VOLUME The VOLUME dial regulates the level of audio output To increase output rotate the dial to the right To decrease output rotate the dial to the left TUNING The TUNING UP and DOWN buttons allow you to find the radio station of your choice PRESET The PRESET UP and DOWN buttons allow you easy access for up to 24 preset radio ...

Страница 10: ...ecreate the feeling of being where the sound is coming from whether you are watching a movie or listening to a CD It utilizes the main and surround speakers BYPASS The Bypass mode utilizes just the main speakers CENTER mode The CENTER MODE button lets you select the Normal Phantom or Wide mode These modes are only available when Dolby Pro Logic or Dolby 3 Stereo are active NORMAL The NORMAL mode c...

Страница 11: ...round speakers only when the system is in Dolby Pro Logic Hall or Simulated modes BALANCE BASS TREBLE You can manually set the level of balance bass and treble on your system only when it is in the Custom Preset mode Otherwise the levels are automatically adjusted based on the active Preset mode Display messages The following is an example of all the display messages you may encounter while using ...

Страница 12: ...r that you can only receive FM stations in stereo if they are being broadcast in stereo Programming presets Your system is capable of holding up to 24 preset radio stations in memory 8 from FM1 8 from FM 2 and 8 from AM for as long as the unit is plugged in and up to two weeks after AC power has been removed 1 Choose the radio station and band you wish to store 2 Press the MEMORY button to activat...

Страница 13: ...REPEAT will flash in the display if your choice is to repeat the whole disc or the entire programmed play sequence Program Only one disc at a time can utilize the Program mode but up to 20 tracks can be programmed to play in whatever sequence you choose RANDOM The RANDOM button allows you to play all the tracks on the current disc in a random sequence RANDOM will show in the display NOTE Your syst...

Страница 14: ...will continue spin To start the disc playing from where it was paused press the PLAY or PAUSE button Stop The STOP button immediately ends disc activity You may stop a disc when it is in Play or Pause mode Track The TRACK forward and reverse buttons allow you to scroll through the tracks on a disc or a program list and chose the one you want to hear If in the Play Pause or Stop mode and pressed on...

Страница 15: ... list Press the REPEAT button while the system is in the mode you desire Play Program or Random to activate your choice Simultaneous playing and loading While a CD is playing you can press the OPEN CLOSE button and load change remove idle CDs PROGRAMMING LISTS You must be in Stop mode to program your play order 1 Press the DISC SKIP button to choose the desired disc 2 Press the PROGRAM button PROG...

Страница 16: ...itself off PAUSE Press to interrupt the Play or Record mode Press PLAY to resume activity If a deck is paused for more than three minutes it will automatically shut itself off Playing Cassette Tapes You can play cassettes from either of the two tape deck 1 Press the Tape function button to activate the cassette deck The Tape LED will light 2 On the cassette compartment door press and release where...

Страница 17: ...e into Deck 1 NOTE The system will enter Dubbing or High Speed Dubbing mode only if both tape decks are occupied However the system will not enter either mode if the erase protection cap of the cassette in Deck 1 has been removed 3 Press the DUB dubbing button 4 Press only one of the flashing PLAY buttons on either deck to begin recording 5 Press STOP at any time to stop recording NOTE Pressing PA...

Страница 18: ...ds over whatever is on a tape To protect a tape from accidental erasure break off one or both plastic tabs one for each tape side on the top of the cassette tape If you decide later to record on the tape seal the hole with a piece of cellophane tape Quit Slacking A little bit of slack in your tapes can cause scratches on the tape or worse yet the tape could break If you notice some slack in the ta...

Страница 19: ...d down Tunes the TV channel up and down CLEAR Removes any menu from the screen DISPLAY Displays channel information GUIDE RDM For some models brings up 12 small pictures previews of the next 12 channels in the channel list Press again to turn off channel guide INPUT SEEK For some TV models toggles through the available input sources MENU PROGRAM For some models stores channels in the TV s memory M...

Страница 20: ...0 seconds before returning to the original channel Press repeatedly to increase the time STOP Stops a tape VCR1 Turns on the VCR and puts the remote in VCR1 mode VCR2 LD For some VCR models if programmed turns on a second VCR and puts the remote in VCR2 mode Laserdisc Player Controls CHAN up and down v Changes to the next higher or lower track on the laserdisc FF Scans forward on the laserdisc Num...

Страница 21: ... Press RECORD and then PLAY to begin recording To record from the Tape deck 2 to TAPE DECK 1 1 Insert the prerecorded tape you want to record from into deck 2 2 Insert a blank tape into deck 1 3 Using the TAPE button to select deck 2 4 Press RECORD to ready the decks 6 Press the TAPE button to select deck 1 and press PLAY 7 Quickly press the TAPE button again to select deck 2 and then press PLAY t...

Страница 22: ...ithout effects using just the main speakers REAR CTR LEVEL Adjusts the balance of the rear and center speakers in conjunction with the buttons To access preset stations 1 Press the AM FM button to select the tuner 2 Press the AM FM button again to select FM1 FM2 AM 3 To access your preset choices press CHAN up and down v To Manually tune stations Use the FF button for tuning up and the REW button ...

Страница 23: ...brand and its code number s in the code list in appendices or on the code sheet packed with the remote For your satellite receiver look up the brand and corresponding code number s in the list to the right 3 Press and hold the DSS CABLE button on the remote 4 Enter the three digit code from the code list 5 Release the DSS CABLE button then press POWER or CHAN up or down v to see if the cable box r...

Страница 24: ...e remote commands Programming the AUX button You can program the AUX button on the remote to control another component The AUX button can be used to control other brands of audio components TVs cable boxes satellite receivers and VCRs To program the AUX button follow these steps 1 Turn on the component and find the brand and corresponding code number s in one of the code lists in the appendices 2 ...

Страница 25: ...he tray contains a disc Make sure that discs labels are facing up Make sure that Pause mode is not activated Make sure CD function is selected CD sound skips Clean the disc as explained in Care and Maintenance Check disc for warping scratches or other damage Check for vibration or shock that may affect the CD player Move system if necessary Distorted or noisy recordings Inspect the recording head ...

Страница 26: ...tz 011 013 027 069 Memorex 005 MGA 006 011 014 019 022 027 041 056 061 068 Mitsubishi 006 011 014 019 022 027 041 055 056 061 068 MTC 011 019 027 Multivision 081 NAD 018 023 NEC 011 014 019 027 038 084 Panasonic 012 013 038 086 111 Philco 006 007 010 011 013 016 019 027 033 035 037 038 043 087 089 Philips 002 006 007 010 011 013 016 033 035 037 038 043 066 073 Pioneer 011 027 045 062 093 Portland ...

Страница 27: ... 008 Memorex 008 009 012 015 MGA 004 027 Midland 032 Minolta 005 035 Mitsubishi 004 005 027 035 040 Montgomery Ward 006 MTC 007 015 Multitech 007 015 031 032 NEC 002 014 016 030 044 046 059 061 064 Panasonic 008 053 075 077 Pentax 005 035 044 Pentex Research 046 Philco 008 029 053 056 Philips 008 029 Pioneer 005 016 050 Portland 044 045 052 ProScan 000 Quartz 002 Quasar 008 053 RCA 000 005 007 008...

Страница 28: ...8 019 021 026 028 029 032 033 040 041 NSC 009 Oak 001 016 038 Oak Sigma 016 Panasonic 003 027 039 061 Philips 007 008 019 021 026 028 029 032 033 040 041 Pioneer 018 020 044 Randtek 007 008 RCA 000 027 Regal 003 012 013 Regency 002 033 Samsung 044 Scientific Atlanta 003 022 035 063 064 Signature 046 Sprucer 027 Starcom 046 Stargate 2000 058 Sylvania 011 059 Teknika 006 Texscan 010 011 059 Tocom 01...

Страница 29: ... damage to the disc surface Tape Care Do not expose tapes to sunlight or store in hot places High temperatures may warp the shell or damage the tape itself Keep cassettes in their boxes when not in use Cassette tapes can be erased by magnetic fields produced by magnets electric motors electrical transformers and other devices Keep tapes away from magnets and magnetic fields Cleaning the Tape Heads...

Страница 30: ...29 Cleaning the exterior 29 Connecting antennas 5 Connecting auxiliary components 6 Connecting for power 6 Connecting the speakers 3 connecting the wires Connecting for power 6 Component connection 6 Controls tuner 7 CD 11 cassette deck 14 D DISC SKIP 11 Display messages tuner 9 Display messages CD 12 E EQ MODE 9 F FM MODE 7 First things first 2 Front panel display 9 FUNCTION BUTTONS 7 G General c...

Страница 31: ...5 Recording from the radio 15 Recording from tape to tape 15 Recording from TV VCR video16 Remote cable codes 26 Remote control use 17 Remote TV codes 24 REPEAT 11 Repeat play 13 s Sample set up for surround sound 5 Satellite receiver controls remote 20 SEARCH 11 Setting up for surround sound 3 main front speakers center speakers surround speakers subwoofers Setting up the system 3 Simultaneous pl...

Страница 32: ... Drive El Paso Texas 79906 Pay any charges billed to you by the Exchange Center for service not covered by the warranty Insure your shipment in case of loss or damage Thomson accepts no liability in case of damage or loss A new or refurbished unit will be shipped to you prepaid freight What your warranty does not cover Customer instruction Your Owner s Manual provides information regarding operati...

Отзывы: