RCA RFRF472 - великолепный продукт с бесплатным пользовательским руководством. Скачайте руководство пользователя для RCA RFRF472 с нашего веб-сайта, чтобы насладиться всеми преимуществами этого продукта. manualshive.com - лучшее место для загрузки.
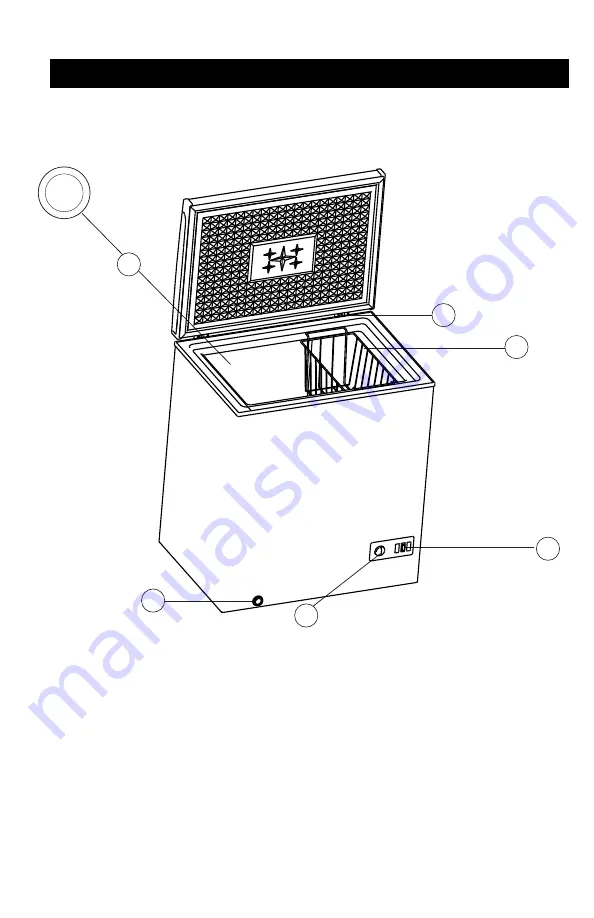
Parts And Features
1. Interior Drain Plug (See Insert)
2. Hinges
3. Vinyl Coated Wire Basket
4. Temperature Control
5. Exterior Drain Plug
6. Compressor On Indicator
3
6
2
1
5
4
Страница 1: ...er license by Curtis International Ltd RCA Trademark Management or its affiliates RCA the RCA logo the two dogs Nipper and Chipper logo are registered trademarks or trademarks of RCA Trademark Any other product service company trade or product name and logo referenced herein are neither endorsed nor sponsored by RFRF472 ...
Страница 2: ...r freezer before cleaning or before making any repairs Note If for any reason this product requires service we strongly recommend that a certified technician performs the service 6 Do not use any electrical device or any sharp instrument in defrosting your freezer 7 If your old freezer is not being used we recommend that you remove the doors This will reduce the possibility of danger to children 8...
Страница 3: ...y as you can 10 This freezer should not be recessed or built in an enclosed cabinet It is designed for freestanding installation only 11 Do not operate your freezer in the presence of explosive fumes SAVE THESE INSTRUCTIONS DANGER Risk of child entrapment Before you throw away your old refrigerator or freezer take off the doors Leave the shelves in place so that children may not easily climb insid...
Страница 4: ...Parts And Features 1 Interior Drain Plug See Insert 2 Hinges 3 Vinyl Coated Wire Basket 4 Temperature Control 5 Exterior Drain Plug 6 Compressor On Indicator 3 6 2 3 1 5 4 ...
Страница 5: ... a floor strong enough to support it fully loaded When moving the freezer never tilt it more than a 45 degree angle This could damage the compressor and the sealed system If the freezer is tilted let it stand in an upright position for at least 24 hours prior to plugging This is to allow the refrigerant to settle Proper Air Circulation To assure your freezer works at the maximum efficiency it was ...
Страница 6: ...nditions If it is necessary to use an extension cord use only a 3 wire extension cord that has a 3 blade grounding plug and a 3 slot outlet that will accept the plug The marked rating of the extension cord must be equal to or greater than the electrical rat ing of the appliance DO NOT USE EXTENSION CORD LONGER THAN 12 FT Install Limitations Do not install your freezer in any location not properly ...
Страница 7: ...the temperature level you select The temperature control dial has 7 settings plus ON 1 is the warmest 7 is the coldest Set the dial to 4 and allow 24 hours to pass before adjusting the temperature to your needs fig 1 For faster freezing capability The first time you turn the unit on turn the temperature control dial to ON and run for at least 2 hours then turn dial to 4 Note If the freezer has bee...
Страница 8: ...s advisable to let ice and frost melt Remove frozen food from the freezer and place it in a cooler to protect the food Unplug the unit Defrosting usually takes a few hours To defrost faster keep the freezer door open For draining place a tray beneath the outer drain plug Unscrew and remove drain plug This will let the water flow out in the tray When done screw on the drain plug in place Note monit...
Страница 9: ...he drying out of the improperly packaged food Follow package or container instructions for proper storage Packaging Recommendations Plastic containers with air tight lids Heavy duty aluminum foil Plastic wrap made from saran film Self sealing plastic bags Do not refreeze defrosted thawed foods It is recommended that the freezing date be marked on the packaging These are some suggestions for safe s...
Страница 10: ...d with warm water Use sponge or soft cloth dampened with the cleaning solution to wipe down your freezer Rinse with clean warm water and dry with a soft cloth Do not use harsh chemicals abrasives ammonia chlorine bleach concentrated detergents solvents or metal scouring pads SOME of these chemicals may dissolve damage and or discolor your freezer Door Gaskets Clean door gaskets every three months ...
Страница 11: ...od in freezer Clean freezer before reusing Vacation and Moving Care For long vacations or absences empty food from freezer unplug the unit and clean the door gaskets according to General cleaning section Prop doors open so air can circulate inside When moving always move the freezer vertically Do not move with the unit lying down Possible damage to the sealed system could occur WARNING IF OUTAGE I...
Страница 12: ...unit Make sure temperature control is not set to ON setting for extended period of time Food temperature is too cold If temperature control setting is too cold adjust to a warmer setting and allow several hours for temperature to adjust Compressor runs too frequently This may be normal to maintain constant temperature during high temperature and humid days Doors may have been opened frequently or ...
Страница 13: ...chiens Nipper et Chipper sont des marques déposées ou des marques déposées de marque RCA Gestion et sont utilisés sous licence par Curtis International Ltd Tout autre produit service entreprise commerce ou produit nom et le logo mentionnés aux présentes ne sont ni approuvés ni sponsorisés par Gestion de marque RCA ou de ses filiales RFRF472 ...
Страница 14: ...on de la fiche ou de l extremite du connecteur 5 Debranchez votre congelateur refrigerateur avant de le nettoyer ou avant de le reparer Note Si pour n importe quelle raison cet appareil exige un service de reparation nous recommandons avec force qu un technicien certifie execute le service 6 N utilisez aucun dispositif electrique ou aucun instrument aigu pour degriver votre congelateur refrigerate...
Страница 15: ... ne doit pas etre encastre ou incorpore dans un plac ard enclos Il est concu pour une installation sans encastrement 11 N operez pas votre unite en presence des fumees explosives VEUILLEZ CONSERVER CES INSTRUCTIONS DANGER Risque d occlusion d enfant Avant que vous jetiez votre vieux réfrigérateur ou congélateur enlevez les portes Laissez les étagères en place de sorte que les enfants ne puissent p...
Страница 16: ... Rallonge 6 Caractéristiques du Congélateur et Utilisation 7 Utiliser le Congélateur 7 Caractéristiques Générales 7 Casiers de Rangement pour Aliments 8 Dégivrage et évacuation de l eau 9 Informations sur le Rangement des Aliments 9 Bruits de Fonctionnement lors d une Exploitation Normale 9 10 Entretien et Nettoyage du Congélateur 10 Nettoyage et Maintenance 10 Coupures de Courant 11 Entretien lor...
Страница 17: ...éristiques 1 Le Bouchon intérieur d Egout Voir l insertion 2 Charnières 3 Le vinyle A Revêtu le Panier de Fil 5 Le Bouchon extérieur d Egout 6 Compresseur sur l indicateur 4 Ajustement de Régulation de la température 6 2 3 1 5 4 ...
Страница 18: ...ent résistant et capable de le soutenir lorsque ce dernier est complètement rempli Lorsque vous déplacez le congélateur veillez à ne jamais le pencher plus de 45 En effet vous risquez d endommager le compresseur et le dispositif scellé Si le congélateur a été penché laissez le debout en position verticale pendant au moins 24 heures avant de le brancher afin qu il revienne à son état de fonctionnem...
Страница 19: ...non chauffé et ne présentant aucune isolation par ex garage etc Ce congélateur n a pas été conçu afin de fonctionner à une température inférieure à 55 F 12 C Choisissez un endroit adéquat présentant une surface dure à l écart des rayons du soleil et de toute source de température telles que radiateurs radiateurs de plinthe appareils de cuisson etc Corrigez toute inégalité du sol L usage de Rallong...
Страница 20: ...ur Après 24 heures d utilisation réglez le congélateur sur le réglage désiré Si vous débranchez le congélateur ou en cas de coupure de courant attendez 5 minutes avant de rebrancher le congélateur Caractéristiques générales voir fig 1 Bouton de réglage de température Le congélateur demeurera automatiquement à la température que vous avez sélectionnée La commande de température comporte 7 positions...
Страница 21: ...r la surface de la porte Des marqueurs effaçables de remplacement peuvent être achetés dans les papeteries Vous devez uniquement écrire sur la surface avant de la porte Les autres surfaces de l appareil telles que l habillage de la porte la carrosserie et l intérieur ne sont pas faites pour que l on écrive dessus NE placez PAS d objets sur le haut du congélateur pour éviter de l endommager Entrepo...
Страница 22: ... Retirez le bouchon d évacuation d eau situé à l intérieur du congélateur Le dégivrage prends quelques heures Pour dégivrer plus rapidement veillez à ce que la porte du congélateur demeure ouverte ...
Страница 23: ...oir la mort Attention Avant d utiliser des produits de nettoyage veuillez toujours lire et suivre attentive ment les instructions du fabricant ainsi que les avertissements afin d éviter toute blessure et ne pas endommager le congélateur Nettoyage général Préparez une solution de nettoyage à base de 3 ou 4 cuillères à soupe de bicarbonate de soude mélangées avec de l eau tiède Utilisez une éponge o...
Страница 24: ...temps inspectez puis jetez la nourriture avariée du congélateur Nettoyez le congélateur avant de le réutiliser Entretien lors des Vacances ou d un Déménagement Videz le congélateur avant de partir en vacances Faites levier afin que les portes demeurent ouvertes et que l air puissent circuler à l intérieur Si vous déménagez transportez le congélateur verticalement Ne pas transporter le congélateur ...
Страница 25: ...ongélateur Réglez la commande de température sur un réglage plus froid La Température des Aliments est Trop Froide Si la température est trop froide placez la commande de température sur un réglage moins froid et patientez plusieurs heures avant que la température remonte Le congélateur se met en marche trop fréquemment Ceci est probablement normal afin de maintenir une température constante lorsq...