background image

4

menu

chan


+

vol

power

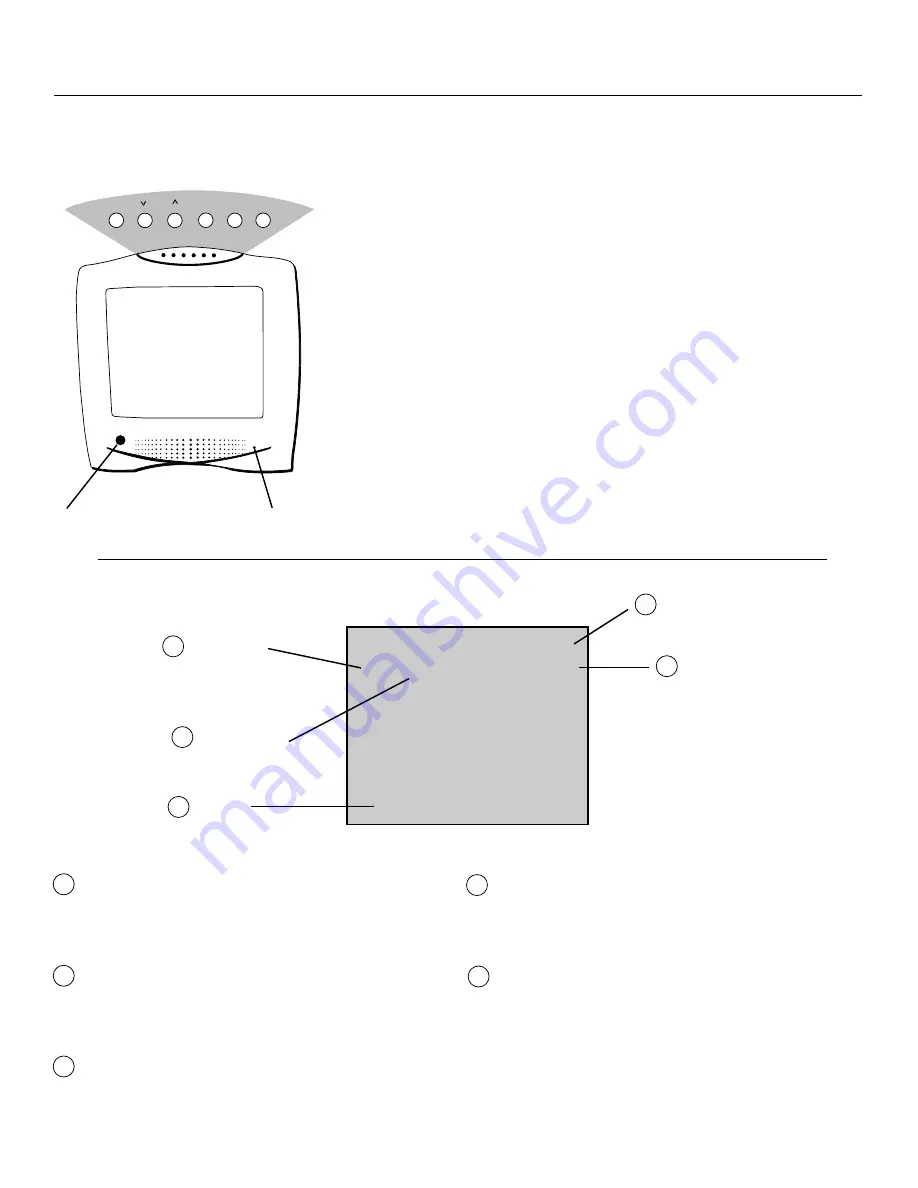
Front Panel

Shown here are the front-panel buttons.

Controlling Your TV

Remote Sensor
• When using the remote control, point it

toward this sensor.

Headphone Jack
• You can plug an optional set of head-

phones into this jack for private
listening.  When headphones are
attached, the sound comes through the
headphones instead of the TV speaker.

• If the plug on your headphones does not

fit the jack, adapters are available at
your local electronics supply store

MENU Button

• Press repeatedly until the item you want

is highlighted, then press + or  to enter
the menu.

• Press repeatedly to move down each

menu screen and then press + or  to
adjust each setting.

• To mute the TV, press once and then

press +.

CH 

and 1

1

1

1

1  Buttons (Channel Up and

Down)

• Press CHAN 

2

2

2

2

2 to see the next higher

channel in memory.

• Press CHAN 

1

1

1

1

1 to see the next lower

channel in memory.

• You can add or erase channels in

memory as desired.  Details are on page
12.

VOL 

and 

 Buttons (Volume Up and

Down)

• Press VOL 

+

 to increase volume, or

press VOL 

 to decrease volume.

• Press 

 or 

+

 to adjust the setting of an

item that is highlighted in the menu.

• The volume display will automatically

appear on the screen when you press the
VOL buttons.

POWER Button
• Press to turn the TV on or off.

Remote Sensor

Headphone Jack

                                         13
SLP ALM                 7:17PM 

MUTE        

1

Sleep Timer

2

Alarm Timer

5

Channel Number

4

Time

MUTE

3

Sleep Timer
This display appears when the sleep timer has been set.
Details are on page 10.

Alarm Timer
This display appears when the alarm timer has been set.
Details are on page 11.

MUTE
This display appears when the TV’s sound is muted.  Press
MUTE on the remote.  Details are on page 6.

1

2

3

Time
This display appears after the clock is set whenever you
change channels or press DISPLAY.

Channel Number
This display appears whenever you change channels or press
DISPLAY.

4

5

On-Screen Displays

Содержание E13332

Страница 1: ...USER S GUIDE C O L O R T V ...

Страница 2: ...___ __________________________________________________________________ Operate TV only on 120 volts 60 Hz AC power normal house power FCC Regulations state that unauthorized changes or modifications to this equipment may void the user s authority to operate it i This symbol indicates important instructions accompanying the product This symbol indicates dangerous voltage inside the product that pre...

Страница 3: ...ack 4 On Screen Displays 4 Remote Operation 5 6 Operating Features VIDEO Menu 7 Closed Captioning 8 Languages English French Spanish 8 SETUP Menu 9 Sleep Timer Operation 10 Alarm Timer Operation 11 Autoprogramming Channel Memory 12 Editing Channel Memory 12 Connecting Your TV Antenna Cable Information 13 Dipole Antenna Connection 13 Home Antenna Connections 14 Cable TV Connections 15 Cable TV Oper...

Страница 4: ...ent 4 Replace the cover 3 Connect antenna or cable TV system Most antenna or cable TV systems can be connected as shown here Details for connecting a home antenna to your TV are on page 14 Details for connecting a cable TV system to your TV are on pages 15 16 4 Plug in the TV Plug in the TV matching the wide and small blade of the plug with the outlet ANTENNA Incoming Cable from Antenna or Cable T...

Страница 5: ... to highlight EDIT CHANNELS Press to select EDIT CHANNELS Select the desired channel number by pressing the CHANNEL up or down button or by pressing two number buttons Then press to add a channel or press to erase a channel Details are on page 12 Press CLEAR to remove the menu from the screen 7 Set the clock Press MENU repeatedly until SETUP is highlighted Then press to select the SETUP menu Repea...

Страница 6: ... 1 1 1 1 1 to see the next lower channel in memory You can add or erase channels in memory as desired Details are on page 12 VOL and Buttons Volume Up and Down Press VOL to increase volume or press VOL to decrease volume Press or to adjust the setting of an item that is highlighted in the menu The volume display will automatically appear on the screen when you press the VOL buttons POWER Button Pr...

Страница 7: ...number on the screen Press to see if the Sleep Timer and or Alarm Timer is set Press to remove menus from the screen SKIP SPEED OFF REW PLAY FF REC STOP PAUSE DISPLAY SLEEP MUTE PREV 1 2 3 4 5 6 7 8 9 0 TRACK F ADV CLEAR MENU RESET TV VCR CHAN V O L CHAN V O L SLEEP Button Sets TV to automatically turn off in 30 60 or 90 minutes MUTE Button Press to quickly reduce sound to minimum level Closed cap...

Страница 8: ...to access any channel number To select a channel press two number buttons For example press 0 then 6 for channel 6 To select a 3 digit number press and hold number button 1 until 1 appears on the screen Then press the other two numbers SKIP Commercial Skip Allows you to look at other channels during commercials using the CHANNEL buttons Each press adds 30 seconds The TV switches back to original c...

Страница 9: ... or press to decrease brightness The CONTRAST function adjusts the overall brightness and contrast of the picture Press or to select CONTRAST Press to increase or press to decrease contrast The TINT function adjusts the color of flesh tones Press or to select TINT Press to add more green tint or press to add more red tint The COLOR function adjusts the amount of color in the picture Press or to se...

Страница 10: ...upport a Text Mode Typically the Text Mode consists of program information weather bulletins local activities etc Closed captioning is not available on all channels or at all times Only specific programs are encoded with closed captioning information CC The on screen displays in this TV can be displayed in three languages English French and Spanish When you select a language most of the displays w...

Страница 11: ...page 11 After setting the CLOCK function the time is displayed on the TV screen whenever you change channels or press DISPLAY Press and hold to set the correct hours and to set the correct minutes Details are on page 3 1st SETUP Menu Screen Operating Features Press MENU until the second SETUP Menu appears When you press or to start the AUTOPROGRAM function the TV cycles through all channels and pl...

Страница 12: ...eep Timer display appears on the screen When this display appears press CLEAR to cancel the Sleep Timer if you want the TV to remain on 1 Press MENU until SETUP is high lighted Then press to select the SETUP menu 2 Press to select the length of time you want the TV to stay on Each press of the button adds 30 minutes Each press of the button subtracts 30 minutes 3 When finished the display disappea...

Страница 13: ...gram You may also set the timer for a special program that you might otherwise forget Once you set the Alarm Timer the TV turns on at the preset time stays on for one hour and then shuts off You may need to adjust the channel and volume level before activating the Alarm Timer The Alarm Timer turns on the TV to the TV channel station and the volume level that was selected the last time the TV was o...

Страница 14: ... at the right The first time you turn on the TV it cycles through all channels and places active channels into the channel memory You can then add or erase channels as desired by following the instructions in the Editing Channel Memory section at the right Follow these instructions to erase and add channels 1 Press MENU until SETUP is high lighted Press to select the SETUP menu 2 Repeatedly press ...

Страница 15: ...to connect the indoor antenna supplied with your TV only if you do not connect an outdoor antenna or a cable TV system Insert the antenna base into the pocketed slot on the back of your set Stand at the back of your set with the antenna twin lead facing you and press the base of the antenna into the slot until it locks in place Connect the ends of the twin lead to the Antenna Adapter supplied Conn...

Страница 16: ...sh on Antenna Mixer use only 193984 D Cables From Home Antenna s Cables From Home Antenna s Cable From Home Antenna Cable From Home Antenna If the antenna cable coming from your home antenna is a 300 ohm flat twin lead that carries only VHF channels 2 13 only UHF channels 14 69 or VHF and UHF channels connect it to your set like this If the antenna cables coming from your home antenna s are a 75 o...

Страница 17: ...his diagram if your cable company requires a cable box that can be controlled by remote control Follow this diagram if your cable company requires a cable box that cannot be controlled by remote control Back of TV ANTENNA A B IN OUT CABLE BOX A B C C C Back of TV The A position on the A B switch lets you select all non scrambled channels by the TV s remote The B position allows you to select scram...

Страница 18: ...led Cable TV Channels Some cable companies offer premium pay channels in which the signal is scrambled Descrambling these signals for normal viewing may require the use of a cable box which is generally provided by the cable company How you connect the cable box to your TV depends upon whether or not the cable box can be controlled by remote control If your cable box is remote controllable you wil...

Страница 19: ...lete other side also Detach Here OFF VCR1 TV AUDIO ON OFF VCR 2 CABLE REW FF STOP PLAY REC TV VCR PROG PAUSE SETUP DISPLAY CLEAR ID 1 2 3 4 5 6 7 8 9 0 CHAN VOL MENU AUDIO VIDEO PC MUTE PIP SWAP FRZ MOVE Remote Control This is the remote that came packed with your TV You can use the order form to order it direct by mail if desired Optional Remote This remote not only controls your TV but can also ...

Страница 20: ...dard Time Use this number only to place an order for accessory items listed on this order form 1 800 338 0376 Most orders are shipped UPS within 72 hours of receipt If it is not possible to ship within 30 days we will notify you For mail order detach and mail the completed order form with credit card information money order or check in U S currency made payable to Thomson Consumer Electronics to t...

Страница 21: ...hen dry it with a soft cloth A mild soap may be used on the screen if it is extremely dirty Be sure to turn off the TV before cleaning the screen and do not allow liquid to run down the screen and inside the TV A special antistatic cleaning and polishing solution AH035 is available for use on most TV screens and non textured cabinets This non abrasive formula imparts brilliance repels static and r...

Страница 22: ...may have been activated because of a power surge Wait 30 seconds and then turn on again If this happens frequently the voltage in your house may be abnormally high Alarm function may be turned on Try another channel Maybe sound is muted Try pressing VOL up button to restore sound If headphones are connected sound from TV speakers will be muted Channel may not be in channel memory Try using number ...

Страница 23: ...e or first rental Pick up your television when repairs are completed What your warranty does not cover Customer instruction Your Owner s Manual clearly describes how to install adjust and operate your television Any additional information should be obtained from your dealer Installation and related adjustments Signal reception problems not caused by your television Damage from misuse or neglect Ba...

Страница 24: ...vec votre appareil vous pouvez en obtenir un INDIQUER LE NUMÉRO DE MODÉLE VOTRE NOM ET VOTRE ADRESSE en vous adressant à Thomson Électronique Grand Public du Canada Service des donnees techniques 6540 Tomken Road Mississauga Ontario Canada L5T 2E9 If your TV needs service please contact your dealer or the nearest servicenter Please do not send any products to the Indianapolis address listed below ...

Отзывы: