1
Copyright © 2020 RCA Communications Systems
www.RCACommunicationsSystems.com
Communications Systems
BRM350D Digital Mobile
Two-Way Radio
INSTRUCTION MANUAL
Congratulations and Thank You for selecting the BRM350D
mobile two-way radio from RCA Communications Systems
-
The most trusted name in radio!
Our newest digital series professional communications products
based on DMR technology establishes a benchmark in premium
digital two-way radio equipment, made to perform flawlessly under the
most demanding commercial conditions. Cutting edge design, high-
end professional grade materials and components, simple operation
and superior assembly quality: RCA Communications Systems has
it all, including our exclusive no-nonsense, three-year “Warranty
Protection Program,” one of the most comprehensive warranties in the
communications industry.
To ensure you achieve maximum performance from your BRM350D
mobile radio, please be sure to carefully read this manual.
MODELS COVERED IN THIS MANUAL:
• BRM350D VHF Two-Way Radio
• BRM350D
UHF Two-Way Radio
YEAR
WARRANTY
PROTECTION PROGRAM
CONTENTS:
Product Inspection
..............................................2
RCA BRM350D Mobile Overview
.......................2
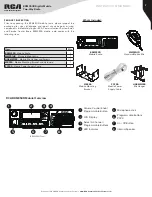
What’s Included
..................................2
Transceiver Installation
...............................3
Tools Needed ....................................3
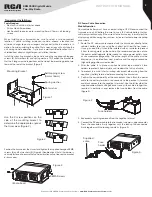
Installing Mounting Bracket ......................3
DC Power Cable Connection ........................3
Mobile Operation ........................3
Fixed Station Operation ...............................4
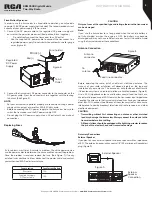
Replacing Fuses ............................................4
Antenna Connection ......................................4
Accessory Connections ............................4
External Speaker .........................................4
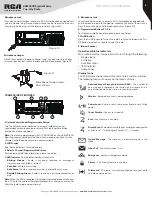
Microphone Jack ............................................5
Microphone Hanger .......................................5
Transceiver Features ....
....................................5
Operational Status Indicators ......................5
Display Icons ..................................5
Call Icons ..................................6
Sent Item Icons ..................................6
Audio Tones ..................................6
Making and Receiving Calls
..................................6
Receiving a Call ......................6
Transmitting a Call ......................6
Select A Channel ......................6
Setting the Squelch Level (Analog) ......................6
Switching Between Analog/Digital Mode
................6
Programmable Buttons
...................................6
Accessing Programmed Function/Menu ...........7
Keypad Mic (Optional MM301HDK)*...............7
Using Menu/Programmed Functions
.............7
Selecting a Zone ..............................................7
Selecting Radio Channel/Subscriber/Group ID....7
Receiving/Responding to a Radio Call ...............7
Receiving/Responding to a Group Call ............7
Receiving/Responding to a Private Call ............8
Receiving an All Call .......................................8
Monitoring a Channel (Analog) .......................8
Making a Radio Call .......................................8
Making a Call With Channel Selector Buttons ..8
Making a Private Call .....................................8
Making an All Call ...........................................8
Making Group/Private Call W/1 Touch Button ...8
Emergency Operation .....................................8
Initiating/Responding to Emergency Alarm ......9
Exiting Emergency Mode ...............................9
Advanced Features
..........................................9
Public Address ................................................9
Radio Check ..................................................9
Sending a Radio Check
.........................
..........9
Remote Monitor ...
.....................
......................9
Initiating Remote Monitor
......................
........9
Contacts Settings ...........................................9
Group Call from Contacts ..............................9
Private Call from Contacts
.......................
.......9
Call Indicator Settings/Call Tones ...................10
Call Tones for Text Messages ...........................10
Assigning Alert Tones ......................................10
Accessing the Call Log....................................10
Storing Alias or ID from Missed Call List..........10
Deleting a Call from the Call List........................10
Receiving & Responding to Call Alert..............10
Making Call Alert from Contact List................10
Text Message Features
.........................
...........11
Navigate to Message.......................................11
Receiving/Reading a Text Message ..................11
Managing Received Text Messages ..................11
Viewing Inbox Text Messages .........................11
Writing/Sending Text Message ........................11
Sending a Quick Text Message........................11
Managing Fail-to-Send Text Messages.............11
Resend a Text Message...................................11
Forwarding a Text Message.............................11
Managing Sent Text Message ...........................11
Viewing Sent Text Messages............................12
Deleting All Sent Messages from Sent Items .....12
Replying to an Inbox Text Message ...................12
Deleting a Text Message from Inbox ................12
Privacy
..............................................................12
Dual Tone Multi Frequency (DTMF) Analog
.......12
Security
............................................................13
Radio Disable .................................................13
Radio Enable ..................................................13
Scan Lists
..............................................................13
Viewing an Entry in the Scan List .....................13
Scan Instructions and Methods........................13
Starting and Stopping Scan ..............................13
Responding to a Scan........................................13
Deleting/Restoring A Nuisance Channel
.....13
Utilities
.................................................................13
Keypad Locked/Unlocked* ............................13
Keypad Tones* ..............................................14
Setting the Power Level................................14
Voice Operating Transmission (VOX) On/Off ....14
Controlling the Display Backlight
....................14
Talkaround
........................................................14
Turning Radio Tones/Alerts On or Off
...........14
Turning the LED Indicator On or Off
..............14
Turning the Introduction Screen On or Off
.....14
Accessing General Radio Information/Checking Radio ID
.......15
Care and Cleaning
...........................................15
Customer Support Contact Info
.......................15
Troubleshooting
........................................15
CONTENTS:
(continued)


