background image

4

ASSEMBLY AND SET-UP

PRE-RIDE CHECKLIST

1

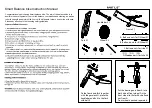
 Remove the four (4) coupling 

bolts from the front fork using 

a 5 mm Allen wrench and a 

10 mm wrench.

1

 Using two (2) 5 mm Allen 

wrenches, remove the four (4) 

coupling bolts from the frame.

2

 Insert the wheel assembly into 

the front fork and align holes. When 

installing the wheel, make sure the 

letter 

“F” and arrow

 (located on 

the side of the wheel) are facing the 

direction as shown above.

2

 Align the four (4) holes in seat 

with the four (4) holes in frame. 

Insert the coupling bolts through the 

top and bottom of the frame.

3

 Reinsert the coupling bolts 

through the front fork and 

tighten securely.

3

 Tighten the coupling bolts using  

two (2) 5 mm Allen wrenches.

 Attaching the Front Wheel

Required Tools:

 5 mm Allen Wrench and 10 mm Wrench

 Attaching the Seat

Required Tools:

 Two (2) 5 mm Allen Wrenches

Need Help?

 Visit our website for replacement parts, product support, a list of authorized service centers in the US and customer service contact information 

at 

www.razor.com

. Please have the product I.D. code (located on the white label of your product) available for better assistance. Additional Customer 

Service contact information is listed at the back of this manual.

Wheels

Periodically inspect the wheels for excess wear.

Frame, Fork and Handlebars

Check for cracks or broken connections. Although broken 

frames are rare, it is possible for an aggressive rider to 

run into a curb or object and wreck and bend or break the 

frame. Get in the habit of inspecting your scooter on a 

regular basis. 

Hardware/Loose Parts

Check and secure all fasteners before every ride. Make sure 

the steering bolt and casters are tight. There should not be 

any unusual rattles or sounds from loose parts or broken 

components. If the unit is damaged, do not ride. 

Reference 

“Safety Warnings” on page 1 of this manual.

Safety Gear

Always wear proper protective gear, such as an approved 

safety helmet. Elbow pads and kneepads are recommended. 

Always wear closed toe shoes (lace-up with rubber soles) and 

keep shoelaces tied and out of the way of the wheels. NEVER 

RIDE BAREFOOTED OR IN SANDALS.

Laws and Regulations

Always check and obey any local laws or regulations.

Be Careful!

This product is not for aggressive or trick riding. Avoid steep 

inclines and don’t ride too fast — you can lose control and 

fall. Skateboard parks are not designed for young riders. Never 

ride in traffic or on the street and watch your surroundings for 

pedestrians, bikers, boarders and skaters.
Maintain a hold on the handlebars at all times.

Содержание Flash Rider 360

Страница 1: ... illustrations are for demonstration purposes only Illustrations may not reflect exact appearance of actual product Specifications subject to change without notice Please have your product along with the 22 character product I D code with you before contacting Razor for warranty assistance and or replacement parts Product I D Code _____________ ____________ ____________ ...

Страница 2: ... Elbow and kneepads long sleeved shirt and long pants are recommended Always wear closed toed shoes keep shoelaces tied and out of the way of the wheels Never ride barefooted or in sandals FAILURE TO USE COMMON SENSE AND HEED THE ABOVE WARNINGS INCREASES RISK OF SERIOUS INJURY USE WITH APPROPRIATE CAUTION AND SERIOUS ATTENTION TO SAFE OPERATION WARNING Riding the FlashRider 360 Caster Trike can be...

Страница 3: ...packed at the factory there should not be any problems even if the box has a few scars or dents Estimated Assembly and Set Up Time Allow up to 15 20 minutes for assembly WARNING DO NOT USE NON RAZOR PRODUCTS WITH YOUR FLASHRIDER 360 CASTER TRIKE The FlashRider 360 Caster Trike has been built to certain Razor design specifications The original equipment supplied at the time of sale was selected on ...

Страница 4: ... the Spark Bar left side into the spring mechanism Align the holes on the Spark Bar Handle with the hole on the spring mechanism and tighten the coupling bolt with a 10 mm wrench and a 5 mm Allen wrench 3 Securely tighten the longer coupling bolt on the rear frame using two 2 5 mm Allen wrenches 3 Be sure to properly align the slot on the headtube with the pin on the front fork as shown 3 Align th...

Страница 5: ...tion is listed at the back of this manual Wheels Periodically inspect the wheels for excess wear Frame Fork and Handlebars Check for cracks or broken connections Although broken frames are rare it is possible for an aggressive rider to run into a curb or object and wreck and bend or break the frame Get in the habit of inspecting your scooter on a regular basis Hardware Loose Parts Check and secure...

Страница 6: ...laceable cartridge and cause the trike to stop making sparks Worn out cartridges should be replaced Wheels and Bearings Under normal circumstances and conditions Razor wheels and wheel bearings are maintenance free Nonetheless it is the responsibility of the owner or guardian to periodically inspect the wheels for wear and tear the axle for proper tightness bearings for side to side play and for l...

Страница 7: ...el Complete x2 6 1 Rear Wheel Covers Right Left Upper Lower 6 2 Spring Washers Right Left 6 3 Casters Right Left 6 4 Axle Bolts 6 5 Wheels Right Left 7 Seat 7 1 Seat Coupling Bolts x4 8 Spark Bar Handle 9 Spark Bar 10 Spark Cartridge 11 Spark Cartridge Cover Keep your FlashRider 360 Caster Trike rolling for years with genuine Razor parts Visit our website to purchase replacement parts Specificatio...

Страница 8: ... 800 244 543 info funtastic com au Printed in China for Razor USA LLC Copyright 2003 2020 Razor USA LLC All rights reserved Razor and the Razor logo design are among the registered trademarks of Razor USA LLC in the United States and or select foreign countries FlashRider and the FlashRider logo design are trademarks of Razor USA LLC US_200803 WARRANTY Razor Limited Warranty The manufacturer warra...

Отзывы: