


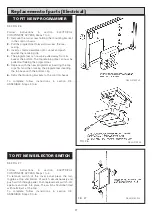


SEE FIG. 26
Follow instructions in section ELECTRICAL
COMPONENT ACCESS, Steps 1 to 4.
1.
Remove the two screw holding the mounting bracket
in the control chassis.
2.
Pull the programmer forward to access the rear
casing.
3.
Insert a small screwdriver into cut-out and push
against the retaining clip.
4.
The programmer can now be pulled away from its
base at the bottom. The top retaining clips can now be
pulled out freeing the programmer.
5.
Replace with the new programmer inserting the top
clips first and then locking the programmer inserting
the top base with the bottom clip.
6.
Refix the mounting brackets to the control chassis.
To complete follow instructions in section RE-
ASSEMBLE, Steps 3 to 6.
SEE FIG. 27
Follow instructions in section ELECTRICAL
COMPONENT ACCESS, Steps 1 to 4.
To remove switch of the cover panel press the two
toggles, at top and bottom of switch, simultaneously and
push switch through panel. Push replacement switch into
aperture and click into place. The switch should be fitted
with terminal 1 at the top.
To complete follow instructions in section RE-
ASSEMBLE, Steps 3 to 6.
Replacement of parts (Electrical)
17
TO FIT NEW PROGRAMMER
TO FIT NEW SELECTOR SWITCH
FIG. 26
FIG. 27
DESN 510559
DESN 510553 A
DESN 510552’A’
Содержание Heatranger 480GB
Страница 15: ...Replacement of parts Electrical FIG 20 DESN 511140 14...
Страница 23: ...Electrical Controls 22 CONTROL CIRCUIT BOILER FIG 30...
Страница 24: ...Electrical Controls 23 CONTROL CIRCUIT COOKER FIG 31...
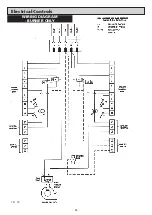
Страница 25: ...Electrical Controls 24 WIRING DIAGRAM BURNER ONLY FIG 32...
Страница 26: ...25 WIRING DIAGRAM APPLIANCE Electrical Controls FIG 33...
Страница 30: ...29...
Страница 31: ...30...
Страница 32: ......
Страница 33: ......


