
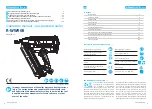


www.rawlplug.com
11
www.rawlplug.com
10
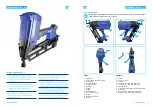
WW90 II
WW90 II
Before connecting the charger to the electrical
outlet, make sure that the mains voltage
corresponds to the voltage specified on the
device’s nameplate and the specifications
provided in the operation manual.
Use the original charger only, and charge only the
batteries specified by the manufacturer.
The original charger features double
insulation conforming with the EN 60745
standard, which is why no earth wire is required.
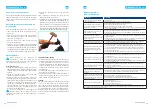
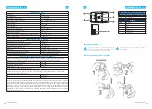
CHARGING THE BATTERY AND INFORMATION
ON THE CHARGER’S LEDS
The nailer features two Li-Ion batteries. A full
battery charge cycle takes up to 75 minutes.
If a charger without a battery in is connected
to the power supply, its red LED lights up for a
while and then changes to green.
Once the battery has been connected to the
charger, its red LED lights up.
When the battery is fully charged, the LED light
up green.
If the battery temperature is incorrect, the red
LED starts flashing at regular intervals. --In the
event of any battery problem, the red LED
lights up, and the battery must be replaced
immediately.
When a fully charged battery is connected to the
charger, the green LED lights up.
If any abnormal symptoms should occur during
battery charging, including overheating, smoke,
buzzing, etc., interrupt the battery charging
immediately and contact the service centre.
The batteries, the charger and the power
adapter should all be in good technical
condition, free of any mechanical damage,
to ensure safe and efficient charging.
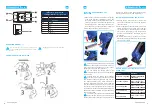
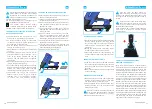
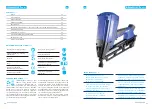
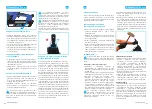
CHARGING AND DISCHARGING THE NAILER
Before charging the nailer with nails, connect the
battery and the gas container.
Loading a nail before connecting the battery may
cause incidental nail ejection.
When charging the nailer, point its muzzle away
from yourself and others, and never place your
finger on the trigger.
To the nailer with nails, slide tape 1 into the
magazine hole, and then push them upwards as
much as possible.
Move nail feeder 2 as indicated by the arrow
as much as possible until it is home, and then
release it. The feeder should stop at the end of
the nail tape, pressing them against the muzzle.
To empty the nailer of nails, press button 3 on the
nail feeder and move it upwards.
Press and hold nail lock 4, then slide the nails
towards the charging inlet, and release the lock
when the tape starts to slide over it.
Remove nails from the magazine.
3
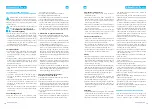
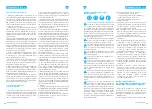
NAILING DEPTH ADJUSTMENT
The tool features a nail driving depth adjustment
function. Always perform a test fixing before
you start working. The test fixing should be
performed with the adjustment slider set in
position (1).
Change the nailing depth adjustment slider’s
setting to achieve the desired outcome.
If the nailing outcome (2) is not satisfactory, use
a nail of a different length and repeat the above
steps.
REMOVING TOOL MUZZLE JAMS
In the event that a nail gets jammed inside the
tool, disconnect the power supply (gas container
and battery) from the device before performing
any action.
Remove the magazine by pressing the right lever
on the nailer body.
DRIVING DEPTH ADJUSTMENT
This nailer features a driving depth adjustment
function. Test the driving depth on a scrap piece
of material before you start your work.
Driving depth can be adjusted with a knob. Keep
rotating the knob until you find your desired
driving depth setting.
NOTE! We do not recommend using the tool
with its nailing adjustment knob in extreme
settings (minimum and maximum), as this may
lead to malfunction of the device.
Once the nailer has been armed (i.e.
after connecting the battery and the gas
container, and inserting the nail tape), do not point
the nailer muzzle at yourself, any other person or
animal.
Do not hit nails or the material being fixing
and other elements with any part of the
nailer, as it is a precision tool and any impact can
adversely affect its operation.
When working with a cordless battery-powered
nailer, hold it securely and maintain a stable
working position.
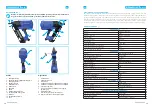
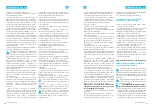
CONTACT ACTUATION AND ACTIONS
REQUIRED TO DRIVE A NAIL
The WW90II nailer operates in a contact (sequen-
tial) actuation mode, which means that before a nail
is ejected, the nailer must first be unlocked, which
is performed by pressing safeguard A on the muz-
zle against the material in which you are fixing. This
causes safeguard A to slightly retract towards the
tool, activates the ventilation fan and unlocks the
trigger via the lever, and a nail is not ejected until
the trigger is pulled. The contact actuation solution
applied in the tool prevents nails from being driven
in by pressing the nailer with safeguard A against
the material with the trigger pulled. This makes the
nailer a very safe tool to use. To drive another nail,
release the lock (move the tool away from the sur-
face of the working material) and the trigger before
repeating the above action. Before pulling the trig-
ger, make sure that the nail is to be driven directly
into the fixture. The tool must be positioned at a
right angle to the surface in every plane.
4
2
1
EN
EN
Содержание R-WW90II
Страница 39: ...www rawlplug com 73 WW90 II R WW90II 1 04 2020 AG34 90 C1 RU...
Страница 44: ...www rawlplug com 83 www rawlplug com 82 WW90 II WW90 II 7 C 19 F PH2 A 1 2 WW90II A A A 4 RU RU...
Страница 45: ...www rawlplug com 85 www rawlplug com 84 WW90 II WW90 II a b c d 1 a b c 2 a b c d e f A A A RU RU...
Страница 47: ...www rawlplug com 89 www rawlplug com 88 WW90 II WW90 II 50 C 120 F 2 RU RU...
Страница 48: ...www rawlplug com 91 www rawlplug com 90 WW90 II WW90 II 5 6 7 8 9 R RAWL GP6 1 2 3 4 RU RU...
Страница 69: ...www rawlplug com 131 www rawlplug com 130 WW90 II WW90 II 59 60 61 62 63 64 65 66 67 57 58...


