background image

E

1

D

C

B

A

2

3

4

5

6

7

8

9

10

D

C

B

E

A

6

7

8

9

10

1

2

3

4

5

ANSI B

Designed:

Date:

Raw Thrills, Inc.

5441 Fargo Ave.

Skokie, IL 60077

USA

rawthrills.com

tel: 847.679.8373
fax: 847.679.8538

TITLE

DWG

SHEET

SHEETS

REV

DESCRIPTION

BY

DATE

REV

A

B

C

D

E

F

INITIAL

MINOR EDITS

LED changes and additions

Changes to main harnesses

Production edits. Removed 811-00221-01

2022.04.05

2022.04.18

2022.07.06

2022.07.13

2022.09.01

JTN

JTN

JHM

JHM

JHM

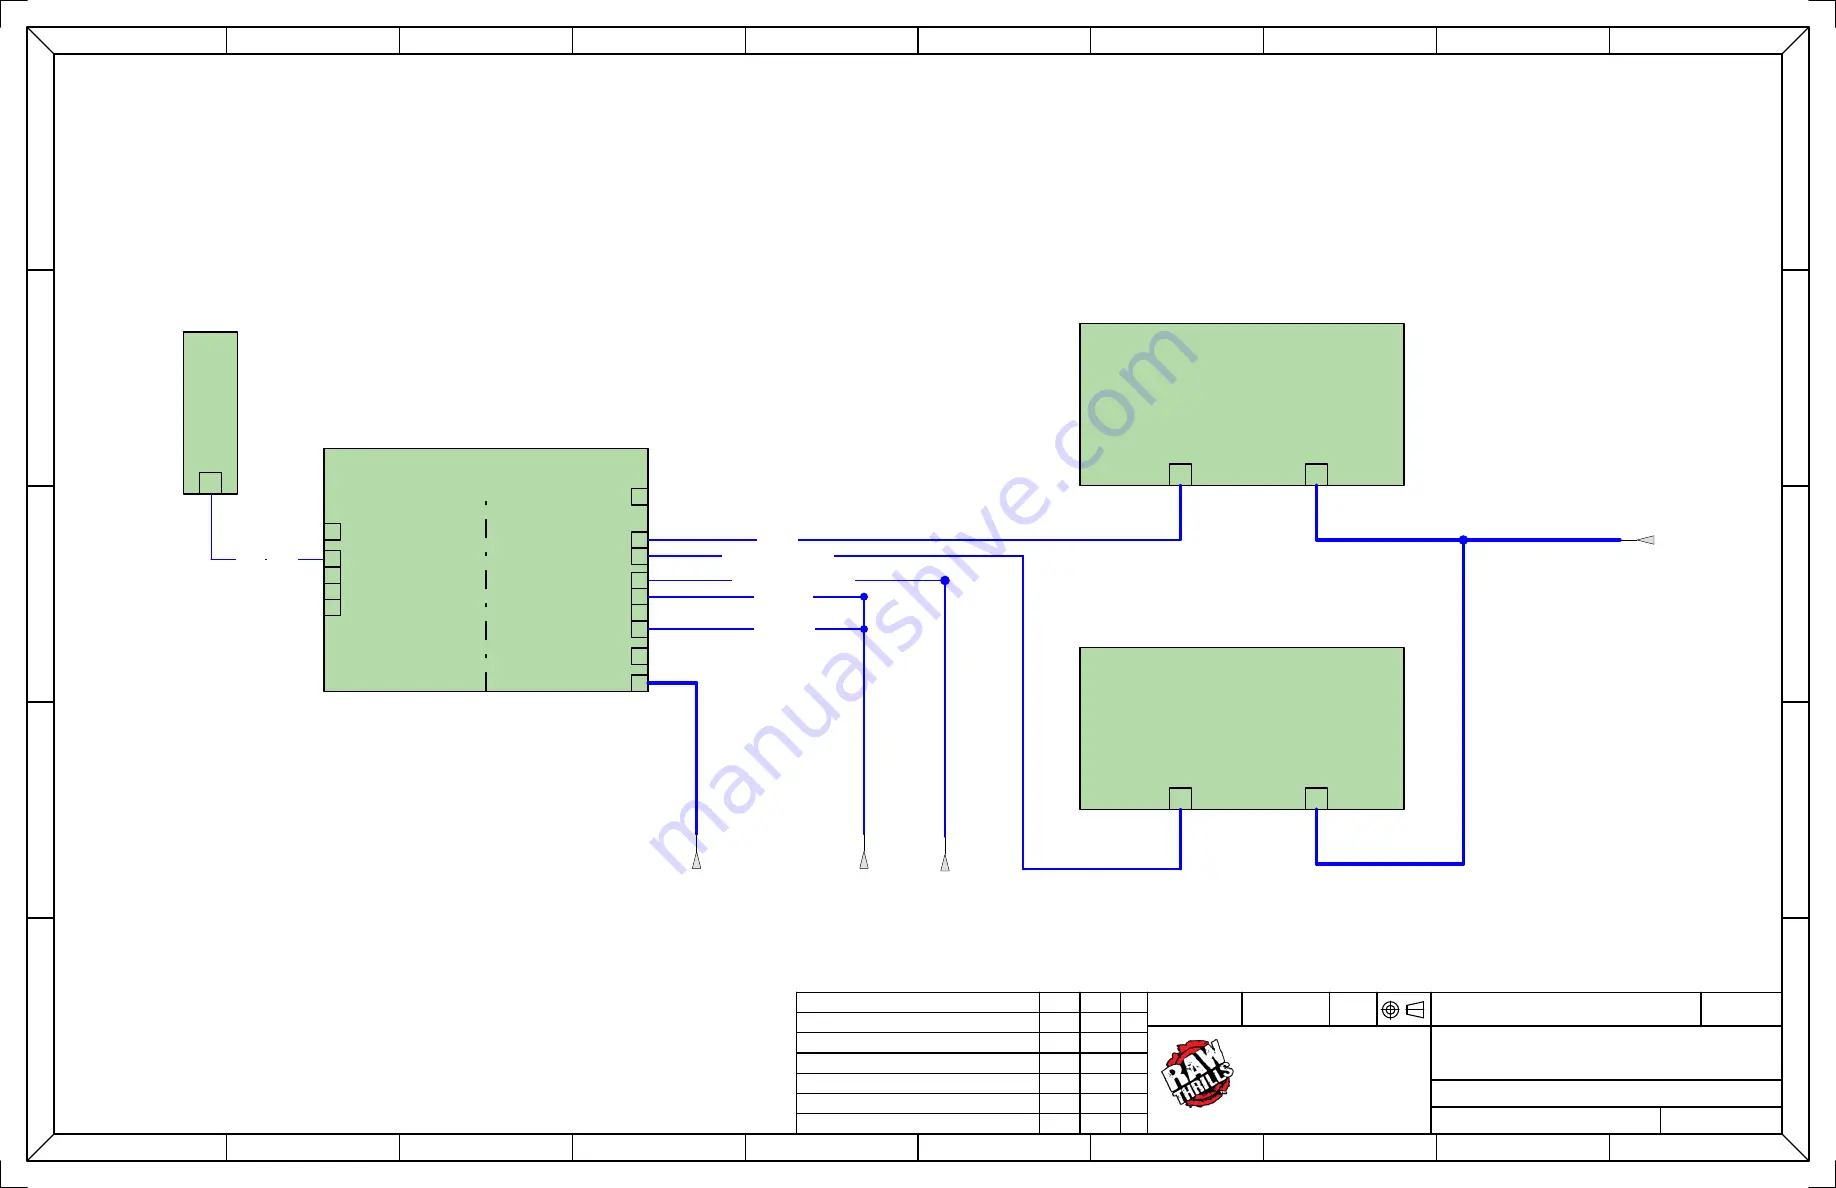
FAST AND FURIOUS ARCADE:

SYSTEM DIAGRAM

PC + monitors

6

6

JTN

2022.04.05

E

/1.J8

AC

VIDEO

AC

VIDEO

/1.G5

/2.J8

/4.G7

Security Dongle

TOP MONITOR

BOT MONITOR

WEB CAM

RIO2

AUDIO

AC

1

2

3

4

5

6

8

9

10

11

12

13

14

15

Lenovo M70t

65" Commercial LED Monitor

809-00016-01

65" Commercial LED Monitor

809-00016-01

Security Dongle

1

Security Dongle

FROM: AC SQUID (PAGE-1)

FROM: 

AC SQUID (P

AGE-1)

FROM: MAIN FRONT DOOR (P

AGE-2)

FROM: ENGINE BA

Y

 (P

AGE-4)

#740

USB

#741

USB

#742

USB

#745

WEBCAM_USB

HDMI

DVI <-> HDMI

Содержание Fast and Furious Arcade

Страница 1: ...90 12 825 040 00086 01 REV 4 Fast and Furious Arcade Operator s Manual Fast Furious Arcade 2022 Universal City Studios LLC All Rights Reserved Software 2022 Raw Thrills Inc ...

Страница 2: ...This Page Left Blank Intentionally ...

Страница 3: ...WATER AND OTHER LIQUID SOURCES 6 CONNECTORS 6 COMPUTER 6 VENTILATION 6 HAZARD TO EPILEPTICS 6 MANUAL 6 SPECIFICATIONS 7 Product Specifications 8 ELECTRICAL POWER 8 TEMPERATURE 8 HUMIDITY 8 DIMENSIONS 8 Fuse Replacement Guide 8 12V POWER DISTRIBUTION 8 Setup 9 SAFETY NOTICE 9 UNPACK MATERIALS 9 REQUIRED TOOLS 9 CABINET ASSEMBLY 10 Lower Monitor Installation 10 Top Monitor Mounting Bracket Installat...

Страница 4: ...UNG MONITOR SETTINGS 19 Diagnostic and Adjustments 20 BASIC FUNCTIONAL TEST ON INITIAL POWER UP 21 TEST MENUS 22 Main Menu 22 Diagnostics 23 Pricing Adjustments Cash 24 Pricing Adjustments Tokens 25 Pricing Adjustments Swipes 26 Game Settings 27 System Settings 28 Audits 29 Resets Menu 30 Volume 31 Calibration 32 Utilities 33 System Information 34 CHOOSING THE RIGHT PRICING ADJUSTMENTS FOR YOUR LO...

Страница 5: ...cing or making adjustments unless otherwise instructed Installing or repairing components while power is on can damage the components and void the warranty Grounding Avoid electrical shock Do not plug in AC power until you have inspected and properly grounded the unit Only plug into a grounded three wire outlet Do not use a cheater plug or cut off the ground pin on the line cord Electrical Shocks ...

Страница 6: ...es Ventilation It is critical that the game is installed in a manner that allows for proper ventilation and air flow Game must be installed such that there is a minimum amount of clearance between the wall or another game to allow good air circulation through the game cooling fans and vents Hazard to Epileptics A small portion of the population has an epileptic condition that may cause seizures Af...

Страница 7: ...l times while in motion Remain in the game until game comes to a complete stop o Do not attempt to reach for objects on the floor or near the game when it is moving Stay clear and stand at a safe distance while game is in motion o Small children should always be accompanied by a parent or guardian The machine is equipped with safety features which the operator and the player need to be familiar wi...

Страница 8: ...t not exceed 95 relative humidity Dimensions 8 10 H x 4 9 W x 9 11 D 271 15cm H x 145 42cm W x 302 90cm D Approximate weight 1100lbs 500kg Single cabinet setup recommended minimum floor space requirement 10 H x 8 1 W x 15 3 D 304 8cm H x 247 015cm W x 466 09cm D see pg 46 for diagram Twin cabinet setup recommended minimum floor space requirement 12 H x 12 10 W x 15 3 D 365 76cm H x 483 87cm W x 46...

Страница 9: ...or your safety and the safety of others Work only in an area with sufficient lighting and a clean level surface Unpack Materials 1 Place the shipping crate s on a flat stable surface 2 Cut the banding straps and remove the cardboard lids 3 Lift off the large cardboard containers surrounding the cabinet assembly and remove any shipping cleats 4 Remove the keys from the front dash 5 Check for shippi...

Страница 10: ...AIL A below included with the monitor mounting kit into the 4 mounting holes on the back of the monitor These spacers must be used to maintain a proper air space and keep the monitor from overheating 4 Set monitor up onto cabinet ledge line up with mounting slots in cabinet and hold monitor to face of cabinet as shown fig a below 5 Use 4 8Mx65MM screws fig a DETAIL A below with 1 washer on each sc...

Страница 11: ...strongly recommended that the game NOT be moved with the monitor installed in the operational upright position 1 Set top monitor mounting bracket in position on top of the main cabinet align 2 hole and 4 slots in bracket with the holes in the top of the cabinet Hold in place while finger tightening 4 20 x 1 screw lock and flat washer into holes in top of cabinet fig b Detail B below 2 Securely tig...

Страница 12: ... standoff spacers into the 4 mounting holes in the back of the monitor fig c below 3 Set hanger bracket in the position shown so the top mounting holes line up with the upper standoffs fig c below 4 Insert 2 8Mx50MM screws flat and lock washer fig c below and tighten hanger bracket to monitor securely DO NOT OVERTIGHTEN fig c Completed Assembly fig d ...

Страница 13: ...annel below fig e below 2 Install the lower 2 standoff spacers into the lower holes in the back of the monitor fig e below 3 Install 2 remaining 8Mx50MM screws flat and lock washer fig e below and tighten monitor to bracket securely DO NOT OVERTIGHTEN 4 IMPORTANT STEP Install 2 20x1 screws flat and lock washers fig e below to the top of the bracket to secure the upper monitor assembly fig e ...

Страница 14: ...nd feed AC cable down through the 2 center hole in top of cabinet fig f below 2 Install HDMI cable to top monitor in HDMI 1 and feed through side slot and center hole in cabinet top fig f below Connect to the HDMI port on the video card at rear of PC 3 Install the rear cover plate with 20 x screws and flat washers provided fig f Detail C below fig f ...

Страница 15: ...15 P a g e Cabinet Joiner Bracket Installation 1 Install the joiner bracket to main cabinet with 4 20 x 2 screws flat and lock washers fig g Detail D below 2 Set the cover plate to the side it is not needed at this time fig g ...

Страница 16: ...pan of the joiner bracket 3 Install 4 20 x 1 screws flat and lock washers to secure the motion base to the cabinet joiner bracket and main cabinet fig i Detail A below 4 With the cabinet in the desired location set all leg levelers on the cabinet and motion base in the down position 5 Use supplied 8 20 x screws lock and flat washers fig i Detail B below to secure the cover plate to the joiner brac...

Страница 17: ...https coin op org standardization for the latest UCL standard and manual information The UCL connections on the game use pins 1 2 6 8 and 9 The other pins are unused Each UCL connector can supply up to 1A at 12VDC You can choose to use 1 card reader in the pricing adjustments section of the test menu It is recommended to use 1 card reader for best results and player access There is 1 supplied conn...

Страница 18: ...city overload 20A 120VAC 10A 230VAC 2 Turn the main cabinet power switches on there are two switches GAME and COMPRESSOR 3 Calibrate the steering follow onscreen prompts 4 Calibrate the gas and brake pedals follow onscreen prompts 5 Calibrate the motion platform follow onscreen prompts 6 Calibrate the camera follow onscreen prompts MACHINE IS NOT OPERATIONAL WITHOUT FIRST CALIBRATING THE HARDWARE ...

Страница 19: ...elect Hello 3 Wireless Connection SKIP right arrow 4 Display Orientation Landscape 5 PlayVia Magicinfo SKIP 6 Connection to Magicinfo server SKIP 7 Set Date Time 8 Set PIN Save the PIN in a secure place as this will be needed in STEP 5 below 9 Select Done STEP 3 Press the SOURCE button on the remote Navigate to HDMI 1 STEP 4 Press MENU on the remote to enter the settings menu STEP 5 Verify the set...

Страница 20: ...tton Action TEST Not in Test Menu Enters Test Menu TEST In Test Menu Selects Highlighted Option SERVICE On Main Menu Exits Test Menu SERVICE Not on Main Menu Cancels Selection VOLUME UP Tunes Button Move Up VOLUME DOWN View Button Move Down Start Buttons Selects Highlighted Option Stop Motion Button Return to Previous Screen When in the Pricing Menu an on screen message acknowledges changes or whe...

Страница 21: ...nitor is working properly 3 Enter the Sound Test and verify the audio works and is not distorted 4 Enter the Light Test and verify that all the lights are working properly 5 Enter the Coin Meter Test and verify the coin meter is working properly 6 Enter the Watchdog Test and verify the game reboots 7 Upon a successful reboot you are ready to adjust pricing volume and other functions ...

Страница 22: ...menus here You can use the test menu bracket and volume buttons to navigate The View Tunes buttons also are available to use for easier navigation through these menus MAIN MENU DIAGNOSTICS PRICING ADJUSTMENTS GAME SETTINGS SYSTEM SETTINGS AUDITS RESETS VOLUME CALIBRATION UTILITIES SYSTEM INFORMATION EXIT ...

Страница 23: ...e connectivity between linked games Cabinet Lights Test Tests all LED cabinet lighting together and individually Wheel Force Feedback Test Test steering wheel force feedback Cabinet Motion Test Test the functionality of the motion platform Drain Valve Test Test the drain valve Meter Test Test the functionality of the mechanical coin meter inside the cabinet Ticket Test Test the functionality of th...

Страница 24: ...Currency Input Change the currency input Currency Type Change the currency type Coin Value Change the money value of the coin Coins to Play Adjust the amount of coins to start a game Coins to Continue Adjust the amount of coins to continue a game Coins to Upgrade Adjust the amount of coins to upgrade the player s car before the start of the race Max Credits Adjust the maximum number of credits Bon...

Страница 25: ...Currency Input Change the currency input Currency Type Change the currency type Token Value Change the money value of the token Tokens to Play Adjust the amount of tokens to start a game Tokens to Continue Adjust the amount of tokens to continue a game Tokens to Upgrade Adjust the amount of tokens to upgrade the players car before the start of the race Max Credits Adjust the maximum number of cred...

Страница 26: ...TYPE SWIPE VALUE SWIPES TO PLAY MAX CREDITS E TICKET MODE EXIT Freeplay Turn free play mode on or off Currency Input Change the currency input Currency Type Change the currency type Swipe Value Money value of the swipe Swipes to Play Adjust the amount of swipes to start a game Max Credits Adjust the maximum number of credits E Ticket Mode Turn E Tickets on or off default off ...

Страница 27: ...n must be set This allows players to scan a QR code after race to share their high scores on social media sites Additionally this enables QR player login during car select or track select so the player can view their achievements online along with saving their QR login info Upgrades Turn on or off default on When on this allows the players to purchase upgrades before the start of a race Auto Start...

Страница 28: ...abinets must be numbered in order from left to right This ensures gameplay elements display correctly Camera Settings Change settings for photo camera on or off Language Set in game language High Res Movies Play highest resolution movies possible Turn off if you experience stuttering Combine Attract Movies Combine attract movie screens across networked games LED Brightness Adjust the brightness of...

Страница 29: ...de 29 P a g e Audits Audit screen helps assess game performance find intermittent problems decide whether to adjust game difficulty and help maximize game earnings There are no special menu options for this test menu entry ...

Страница 30: ...FACTORY RESTORE EXIT Reset Credits Reset credits to zero 0 Reset Tickets Clears out all tickets owed on the game Reset Pricing Adjustments Reset all pricing settings to default Reset Game Adjustments Reset all game settings to default Reset Leaderboards Reset all high score tables Reset Game Audits Reset all game related audits Reset System Audits Reset all system audits Reset Coin Audits Reset al...

Страница 31: ...ts VOLUME GAME VOLUME ATTRACT VOLUME CREDIT VOLUME EXIT Game Volume Adjust the volume during gameplay from 0 to 20 Attract Volume Adjust the volume during the attract mode sequences from 0 to 20 Credit Volume Adjust the volume of the credit chime from 0 to 20 ...

Страница 32: ...Calibration of hardware CALIBRATION INPUT CALIBRATION MOTION CALIBRATION CAMERA CALIBRATION EXIT Input Calibration Calibrate the input POTS such as steering Motion Calibration Calibrate cabinet motion Camera Calibration Calibrate camera orientation ...

Страница 33: ...SYNC ADJUSTMENTS TO ALL CABINETS EXIT Copy audits logs scores to USB Copy all audits and diagnostics to USB drive View Message Log Examine logged messages from the game View Error Log Examine error messages from the game View Engine Log Examine game engine messages Sync Adjustments to All Cabinets Sync all game pricing and volume settings with all networked games ...

Страница 34: ...tion This screen allows you to see various information about the software and hardware Serial Number Software Revision Build Date RIO PCB RIO Firmware Dongle Version Cabinet Type Game Template There are no special menu options for this test menu entry ...

Страница 35: ...xample If the card swipe is worth 1 50 in your card system set the swipe value to 1 50 as well Coin Token Locations Make Sure Your Pricing Coin Value are Correct 1 Hold the Test Button for 2 seconds to enter the Test Menu 2 Select Pricing Adjustments from the menu 3 Select Currency Input from the menu 4 Select Cash or Tokens from the menu 5 Exit out of Currency Input menu 6 While back in Pricing A...

Страница 36: ... a Lenovo M70t Desktop PC above Lenovo M70t Desktop PC NOTICE WARNING DO NOT ENTER THE BIOS SETTINGS MENU Modifying the BIOS settings will cause your game to stop functioning In order to boot new security features verify the BIOS settings against factory settings including timestamp ...

Страница 37: ...om raw web login 1 With game and PC on verify that the RIO2 board has power If not see Troubleshooting 2 Open the upper back door of the cabinet 3 Insert the recovery USB thumb drive included in your game into an open USB port on the PC 4 Turn cabinet power switch to OFF Wait 30 seconds 5 Turn cabinet power switch to ON Wait for install menu to load 6 Once the install menu has loaded press the Tes...

Страница 38: ...switch on the button and re test Verify that the wires are connected to the correct spades on the micro switch Faulty wiring Disconnect the cabinet from AC power Verify that all wires are firmly connected to each button and the PCB Verify that no wires are frayed or improperly shorting to ground Verify that wires are connected to the correct spades on the micro switches Faulty PCB Ensure all conne...

Страница 39: ... verify audio is working at the computer disconnect the USB cable coming from the audio PCB and connect stereo headphones to the green computer audio port Constant low audio hum Faulty power supply Check external DC supply and the PC supply Open ground Check all ground wires in cabinet Ensure AC wall outlet is properly grounded RIO2 disconnected USB cable disconnected Check USB connection from PC ...

Страница 40: ...ontact your distributor for the latest software revision PC Drive test reports bad or missing files Game fails to finish loading After resetting game still reports an error Erratic game mode or attract mode WARNING Data files Corrupted Game Operation May Become Unstable Game Resets Bad file Run Flash Installer No Video PC not turned on Turn PC power switch on Ensure IEC cable tightly plugged in Tr...

Страница 41: ...s running Shut off cabinet via both switches at rear of cabinet Leave off for 3 minutes then power back on Onscreen message Version Mismatch appears after reinstalling updating software One or more cabinets is running a different version of software Enter test menu on each cabinet Check the version number in the top left corner Using the USB drive that came with your game or a USB drive from your ...

Страница 42: ...ossible Cause Solution Linked game monitor displays are not displaying linked attract properly Cabinets are number incorrectly Test menu System Settings Network Settings Verify that the cabinets are numbered from left to right in numerical order ...

Страница 43: ...distributor near you check the Raw Thrills website at www rawthrills com Betson s Raw Thrills Technical Support Hotline Phone 1 800 753 2513 FAX 1 201 438 5019 Email rtsupport betson com All Raw Thrills assembly and service videos rawthrills com assembly and service videos ...

Страница 44: ...53 Air Manifold Assembly Air Regulator Assembly Diagram Pg 54 I O and Hardware Board Assembly Diagram Pg 55 Twin Game Marquee Assembly and Installation Diagram Pg 56 Motion Platform Assembly Diagram Pg 57 Lower Base and Safety Bellows Assembly Diagram Pg 58 Motion Base and Pedestal Assembly Diagram Pg 59 Driver Cabinet and Dash Assembly Diagram Pg 60 Hood Deck and Speaker Assembly Pg 61 Audio Ampl...

Страница 45: ...6 5 5 56 7 6 21 7 5217 2 7 3 7 29 56 7 6 2 6 226 7 2 3 77 51 7 7 0 7 6 285 5 5 5 86 87 7 1 72 32 287 7 26 2 6 1 7 5 1 6 5 48 5 25 5287 1 7 528 6 3 7 86 1 67 3 5 7 25 7 2 6 5 200 1 1 620 6 6 02817 1 678 6 1 72 5 3 7 6 5 6 7 5 6 17 5 5 1 7 7 1 7 1 26 1 67 3 5 7 67 1 85 286 ARCADE 5 5 5 02817 1 ...

Страница 46: ... 48 5 25 6 1 81 7 5 200 1 25 5 5 66 FP 0 1 080 1 7 25 6 1 0 21 FP FP FP FP FP FP FP 5 200 1 0 1 080 5 1 21 3 5 5 5217 66 225 25 5 2035 6625 5 7 20321 176 5217 66 225 25 3 2 2 5 1 32 5 5 7 20321 176 67 1 85 286 5 6 1 0 23 5 7 21 0 16 216 ...

Страница 47: ... 0 2 1 5 5 7 66 0 6 67 1 85 286 5 6 1 0 66 0 5 0 723 021 725 66 0 6 ZLWK KDQJHU EUDFNHW LQVWDOOHG 27720 021 725 66 0 6 5 2035 6625 3 2 1 03 5 2 5 6 66 0 0 16 216 3352 0 7 727 7 6 0RWLRQ DELQHW OEV 0DLQ DELQHW ZLWKRXW PRQLWRUV OEV 0RQLWRUV OEV HDFK OEV 7RS 0RQLWRU UDFNHW 5HDU RYHU OEV DELQHW RLQHU UDFNHW RYHU OEV ...

Страница 48: ...6 783 7 0 548 FP LQ FP LQ FP 225 1 FP LQ FP 08 7 0 0 548 675 6 27 0 6 5 029 0 548 029 1 21 0 25 5 5 66 72 1 7 6 5 48 5 25 6 59 6 08 7 0 0 548 167 7 21 5 0 25 857 5 7 6 FP FP FP FP FP FP 5 200 1 0 1 080 5 1 21 3 5 5 67 1 85 286 5 7 2 08 7 0 23 5 7 21 0 16 216 1 83 72 0 6 9 225 685 6 5 ...

Страница 49: ... 548 5287 6 7 528 5 63 7 9 1 7 2 6 1 211 7 16 1 7 72 0 548 21 27 1 76 2 5 225 3 5 0 2 5 225 3 5 0 35 25 72 167 1 2256 167 7 1 1 7 1 0 6 1 7 528 6 276 1 1 7 2 225 3 5 21 3 5 7 2 5 5 9 2 0 548 66 0 67 1 85 286 08 7 0 6 783 1 0 548 167 7 21 7 5 1 9 8 0 6 783 6 203 7 0 6 5 1 1 7 72 27 5 1 9 256 5 2 5 7 0 548 167 7 21 1 203 7 6 2 2 6 ...

Страница 50: ...UDP DFN RRU 8SSHU 0DLQ DELQHW DFN RRU 8SSHU 0DLQ DELQHW DFN RRU RZHU 0DLQ DELQHW DFN RRU RZHU 0DLQ DELQHW HQRYR0 W HQRYR0 W 3 6WUDS VV 3 6WUDS VV 6 60 RDP 6KHHW IRU 3 RDP 6SRQJH 6HFXULQJ 1 ORQ 6WUDS 3ODWH RXEOH QOHW 6XE VV 6HH VVHPEO LDJUDP 6 6 6 6ROLG 6WDWH 5HOD 3 RRG OHDW 3RZHU LQH LOWHU VV 6HH VVHPEO LDJUDP LGH UDFNHW 0DLQ DE ORRU DXWLRQ 53 9 XDO 9ROWDJH 3RZHU 6XSSO XVHEORFN XVHEORFN 0DLQ DE UR...

Страница 51: ...O DVKHU B LQF 3ODWHG 6WHHO 6SOLW RFN DVKHU 8SSHU 0RQLWRU 0RXQWLQJ UDFNHW 5HDU 0RQLWRU RYHU SDQHO 3 1 1 725 87721 62 7 3 6 5 B 2 6 5 2 6 5 7B 6 5 5 2 7B 6 5 B H HDG 6FUHZ QFK HDG HOG 7 0 12 3 57 180 5 6 5 37 21 47 3URGXFWLRQ RLQHU UDFNHW RLQHU 3 HQV 0 LQ 6WULS 5 ZLWK IRDP WDSH 3URGXFWLRQ RLQHU UDFNHW RYHU B H RFN DQG ODW VV 6FUHZ Z RFN DQG ODW DVKHUV B RFN DQG 5HJ ODW VV B 6FUHZ Z RFN DQG ODW DVKHU...

Страница 52: ...RQ 2LO UHH OHFWULF LU RPSUHVVRU 9 6 86 LVWHG 6WDLQOHVV 6WHHO QGXVWULDO 4XLFN LVFRQQHFW RVH RXSOLQJ IRU LU DUEHG RPSUHVVRU WR 5HJXODWRU KRVH B 2 RQJ LU RVH 7 5 5 8 725 66 1 5HJXODWRU UDLQ RVH B 2 RQJ LU RVH 5HJXODWRU WR 0DQLIROG RVH B 2 RQJ LU RVH RPSUHVVRU OLQH WR 3XUJH 9DOYH 2 RQJ LU RVH 0DQLIROGB B LWWLQJB VV 6HH VVHPEO LDJUDP 7XE DQG 6SRQJH VV 7XE 6SRQJH 6 RPSUHVVRU 6ROHQRLG VVHPEO UDLQ 9DOYH O...

Страница 53: ...IOHUV 3ODVWLF 137 0DOH VFIP LJK 3OXJ 3LSH 6L H 0DQLIROG WR 6SULQJ RVH B 2 RXSOLQJ 0DQLIROG WR 6SULQJ LU OLQH 2 WR 2 SXVK WR FRQQHFW FRXSOLQJ LWWLQJ 3XVK WR RQQHFW HPDOH 3UHVVXUH 6HQVRU XVKLQJ 5HGXFHU 0DOH HPDOH 7 0 12 3 57 180 5 6 5 37 21 47 1 137 PLFURQ LOWHU 5HJXODWRU Z QRUP FORVHG DXWR GUDLQ LWWLQJ 2 3XVK WR RQQHFW 137 0DOH 3XVK WR RQQHFW 7XEH LWWLQJ IRU LU 6WUDLJKW GDSWHU IRU 7XEH 2 137 0DOH 3...

Страница 54: ... 67 1 85 286 5 2 1 5 5 2 5 66 0 7 0 12 3 57 180 5 6 5 37 21 47 5 2 3 1 1 752 3 66 5 2 86 5 02725 5 9 5 3 11 8 2 03 3 ...

Страница 55: ...7 2 1 6 1 3 6 727 7 0 12 3 57 180 5 6 5 37 21 47 66 DVW DQG XULRXV 0XOWL DPH 0DUTXHH 3DQ RXEOH LGH 0DUTXHH OHDU 3 7 RXEOH LGH 0DUTXHH 7UDQVOLJKW 0DUTXHH UDFNHW 6LQJOH UXLV Q 6W OH 5LJKW 0DUTXHH UDFNHW 6LQJOH UXLV Q 6W OH HIW 0DUTXHH DEOH 0DUTXHH DEOH B RFN DQG ODW VV B 6FUHZ Z RFN DQG ODW DVKHUV 7LH UDS QFOXGHG ZLWK 0DUTXHH NLW ...

Страница 56: ...833 5 027 21 6 66 0 6 7 2 6 66 0 2 5 027 21 6 66 0 67 1 85 286 5 027 21 PLATFORM 66 0 ...

Страница 57: ...HGLXP 6WUHQJWK 6WHHO H 1XW 3XVK WR RQQHFW 7XEH LWWLQJ IRU LU 6WUDLJKW GDSWHU IRU 7XEH 2 137 0DOH 5 7586 21 66 LQ 0 5 5 7586 21 66 0 5 7 0 12 3 57 180 5 6 5 37 21 47 5XEEHU 6DIHW 6NLUW 6DIHW 6NLUW RQJ HP UDFNHW 6ORWWHG 6DIHW 6NLUW 8SSHU URVV UDFNHW 6DIHW 6NLUW 8SSHU 6KRUW QJOH 6LGH UDFNHW 6DIHW 6NLUW 8SSHU 6KRUW QJOH 6LGH UDFNHW 6DIHW 6NLUW 6KRUW HP 6LGH UDFNHW 6DIHW 6NLUW RQJ HP UDFNHW 3 6 5 6WHHO...

Страница 58: ...6HDW VV 6HH HWDLOV 0 0 7DLO LJKW KLWH 6 357 UXLV Q UDNHOLJKW 5 UXLV Q 3HG RUL RQWDO LJKW 0DVN UXLV Q 3HG RUL RQWDO LJKW 2YHUOD 5HDU7DLO LJKW VV 5 5HDU7DLO LJKW VV 5 5HDU7DLO LJKW VV 5HDU7DLO LJKW VV UXLV Q HQWHU 7DLO OLJKW RYHU 0 UXLV Q 7DLO 3LSH VV UXLV Q 7DLO 3LSH VV VHH H SORGHG LFHQVH 3ODWH VV UXLV Q LFHQVH 3ODWH VV VHH H SORGHG 3HGHVWDO 6LGH ULOO 7 0 12 3 57 180 5 6 5 37 21 47 7RS 0RWLRQ DVH ...

Страница 59: ...YHU SDQHO 6SHDNHU VV 0LQL 6 7 6 7HVW UDFNHW RRU VV 7HVW UDFNHW RRU VV RRG HFN VVHPEO RRG HFN VVHPEO 7 0 12 3 57 180 5 6 5 37 21 47 DVK 3ODWH 6WHHULQJ 0HFK 9 0RWRU VSOLW KXE I VKDIW WDSV ZKHHO DVK 6WULS 0 DVK 6WULS 0 KLWH Z IRDP WDSH 1HRSUHQH DVKHU DUJH HOORZ 5RXQG XWWRQ 9 0RWLRQ 6WRS OHJHQG QVWUXPHQW 3DQHO KLWH 6W UHQH PLO DVK QM0ROGHG 5RXQG 2UDQJH ROG VZ 9 Z 7XQHV OHJHQG 5RXQG OXH ROG VZ 9 Z 9LHZ...

Страница 60: ... 6WHHO RFNQXW ZLWK WHUQDO 7RRWK RFN DVKHU 00 3DQ HDG 3KLOOLSV 6WDLQOHVV 6WHHO ULYH 725 7 03 5 DPHUD XVW RYHU DPHUD 7LH UDS DPHUD 7LH UDS 0RWR 3 HEFDP DPHUD RXVLQJ 6XSHUELNHV 86 FDPHUD FDEOH 0 LQ 6WULS 5 ZLWK IRDP WDSH 35272 DPHUD FU OLF GJHJORZ 7 0 12 3 57 180 5 6 5 37 21 47 6 6SHDNHU RXVLQJ 50 XOO 5DQJH 6SHDNHU RKP B3 1 3 36 6 5 25 6 7 0 7 6 6SHDNHU ULOO 5 ZLWK RDP 7DSH FP 6SHDNHUV 6 6SHDNHU RYHU...

Страница 61: ...Audio Amplifier DIP Switch Settings ...

Страница 62: ...67 01 230V CE AIR COMPRESSOR ELUAN EWS24 1 2 604 00046 01 AIR FILTER REGULATOR ASSEMBLY 1 3 604 00060 01 12V SOLENOID DRAIN VALVE 1 4 604 00045 01 4 STATION AIR MANIFOLD ASSEMBLY 1 5 500 00195 01 PRESSURE SENSOR 1 6 604 00068 01 HIGH FLOW NOISE REDUCING MUFFLER 2 7 800 00074 01 AIR SPRING 4 8 600 01437 01 AIR COMPRSESOR CONDENSATION TRAY 1 9 604 00069 01 STEEL HEX SOCKET PLUG 3 8 PIPE SIZE 2 10 56...

Страница 63: ...0202 01 TO Compressor Monitor PAGE 4 FROM Main PAGE 2 TO Pedestal Connector PAGE 3 TO PC PAGE 6 TO MONITORS PAGE 6 811 00217 01 810 00304 01 811 00105 01 811 00207 01 810 00480 01 810 00266 01 811 00220 01 206 18W 1007 GRN 208 18W 1007 BLK 207 18W 1007 BLK 205 18W 1007 WHT 203 18W 1007 GRN 202 18W 1007 BLK 204 18W 1007 WHT 107 18W 1015 GRN 107 18W 1015 GRN 108 18W 1015 BLK 201 18W 1015 WHT 201 18W...

Страница 64: ...7 BLK RED 315 22W 1007 BLK WHT 277 22W 1007 BLU RED 278 22W 1007 BLU GRN 279 22W 1007 BLU BRN 280 22W 1007 BLU BLK 281 22W 1007 BLU GRY 282 22W 1007 BLU ORG 283 22W 1007 PUR RED 284 22W 1007 PUR GRN 285 22W 1007 PUR BLU 286 22W 1007 PNK RED 287 22W 1007 PNK GRN 288 22W 1007 PNK BLU 289 22W 1007 BLU PUR 290 22W 1007 BLU WHT 291 22W 1007 BLU PNK 292 18W 1007 BRN BLK 293 22W 1007 BLK YEL 294 18W 1007...

Страница 65: ...8W 1007 ORG PNK 412 18W 1007 ORG PUR 413 18W 1007 ORG PUR 415 18W 1007 ORG RED 423 18W 1007 RED 416 18W 1007 BLK 425 22W 1007 YEL BLK 426 22W 1007 PNK BLK 427 22W 1007 YEL BRN 430 22W 1007 PNK BRN 428 22W 1007 YEL GRY 431 22W 1007 PNK GRY 429 22W 1007 YEL ORG 432 22W 1007 PNK ORG 433 22W 1007 WHT PNK 434 22W 1007 BLK BLU 435 22W 1007 BRN YEL 436 22W 1007 PUR WHT 437 22W 1007 RED PNK 438 22W 1007 R...

Страница 66: ... 174 22W 1007 ORG GRN 171 22W 1007 BLK 061 22W 1007 BLK 060 22W 1007 RED 059 22W 1007 WHT 056 22W 1007 RED 057 22W 1007 GRN 058 22W 1007 BLU 055 22W 1007 RED 062 22W 1007 BLK 055 22W 1007 RED 062 22W 1007 BLK 234 18W 1007 ORG YEL 244 18W 1007 BLK BLK CBL1 RED CBL1 653 22W 1007 ORG YEL 654 22W 1007 ORG YEL 164 22W 1007 BLK 163 22W 1007 BLK 653 654 22W 1007 ORG YEL 164 163 22W 1007 BLK BLK CBL16 RED...

Страница 67: ...17 22W 1007 ORG 728 22W 1007 PUR WHT 720 22W 1007 ORG 733 22W 1007 WHT ORG 719 22W 1007 ORG 732 22W 1007 WHT PUR 721 22W 1007 ORG 736 22W 1007 WHT BRN 034 22W 1007 WHT 031 22W 1007 RED 032 22W 1007 GRN 033 22W 1007 BLU 723 22W 1007 ORG 730 22W 1007 PUR ORG 722 22W 1007 ORG 727 22W 1007 PUR WHT 725 22W 1007 ORG 734 22W 1007 WHT ORG 724 22W 1007 ORG 731 22W 1007 WHT PUR 726 22W 1007 ORG 735 22W 1007...

Страница 68: ... 01 2022 04 05 2022 04 18 2022 07 06 2022 07 13 2022 09 01 JTN JTN JHM JHM JHM FAST AND FURIOUS ARCADE SYSTEM DIAGRAM PC monitors 6 6 JTN 2022 04 05 E 1 J8 AC VIDEO AC VIDEO 1 G5 2 J8 4 G7 Security Dongle TOP MONITOR BOT MONITOR WEB CAM RIO2 AUDIO AC 1 2 3 4 5 6 8 9 10 11 12 13 14 15 Lenovo M70t 65 Commercial LED Monitor 809 00016 01 65 Commercial LED Monitor 809 00016 01 Security Dongle 1 Securit...

Отзывы: