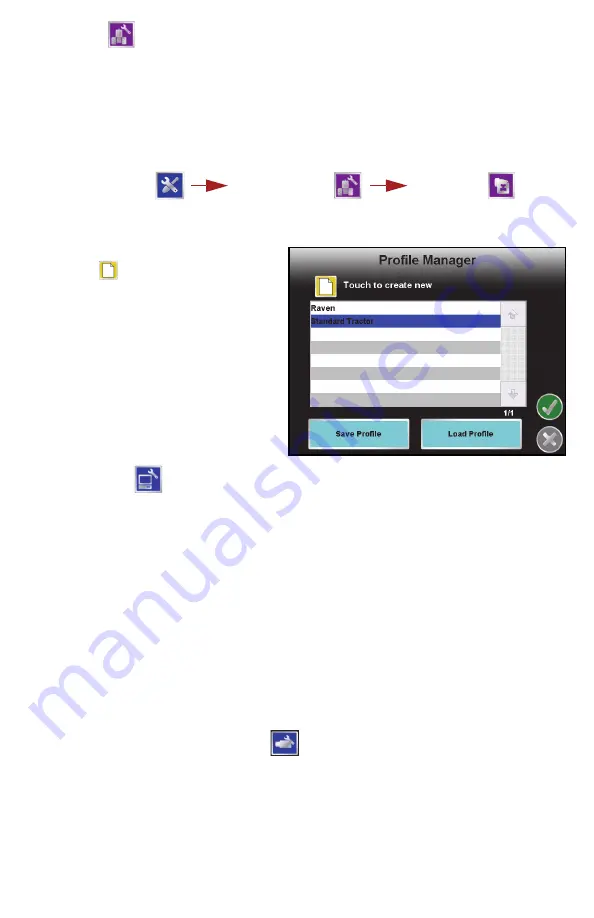
Raven Envizio Pro Series Скачать руководство пользователя страница 16

14

Vehicle 

Access the 

Vehicle

 menu to set up or modify vehicle profiles for each machine or 

implement with which the field computer will be used. Profiles allow the operator to 

set up the GPS antenna height and offset, the swath width, and section setup for 

each implement and transfer those settings to a home or office PC, another 

Envizio Pro, or reload the Profile at a later date.

To Edit Profiles:

1. From the Home screen, touch:

2. The 

Profile Manager

 screen displays with the currently loaded profile 

highlighted in the list of profiles stored on the field computer.

To Create a New Profile:

Touch the 

 icon and use the

on-screen keyboard to enter the 

desired profile name.

To Save a Profile:

Touch the desired profile name in the 

list and select the Save Profile button. 

The current settings will be saved to 

the highlighted profile.

To Load a Profile:

Touch the desired profile name in the 

list and select the Load Profile button.

Computer 

The Computer menu sets display and feature settings of the field computer. 

Access the Computer menu to change the display brightness, light bar sensitivity, 

language, and units, as well as activate features or update the field computer 

software.

File Maintenance

The File Maintenance feature allows the operator to transfer files to and from the 

field computer. Files such as saved field boundaries, guidance paths, coverage 

maps for completed jobs, and prescription maps may be transferred using the 

following procedure.

Note:  

Depending upon the size of the completed job(s), file maintenance may 

take several minutes to complete. A typical job of 200 acres should take 

approximately five minutes. Larger fields and coverage maps with larger 

implements or narrow section configurations system could take 

significantly longer. Check the File Maintenance screen available memory 

display periodically and perform file maintenance as necessary.

Note:  

The configure file output icon 

allows the user to select the file types 

that will export from the Envizio Pro to a USB drive when the “Transfer to 

USB” or “Transfer all to USB” buttons are pressed on the file maintenance 

screen.

Tools Menu

Vehicle Menu

Profiles

Содержание Envizio Pro Series

Страница 1: ...Envizio ProTM Series Quick Reference Guide P N 016 0171 507 Rev H 4 15 E24691 Copyright 2015...

Страница 2: ...modifications or repairs made outside our facilities nor damages resulting from inadequate maintenance of this system As with all wireless and satellite signals several factors may affect the availab...

Страница 3: ...hardware revision and software version available when calling for technical assistance It is best if the user is in the machine and in front of the field computer when calling for support Do review t...

Страница 4: ...me screen Info icon in the upper right corner of the display to view the current software and firmware versions of the field computer If the field computer is connected to a CANbus system additional s...

Страница 5: ...rent status of wireless communication is displayed along the top of the Home screen display This icon will appear Gray if no wireless communications device is connected to the field computer Green if...

Страница 6: ...control feature will be used touch the AccuControl button to enable the feature To create or load a zone map select Enable Zone Map 6 Touch the Product buttons to select the control mode and set the t...

Страница 7: ...rection source on the Guidance screen See the See DGPS Status Indicator on page 2 for more information 5 Touch the Display Mode icon to toggle the day or night modes for the guidance screen display 6...

Страница 8: ...ions currently disabled or toggled off appear in white 15 The Swath Information displays the number of the current swath when using the Straight Line Fixed Contour or Pivot patterns When using the Enh...

Страница 9: ...Set A and Set B icons will be displayed on the Guidance screen when the Straight Line Guidance Pattern is active Touching the Set A icon will place the first or A point of the path at the current vehi...

Страница 10: ...Left icon to move the guidance path to the left in the increments set on the Nudge Settings screen Drift Shift The drift shift allows the operator to manually adjust the position of recorded field fe...

Страница 11: ...AccuBoom feature enabled AccuBoom The following sections offer an overview of the optional Raven AccuBoom system when used with the Envizio Pro Refer to the Envizio Pro Series Installation and Operat...

Страница 12: ...he Start a Job section the Menu will contain tools for recording AccuBoom Zone Map features Touch the On Screen Switch Box icon to toggle each configured section on off or set each section for automat...

Страница 13: ...calibration information regarding the AutoBoom system To view the Glide Series AutoBoom settings and to enable automatic boom height control touch to access the Glide Series AutoBoom setup screens En...

Страница 14: ...ry or to fine tune the AutoBoom system 7 Touch the icon to open the job and begin guidance Operation During a job the AutoBoom Status Indicator will be displayed on the Guidance screen This area may d...

Страница 15: ...new machine or implement similar to the Initial Setup Wizard For more information or help completing the Setup Wizards see the Envizio Pro Series Installation and Operation Manual System Access the S...

Страница 16: ...ay and feature settings of the field computer Access the Computer menu to change the display brightness light bar sensitivity language and units as well as activate features or update the field comput...

Страница 17: ...name from the list and touch the icon along the bottom of the screen The field computer will perform one of the following actions to the selected file or file type For example touch the to transfer a...

Страница 18: ...o contains screens to review the status of GPS reception set message outputs for the internal DGPS receiver only enable GPS reverse sensing or select the differential satellite PRN Pseudo Random Noise...

Страница 19: ...Industries Do Bring the defective part and proof of purchase to your Raven dealer If the dealer approves with the warranty claim the dealer will process the claim and send it to Raven Industries for f...

Страница 20: ...ciated equipment or products and will not be liable for loss of profit labor or other damages Cables hoses software enhancements and remanufactured items are not covered by this Extended Warranty The...

Отзывы: