background image

ERVICE

S

34

6823346-R3

FK0363.eps

Software Versions 2.13 or newer –

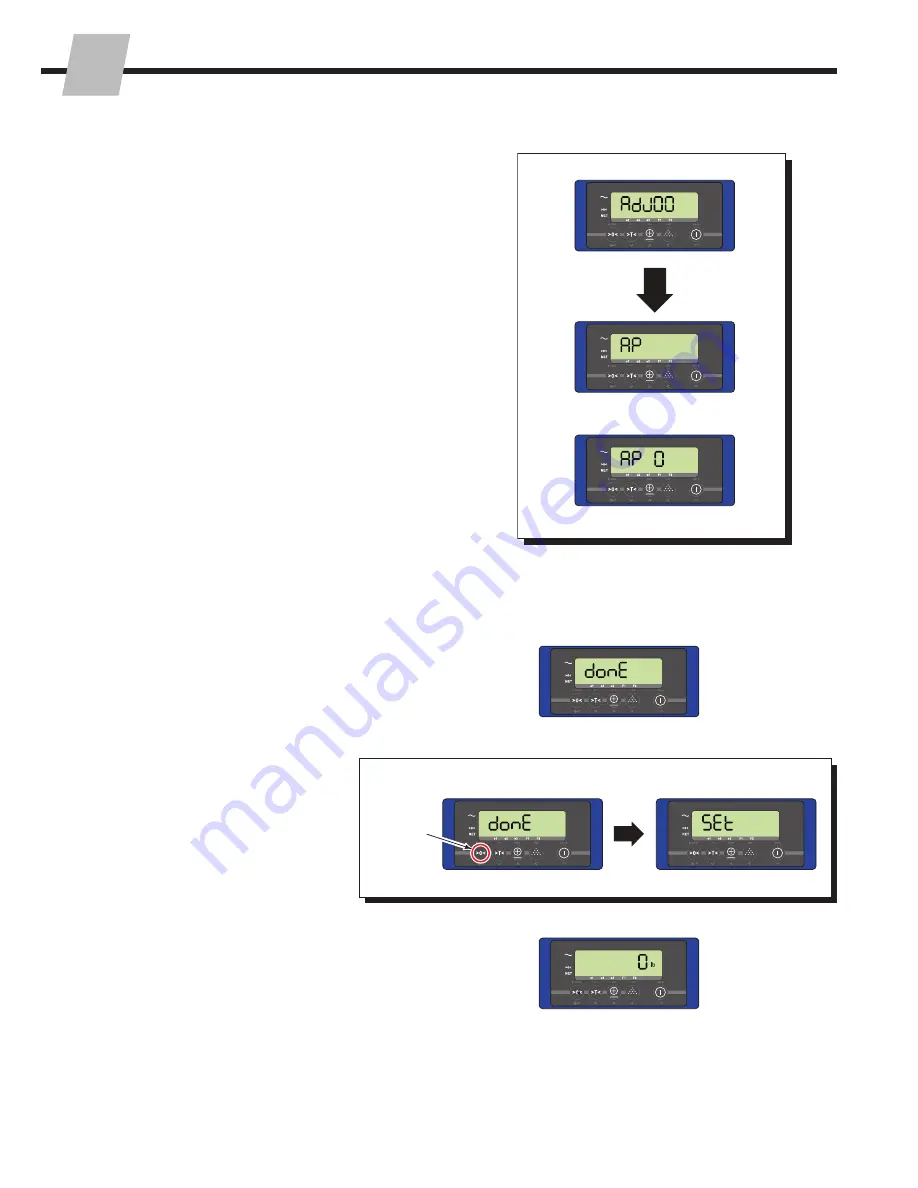
 Then the display 

will show "done".
•  While "done" shows, press and hold the "Zero" button 

for three seconds.  This will store the calibration 

value.  The display will show "Set" while storing the 

calibration value.

The display is zeroed and will return to normal weighing 

mode.

3.2-3 

Zero Calibration 

(continued)

FK0261.eps

To Store Zero Calibration Value:

Press and 

hold the 

"Zero" 

button 

for three 

seconds

6

7

5

After the system has zeroed, the display will show "AP" 

or "AP  0".

OR

Содержание iForks

Страница 1: ...ied IMPORTANT iForks system forks and display are paired and calibrated as a set Do not separate Consult Cascade Service department with any questions CAUTION This is a precise weighing system treat w...

Страница 2: ...mbly 13 Wire Harness 14 Load Cells 15 Display 16 Printer 18 SERVICE Parameter Settings 19 Accessing The Parameters Menu 19 Changing A Parameter 20 Parameter Table 22 View Current Calibration Settings...

Страница 3: ...ormation that should be acted upon to prevent machine damage IMPORTANT A statement preceded by IMPORTANT is information that possesses special significance NOTE A statement preceded by NOTE is informa...

Страница 4: ...debris between fork and fork shoe e g wood chips Inspect the bottom of the forks for debris that might be wedged between the fork and the fork shoe Remove any debris found Check for pinched wires at b...

Страница 5: ...t If the inside teeth of the caliper pass over the fork freely the fork must be taken out of service The fork has 10 wear and 20 reduction in capacity Inspect fork hooks and carriage bar clearance NOT...

Страница 6: ...pages under one of the categories shown below Determine All The Facts It is important to gather all the facts about the problem before beginning any service procedures The first step is to talk to th...

Страница 7: ...tomatic Err97 NTEP OIML only Calibration not allowed Press On Off button two times Contact Cascade Service if calibration is required Err98 Entered weight used for weight calibration must be higher th...

Страница 8: ...to Section 2 4 4 for further diagnosis Check the display for moisture or loose contacts Refer to Section 2 4 4 for further diagnosis Check load cell cables and load cell Refer to Section 2 3 2 or 2 3...

Страница 9: ...3 2 or 2 3 3 2 4 3 Check the display Refer to Section 2 4 4 for further diagnosis Check load cell cables and load cell Refer to Section 2 3 2 or 2 3 3 2 4 3 System is inaccurate but linear The buttons...

Страница 10: ...er Supply Battery With the batteries installed into the display check the voltage Output 6V Replace battery Check voltage going into the display No voltage YES YES YES YES NO NO NO NO Check fuses Chec...

Страница 11: ...changes NOTE For this procedure a weight of at least 50 lb 23 kg is required 1 If required turn on display Verify that the display is zeroed 2 Place a known weight on position A as shown 3 Note the w...

Страница 12: ...urther troubleshooting or service Contact Cascade Service department Refer to the back cover of this manual iFork Capacity Weight A 5000 lb 2268 kg 2 lb 1 kg 6000 lb 2722 kg 2 lb 1 kg 10 000 lb 4536 k...

Страница 13: ...number of counts received from each AD chip is shown individually This helps isolate which load cell could be the problem NOTE The AD values shown on the display should be close to each other for cali...

Страница 14: ...to view the next AD count 7 10 12 11 5 8 6 9 To View Digital Corner Calibration Values Typically parameter 80 digital corner calibration is enabled and parameters 81 84 a compensation factor for each...

Страница 15: ...hing system with paper between the weighing and non weighing parts Load the iForks to full capacity and move the load sideways Check load cell capscrews are firmly tightened For further troubleshootin...

Страница 16: ...points move board or cables Battery holder is faulty replace wire harness Cable or connector is damaged or has oxidized Contact is bad Check cables especially where the cable enters the load cell conn...

Страница 17: ...e cables are not damaged Complete Display still shows an error Display still shows an error Display is instable With or without a load display show over or underload error message and system will not...

Страница 18: ...over bumps or other kinds of shock The display is unstable and does not react to weights External Power Supply Equipped Check fuse and verify that an extra fuse is not installed Battery Supply equipp...

Страница 19: ...f equipped with printer verify LED on printer is on Buttons on display have no reaction 2 4 4 Display continued Disconnect additional features printer Then check if display buttons work If the buttons...

Страница 20: ...tact Cascade Wiring to display may be wrong Contact Cascade Check printer cable is installed Action not allowed because system is NTEP approved Unload scale then perform next weighing and printing act...

Страница 21: ...changed when calibrating Section 3 2 advised by Cascade or as a last option Contact Cascade before making changes to the parameters 3 1 1 Accessing The Parameters Menu 1 If required turn on display 2...

Страница 22: ...de Decrease the Value Increase the Value Shift to the next digit on the left Accept the value press last C A B OR FK0252 eps 3 Press the Zero button to enter the selected parameter 3 FK0248 eps 4 Refe...

Страница 23: ...press last C A B OR Example Parameter 61 Example Parameter 66 Example Available Setting Options 6 After pressing the Zero button to accept the value Step 5 the value is accepted in the previous step t...

Страница 24: ...ic basic count res10 12 Power on automatic zero no no yes no 13 Approved Non approved version A none none none ntep oiml ntepC 14 Sampling quantity 10 10 1 2 5 10 20 50 95 15 Units switch mode active...

Страница 25: ...nack 7 Mobile barcode printer 8 Scanner serial prot 36 Number of linefeeds com2 4 4 0 9 37 Handshake com2 soft soft soft Xon Xoff hard CTS 38 Print Twice C 0 0 0 Print only once 1 Print twice 39 Prot...

Страница 26: ...e clear 2 18 no no No Tare remains in memory after new weight has been picked Yes Tare is cleared after new weight is picked NOTE This is default when P13 is selected as OIML 80 Digital corner calibra...

Страница 27: ...alibration settings Refer to Section 3 1 4 Convert calibration settings when Parameter 1 has changed Refer to Section 3 1 5 2 18 93 A Read out last 10 error messages 2 15 before Read out last 50 error...

Страница 28: ...n 3 1 2 Steps 2 and 3 2 Verify that Parameters 1 through 5 are correct according to US EU values found on the sticker on the display Refer to Changing A Parameter s Setting Section 3 1 2 Steps 2 3 and...

Страница 29: ...libration Weight 2 and Weight 3 will show zero for weight on the display FK0257 eps 9 After the sequence is performed the display will show FC_bE Unit type lb or kg Gravity Value Zero Calibration Valu...

Страница 30: ...Contact Cascade 1 Access the Parameters Menu as described in Section 3 1 1 4 Change the parameter from kg to lb or lb to kg using the Total button Refer to Changing A Parameter s Settings Section 3 1...

Страница 31: ...splay will revert to the parameter menu showing parameter 93 3 1 5 Change Units continued 6 Update Parameters 2 through 5 referencing the chart below Refer to Changing A Parameter s Settings Section 3...

Страница 32: ...e On Off button two times 3 The display will show Set for ten seconds 2 Change the current parameter menu number to 91 Refer to Changing A Parameter s Settings Section 3 1 2 Steps 2 and 3 1 Access the...

Страница 33: ...g a sample of known weight s When to Calibrate Calibration Procedures When the iForks are not within system tolerance Perform Zero Calibration Section 3 2 3 and Weight Calibration Section 3 2 5 with a...

Страница 34: ...Cell Flex Joint Capscrews This is the position to mark on top of the fork shoe Flex Joint Logistics iForks Locate hidden load cells NOTE Load cell positions are the same as the standard iForks To For...

Страница 35: ...pallet on the iForks and or if desired use a protective cover Raise the iForks so that the pallet cover is not touching the ground IMPORTANT If performing this procedure alone or after finishing Weig...

Страница 36: ...ds This will store the calibration value The display will show Set while storing the calibration value 7 The display is zeroed and will return to normal weighing mode 3 2 3 Zero Calibration continued...

Страница 37: ...re IMPORTANT Use a minimum 100 lbs 45 kg For optimal corner calibration use 1000 lbs 454 kg IMPORTANT Use the same weight for each corner 1 1 From normal weighing mode press and hold the Tare button u...

Страница 38: ...continued 5 Corn A will show on the display 8 A new value will show on the display example 45144 Then Corn B will show on the display 6 Place a weight on pallet position A 7 Press the Zero button to a...

Страница 39: ...gistics iFork refer to the illustration shown under Logistics iForks Locate hidden load cells page 32 10 Press the Zero button to accept the weight load cell output value 9 10 11 3 2 4 Corner Calibrat...

Страница 40: ...er to the illustration shown under Logistics iForks Locate hidden load cells page 32 13 Press the Zero button to accept the weight load cell output value 14 A new value will show on the display exampl...

Страница 41: ...ight to position D 16 Press the Zero button to accept the weight load cell output value 17 A new value will show on the display example 45582 Then Done will show on the display FK0368 eps 15 16 17 Pos...

Страница 42: ...he display shows Set 19 The display will return to normal weighing mode NOTE If the display has a negative weight perform the Zero Calibration Section 3 2 2 with the pallet cover remaining on the iFor...

Страница 43: ...hree known weights 0 1 If the handled product weight range is very consistent 1 or 2 weight s is sufficient 1 If necessary turn on display 2 Press and hold the Tare button until CAL appears on the dis...

Страница 44: ...ositions 7 If required change the weight value shown on the display to match the value of the known weight Weight 1 Use the Entry Mode Guide below as an aid to change the total weight A and B Always a...

Страница 45: ...emove the weight from the iForks Press the Zero button to begin calibration for the second known weight Weight 2 NOTE If a pallet cover was not a part of the Zero Calibration Section 3 2 3 the weight...

Страница 46: ...The screen will show Adj08 and then will count down from 8 while the display records the weight The screen will return to showing the weight and an arrow flashing over e2 14 Place a Weight 2 on the p...

Страница 47: ...or the third known weight Weight 3 NOTE If a pallet cover was not a part of the Zero Calibration Section 3 2 3 the weight entered must include pallet weight Weight 3 Pallet Weight 20 Place a Weight 3...

Страница 48: ...different value Contact Cascade for gravitational value 26 Software versions earlier than 2 13 After pressing the Zero button to accept the gravitational value continue to Step 27 Software Versions 2...

Страница 49: ...irm that each weight shown on the display matches the rated weight value A No weight B Weight 1 C Weight 2 D Weight 3 Cycle through the order listed above one to five times 30 If the rated weight and...

Страница 50: ...er plate on each iFork The MAC address for the iFork is located on the lower front face of the receiver IMPORTANT If the MAC address sticker is missing contact Cascade IMPORTANT If iForks are NTEP cer...

Страница 51: ...ue Shift to the next digit on the left A B OR OR 3 Change the current parameter menu number to 85 Refer to Changing A Parameter Section 3 1 2 Steps 2 and 3 5 The display will show F1Adr Perform one of...

Страница 52: ...t five digits of the MAC address for Fork 2 12 The display will show the first five digits of the MAC address for Fork 1 3 3 1 Pairing The Display To iForks continued 8 The display will show F2Adr Per...

Страница 53: ...to save and return to normal weighing mode 16 Power off the display by pressing and holding the On Off button for three seconds 17 Power on the display and confirm the display and the forks are commu...

Страница 54: ...oe from fork arm Keep track of cover spool capscrew and nut Logistic iForks Remove capscrews from bridge plate Remove lower capscrews from flex joint Remove capscrew and nut from the fork shoe Slide f...

Страница 55: ...tic iForks Remove capscrews mounting the flex joints to the load cells 6 Standard iForks Remove capscrews and tolerance ring from load cells If equipped with level sensor remove capscrews Logistic iFo...

Страница 56: ...ngs to each load cell 4 Install load cells and level sensor if equipped into fork arm Tighten capscrews to the torque of Load Cells 80 ft lbs 110 Nm Level Sensor 2 1 ft lbs 2 8 Nm 5 Logistic iForks In...

Страница 57: ...reinstall the fork shoe Step 13 Repeat until the display no longer shows an error Washer Rubber Shear Collar Shims Flex Joint Flex Joint Capscrew iFork Shoe Capscrew 13 14 15 Standard iForks Logistic...

Страница 58: ...n Park South Africa Tel 27 11 975 9240 Fax 27 11 394 1147 ASIA PACIFIC Cascade Japan Ltd 2 23 2 Chome Kukuchi Nishimachi Amagasaki Hyogo Japan 661 0978 Tel 81 6 6420 9771 Fax 81 6 6420 9777 Cascade Ko...

Отзывы: