


9
https://www.rasor-cutters.com/it/
SPARE PARTS
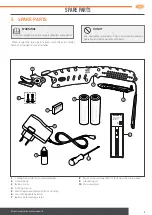
5 SPARE PARTS
l
WARNINGS
Use only original spare parts to replace faulty components.
When requesting spare parts, always state the exact model
name and the device’s serial number.
d
DO NOT
Use unsuitable spare parts. They can cause anomalous
operation and harm people or property.
FUL
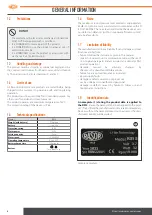
WJ2020
For:21700 3.7-4.2V
Li-ion battery
2A Charge
CHG
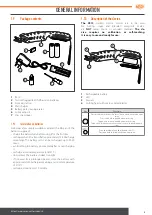
8
7
6
1
2
5
3
4
10
9
1
Cutting head with micro-serrated blades
2
Central body
3
Battery cover
4
Docking station
5
Wall charger (available with EU or US plug)
6
Two rechargeable batteries
7
Battery pole cleaning eraser
8
Pair of screws and washers for fastening the cutting head
9
Lubricating oil
10
Star screwdriver
Содержание RS1S
Страница 11: ...11 https www rasor cutters com it DISPOSAL...


