Raritan EMX Quick Setup Guide
12
QSG-EMX-0I-v2.5.0
255-80-6106-00 RoHS
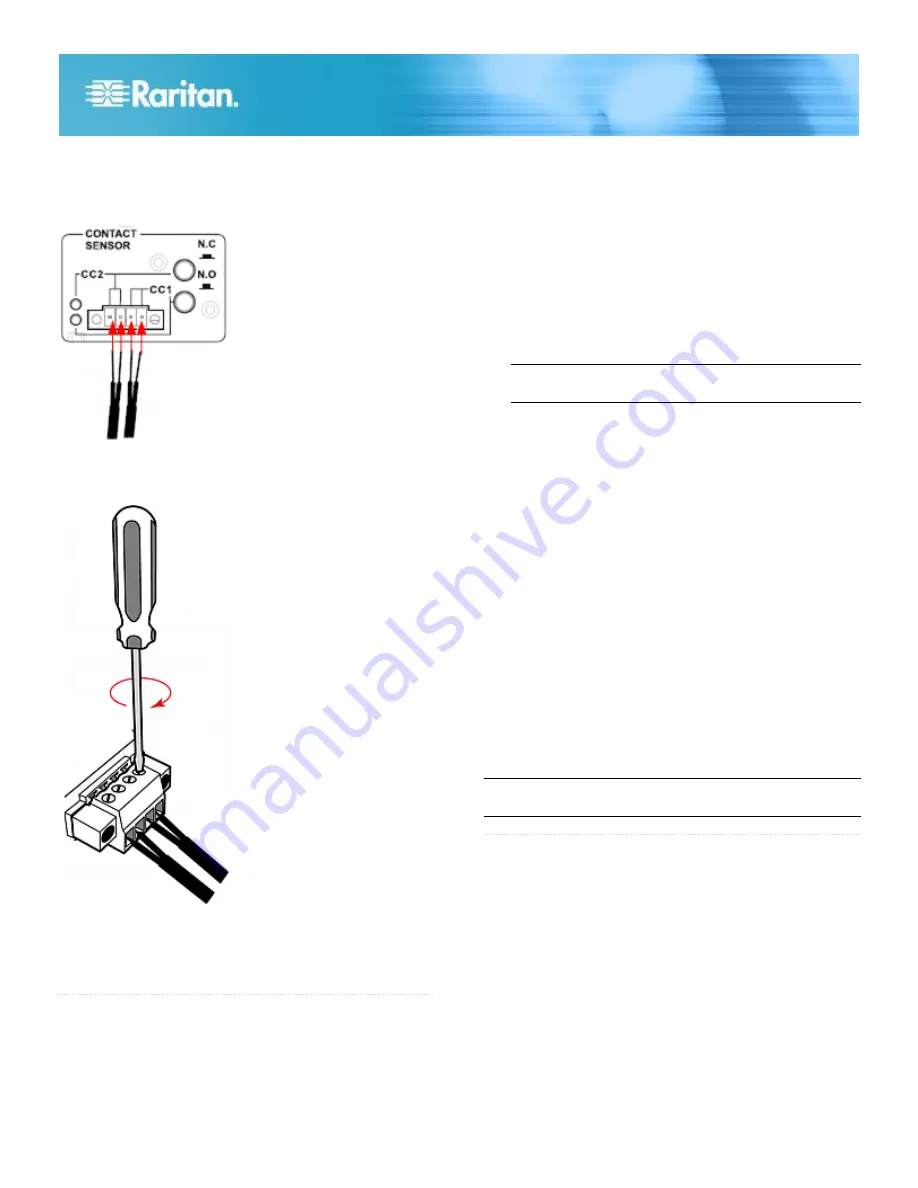
Plug both wires of a detector/switch into the two
termination points to the left.
Plug both wires of the other detector/switch into the
two termination points to the right.
5. Use an appropriate screw driver to tighten the screws
above each termination point until the connected wires are
securely fastened.
6. Plug the terminal module back into the CONTACT
SENSOR panel.
7. Tighten the two screws on each side of the terminal
module to secure it onto the CONTACT SENSOR panel.
QS R ule
What to Do Next
1. Open a browser and type the IP address of the EMX
device.
2. When prompted for a user name and password, enter
admin
and the new password you assigned during the
initial network configuration.
3. The EMX page opens.
4. Choose Device Settings > Date/Time to configure EMX
with the proper date and time or synchronize it with an
NTP server. EMX's time must be in sync with the LDAP
server to use LDAP authentication.
5. Configure each asset sensor assembly in the web
interface.
a. Locate the Feature Ports folder in the left pane, which
contains a list of asset sensor icons.
Note: If there is only one FEATURE port on your EMX
device, only one asset sensor icon is available.
b. Click the desired asset sensor icon in the left pane.
c. Click Setup in the right pane. The setup dialog for the
selected asset sensor assembly appears.
d. Provide necessary information, including the desired
name for the asset sensor assembly, the total number
of rack units (tag ports), orientation of the asset sensor
assembly and so on.
6. EMX is sent from the factory with all the AMS LEDs set to
the Automatic Operation mode. The LED color on the
asset sensor changes according to whether an asset tag
is detected. You can configure the LED color settings from
the web interface:
a. Click the desired asset sensor icon in the left pane.
b. Select the desired rack unit (tag port) of the selected
asset sensor in the right pane.
c. Click Configure Rack Unit to configure the rack unit
settings, including the LED mode and colors.
7. Use the menu at the top of the page to create user
profiles, set privileges and security. Use the tree in the left
pane to configure asset sensors and environmental
sensors.
Note: Detailed instructions are available in the EMX online
help.
QS R ule
Additional Information
For more information about the EMX
®
and the entire Raritan
product line, see Raritan's website (www.raritan.com). For
technical issues, contact Raritan Technical Support. See the
Contact Support page in the Support section on Raritan's
website for technical support contact information worldwide.
Raritan's products use code licensed under the GPL and LGPL. You can request
a copy of the open source code. For details, see the Open Source Software
Statement at
(http://www.raritan.com/about/legal-statements/open-source-software-statement/)
on Raritan's website.


