8
INSTALLATION
Parts Included with the electro scan
•
1 1/2" hose adapters (2)
•
1 1/2" NPT Intake Plug
•
90
°
1 1/2" slip PVC fitting
•
Treatment tank
•
system status panel, control unit, LCD display, cables
•
Wiring harness between control unit and tank
Optional Parts available for purchase:
•
Dual Control
•
Salt Feed Systems
•
Manual head sensor for automatic activation
MOUNTING
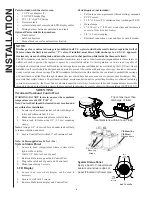
Treatment Tank and Control Unit
WARNING: DO NOT locate in an area where ambient
temperature exceeds 120
o
F (49
o
C).
Note: Control Unit should be located in dry location and
accessible after installation
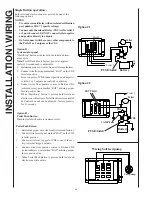
1.
Locate top of treatment tank at or below discharge of
toilet and within six feet (1.5 m).
2.
Make and secure mounting frame to flat surface.
3.
Secure tank to frame using 3/4" (1.9 cm) mounting
straps.
Note:
Placing a 3/8" (.9 cm) rubber pad under tank will help
to reduce vibration and noise.
4. Secure Control Unit within 30" of Treatment Tank
Note: Cables supplied are 16 feet (5 m)
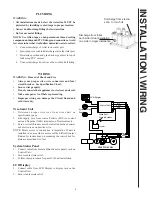
System Status Panel
1.
Locate in head compartment where system status
lights will be visible.
2.
Drill 1 1/2" hole for back of panel
3.
Route cable between panel and Control Unit.
4.
Plug cable into back of panel and Control unit.
5.
Mount panel using 2 screws.
LCD Display
1.
Locate in an area where display can be read if
necessary.
2.
Secure to wall with 2 screws.
3.
Route cable between display and Control Unit.
Treatment tank within 6 feet (1.8 M)
Top of tank lower than
discharge of toilet
3/4" (1.9 cm)
Mounting
Straps
1"(2.54cm) by
1"(2.54cm)
Wooden frame
NOTE:
Discharge of raw, untreated sewage is prohibited in all U.S. waters inside the three mile limit except in the Gulf of
Mexico where the limit is nine miles. "Y" valves, if installed, must direct toilet discharge to a U.S.C.G. approved
treatment system or holding tank and must be secured in that position while inside the three-mile limit.
The EPA standards state that in freshwater lakes, freshwater reservoirs or other freshwater impoundments whose inlets or
outlets are such to prevent the ingress or egress by vessel traffic subject to this regulation, or in rivers not capable of
navigation by interstate vessel traffic subject to this regulation, marine sanitation devices certified by the U.S. Coast Guard
installed on all vessels shall be designed and operated to prevent the overboard discharge of sewage, treated or untreated,
or any waste derived from sewage. The EPA standards further state that this shall not be construed to prohibit the carriage
of Coast Guard-certified flow-through treatment devices which have been secured so as to prevent such discharges. They
also state that waters where a Coast Guard-certified marine sanitation device permitting discharge is allowed including
coastal water estuaries, the Great Lakes and interconnected waterways, freshwater lakes and impoundments accessible
through locks, and other flowing waters that are navigable interstate by vessels subject to this regulation (40 CFR 140.3)
Parts Required (not included)
•
Teflon tape or non-permanent thread sealing compound
•
PVC Cement
•
1 1/2" (3.8 mm) I.D. sanitation hose (raritan part # SH)
•
Hose clamps
•
1" (2.54 cm) x 1" (2.54 cm) wood strips and fasteners to
secure to floor (wooden frame)
•
3/4" (1.9 cm) strapping
•
Electrical connections, wire and fuse or circuit breaker
DRILL
3/32"
(2.4 mm)
DRILL
1 1/2"
(38 mm)
HOLESAW
CONTROL
INDICATOR
PANEL
OUTLINE
C
L
C
L
CONTROL INDICATOR PANEL
MOUNTING
System Status Panel
Apply a bead of nonpermanent
sealant around rear edges of
panel if located in shower area.
not to scale
Содержание Electro Scan EST12
Страница 12: ...12 This page left blank...


