background image

PM7000 Start Guide Issue 1 090608                                                                                                         6 
 

Second step:


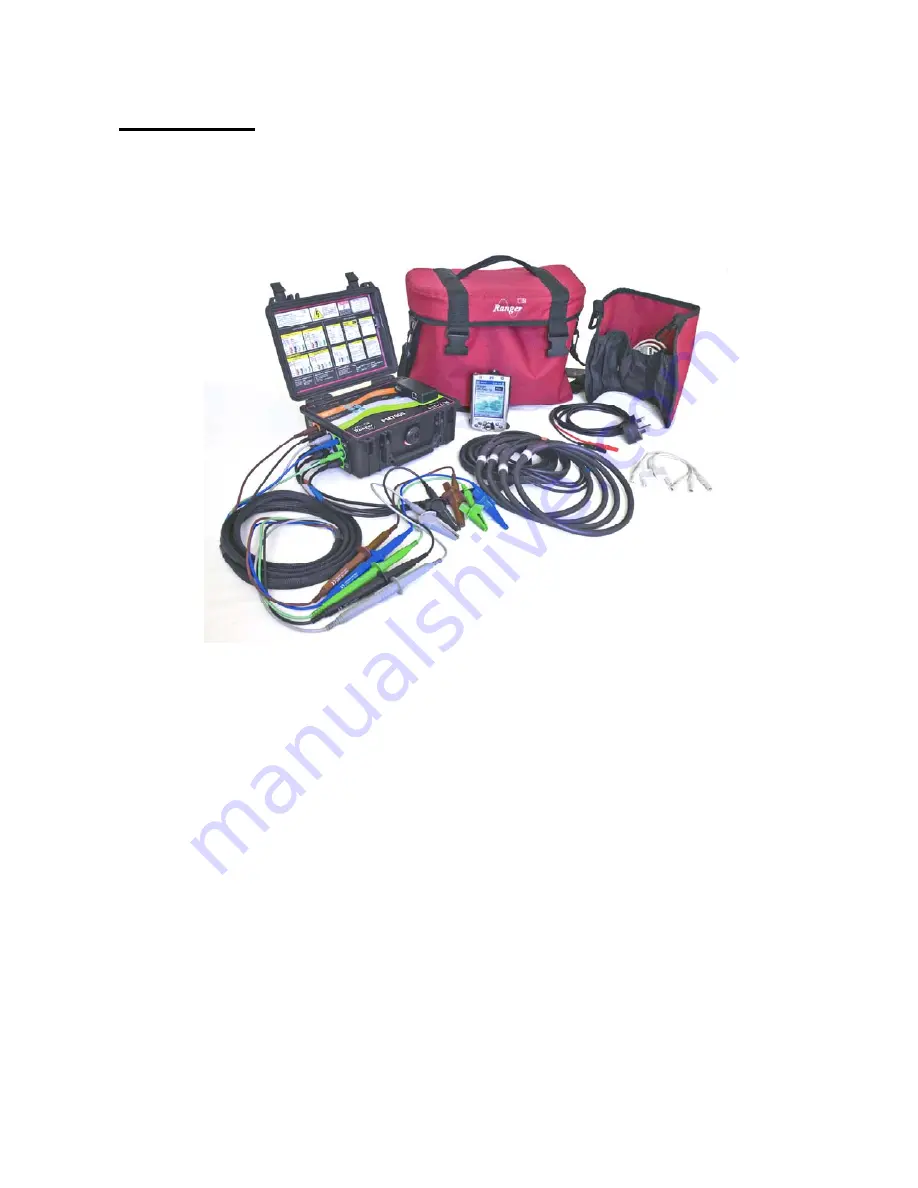
Check your kit 


PM7000 and kit 


Ranger

 PM7000

 power quality analyser 


Four 24" 6000 Amp Flexible Current Clamps 

 (max conductor size 8"), braided 


Four Voltage probes 1000V Cat III (600V Cat IV), braided 


One earth voltage probe (600V Cat IV) 


Three Neutral Common Leads 


Mains lead or charger (US) 


USB lead 


Pronto for Windows Analysis Software 


Customer CD 


PDA 

Содержание PM7000

Страница 1: ...PM7000 Start Guide Issue 1 090608 1 r Outram Research Ltd A Start Guide for the Ranger PM7000 Welcome to the Ranger family and to our top of the range Power Master Ranger the PM7000 PM7000 in Australia ...

Страница 2: ...rth Step 8 Put your PDA on charge Fifth Step 9 Make the communication between the PDA and the PM7000 Sixth Step 11 Make the communication between the computer and the PM7000 Seventh Step Optional 22 Using the Simulator Eighth Step 27 Make a first recording with the PM7000 by measuring the live mains or using the Simulator Ninth Step 33 Download the PM7000 ...

Страница 3: ...e that this includes changing internal fuses and batteries These following safety statements are particularly concerned with connecting your logger to the power source To ensure your safety and avoid any damage to the PM7000 please take careful note Use extreme caution when connecting the signal input cables to the logger Any voltage potential at the signal source will exist on the instrument s re...

Страница 4: ...mation is also found in the Ranger PM3000 manual Voltage Measurement leads Use the GS38 approved test voltage leads supplied These have fuses in the alligator clip end and safety connectors at the connection end They are rated at CAT IV for 600 volts CAT III for 1000 volts Always use these or equally GS38 compliant leads for your safety Voltage leads must be treated with respect as they do an impo...

Страница 5: ...age source outside the specified range of 0 600 10 Vac For measurements between 600 and 1000 Vac please refer to the manual These are a special case Under no circumstances should you remove the front panel of the logger while it is connected to a power source In line with safety requirements the PM7000 gives correct over range voltage readings No danger will arise for an operator relying on any in...

Страница 6: ...ower quality analyser Four 24 6000 Amp Flexible Current Clamps max conductor size 8 braided Four Voltage probes 1000V Cat III 600V Cat IV braided One earth voltage probe 600V Cat IV Three Neutral Common Leads Mains lead or charger US USB lead Pronto for Windows Analysis Software Customer CD PDA ...

Страница 7: ...ce to keep the batteries well charged and the unit always ready for action This is merely a precaution The PM7000 can start up with batteries pretty flat and function once power is applied There will soon be enough charge to allow any activity to be closed down successfully and retained in memory End Plate of PM7000 showing the two ends of the mains cable attached Note the bottom row of BNC connec...

Страница 8: ...lug into the mains to charge up the PDA It can be used while on charge After using it off the cable we recommend you leave it on charge when not in use A car charger to charge the PDA could be a useful addition to your kit if you will be using the logger at different geographical locations Current battery voltage ...

Страница 9: ...ouch PmScreen You will be invited to select the relevant COM Port The COM port is COM 6 on the HP iPAQ114 Touch on Reconnect to COM6 Other PDA s may use COM8 If the PDA and logger are within range of each other nominally within 10 meters 30 feet but it may be more in open line of site conditions or less if one is shadowed from the other and if the logger is in discovery mode the blue light on the ...

Страница 10: ...00 menu interface in some detail without involving the logger You can do this is via a PmScreens Simulator which will come up on your computer screen Find it on the customer CD under PmStart or within the Pronto software programme How to open and use the simulator is explained below When you have finished with the PDA IT IS IMPORTANT to release the Bluetooth communication on it or the PDA gets stu...

Страница 11: ...uter but if they are not click on Install PM7000 Hardware Drivers and follow the instructions If you are unsure whether or not you have the drivers install them anyway There is no adverse effect from re installing them Then launch Pronto Follow the Start Up Assistant to connect to your PM7000 The first time you make a new connection there are four steps Startup Assistant Step 1 In step 1 the defau...

Страница 12: ...PM7000 Start Guide Issue 1 090608 12 Click on Next In the following step 2 for this first connection select Create new connection settings ...

Страница 13: ...PM7000 Start Guide Issue 1 090608 13 Click on Next to bring up Startup Assistant Step 3 This will give you the list of Ranger products supported by Pronto ...

Страница 14: ... list and will appear in the window Click Next to select it and bring up the final Startup Assistant Step 4 screen Now you are going to search for the USB communication port Click on the port box A dropdown menu will reveal the USB communication channel option Select it ...

Страница 15: ...he PM7000 and computer communicate Pronto will have to find the new communication Port Note the Baud rate the speed at which traffic flows between the logger and the computer For the PM7000 it is 921600 and Pronto will choose this value for you when you select PM7000 Different Ranger models may have different baud rates Click Finish The following Select Instrument to Control window may come up con...

Страница 16: ...00 Start Guide Issue 1 090608 16 Here is the opportunity to change the name add comments or alter the baud rate if you ever need to do so Click on Edit and bring up an Edit an Existing Logger Address screen ...

Страница 17: ...7000 is automatically chosen by Pronto In the future if further types of communication mode become available such as over the mobile phone network it may be necessary to change the baud rate Click OK to return to the Select Instrument to Control window Finally click on Connect and you ll see on the screen Pronto is connecting to the instrument Control panel comes up next ...

Страница 18: ...any sessions you have recorded Historically this screen was used to communicate to Rangers before the latest models were given the display user interface PmScreens If your requirement is to play back data or start a recording click on the appropriate button here To access PmScreens click Close Up comes the main Pronto screen ...

Страница 19: ...you This is the default screen with a 3 phase 4w Wye Hook Up You can enlarge or contract the PmScreen area by clicking View Zoom in or Zoom out This screen is intended to give you an immediate indication of system status and especially the connections you have made the Hook up The PM7000 does need to know what was intended so that it can assess the voltage and current phases it finds correctly If ...

Страница 20: ... 1 090608 20 This is an example of the initial screen for a 3 phase 4 wire wye application showing the current correctly in phase with the voltage This screen confirms what we know that only V1 has a proper signal in this case ...

Страница 21: ...ilar selection process and then it will remember that connection also In this simulator example the phasor diagram shows Suspect Hook up to alert you to the likelihood you have fitted the wrong CTs The give away is the current 90 degrees out of phase with the voltage Please note that NEXT time you open Pronto it will remember the previous connection information and four steps will become only two ...

Страница 22: ...or the manual you have the Simulator open on the computer and follow the steps in parallel with the Simulator If you wish to have the instructions and the Simulator open at the same time Resize the material by clicking on the middle box top right of the screen becomes and make room for both programmes on the computer screen To bring up the Simulator Insert the customer CD into your computer Launch...

Страница 23: ...nicating with it clicking on PmScreen will bring up PmScreens on the computer screen Select the Simulator by clicking on connect on the top tool bar of PmScreens Follow the path from Launch Simulator to PM7000 after which the Simulator screen will arrive See below If no logger is connected when you open Pronto the following advice window will come up ...

Страница 24: ...uire a communication route Click on PmScreen on the Pronto tool bar For the same reason you are told Access to this comms port has been denied Click on No This window will go away Click on Connect on the PmScreen tool bar In this example there is no logger connected and therefore no live PmScreen ...

Страница 25: ...he customer CD and follow the steps indicated Now you have the initial Simulator screen in front of you Note the Hook up button The Simulator will give you a comprehensive set of artificial readings Use this facility to investigate the capability of your new PM7000 Here is an example screen the Configure screen showing the extent of the options available to set up ...

Страница 26: ...able programme running PmScreen Click yes And the programme will close down Button help If you hold down a button on PmScreens for a few seconds most of the time you will stimulate the popping up of a help message This message will explain the function of the button you are pressing We hope you find it useful Explore what is available to you as you use your PM7000 ...

Страница 27: ...r This is 3 phase 4 wire wye The initial screen always indicates the hook up connection See the simulator screen in the previous section In a genuine 3 phase application it is valuable to check the vector diagram to make sure your connections are correct If all your phases appear to be in error by 90 degrees check that you have not physically installed voltage output CTs but selected flexible Rogo...

Страница 28: ...ts are all blue and their functions are explained in detail later in the manual As we are interested in doing a simple start we shall ignore these buttons for the time being and click on to bring up the screen that contains the pink set up buttons For the moment we want to our initial set up as configured by the factory The Review screen shows our general set ups such as duration of recording The ...

Страница 29: ...the wave sets choose a time during which the trigger is captured allows you to decide which signals to capture which type of fault condition to trigger and how much memory to allocate to each type The screen shows you how the logger is set up How to set up Waveform Capture is explained in detail in the Manual We assume we are satisfied with the set ups factory for this initial exercise so we can n...

Страница 30: ...0 Start Guide Issue 1 090608 30 Now we touch and bring up the start recoding screen If you want to give this first session a different name touch the box on the above screen and bring up the Keyboard screen ...

Страница 31: ...to use the keyboard is found in the manual One key worth mentioning is the up arrow key Pressing this will allow you to type in the file name and the first letter only will automatically be a capital letter Now you have a screen showing you something similar to the above details If you change your mind it is possible to your recording set up and redo it ...

Страница 32: ...s greyed out so that you cannot inadvertently turn the power off while the logger is recording The PM7000 is now set to record for 1 week If the recording logger is interrupted by a power outage once power is resumed it will automatically restart in the same session for all the time the restart is within that set period At the end of the set period the recording will stop automatically but it is p...

Страница 33: ...g In the latter case Pronto will invite you to stop the recording prior to the download as part of the download process For this Start download we shall use the USB serial link to the computer For more detailed information on using the USB memory device please see the section USB Memory Device operations in the Ranger PM7000 Attach the logger to the computer using the USB serial interface lead Ope...

Страница 34: ...608 34 Use the list to select PM7000 if you have connected it to your computer previously The control panel always gives you the current status of your recordings and will be useful in the future For the quick start we can close it ...

Страница 35: ... Start Guide Issue 1 090608 35 The next screen to come up invites us to stop the recording if we have not already done so Click on yes Now we watch the playback Next you will be invited to Erase logger memory ...

Страница 36: ...ference clocks on the internet If yours is one of these you may wish to click yes However the Ranger loggers have good clocks that keep their time better than the average PC So generally speaking click on No Unless you want a further recording click No If you have taken a long time or gone off to get a cup of coffee this screen may come up Click OK ...

Страница 37: ...ult folder called Projects Click on New as it is a new project The following screen will allow you to search for the folder you want In the example we select the default folder Projects Our first project can be called Test session Type it into the box File name We can discard it later New recordings may go in a new or an existing project ...

Страница 38: ...a name and a location for our data This screen comes up Click either Autosave or save NB if you have multiple sessions in your logger Autosave saves all of them to the same project Patience while data decoding takes place Finally we are asked how we would like to graph our data We ll use the Graph Assistant ...

Страница 39: ...000 Start Guide Issue 1 090608 39 At this stage we have not created any templates so we automatically select the only choice This is new view using graph assistant Click OK The graph assistant will come up ...

Страница 40: ...hat as you especially selected these parameters you are particularly interested in the results from them An account of the Storage Regimes in the PM7000 is given in the manual The other five steps enable you to format the graphs in different ways You will want to familiarize yourself with the choices at a later stage Go straight to Finish for this Start activity Here is an example of a graph you m...

Отзывы: