VirtualDJ 8
– Rane Sixty-Two
14
46. CONTOUR
. Control knobs for the Left, Right and Crossfader Faders to adjust the slope
of the fader curve (cut to smooth behavior)
47. HEADPHONES SOCKET
. Connect your
¼” or 1/8” headphones to these outputs for
cueing and mix monitoring.
K.
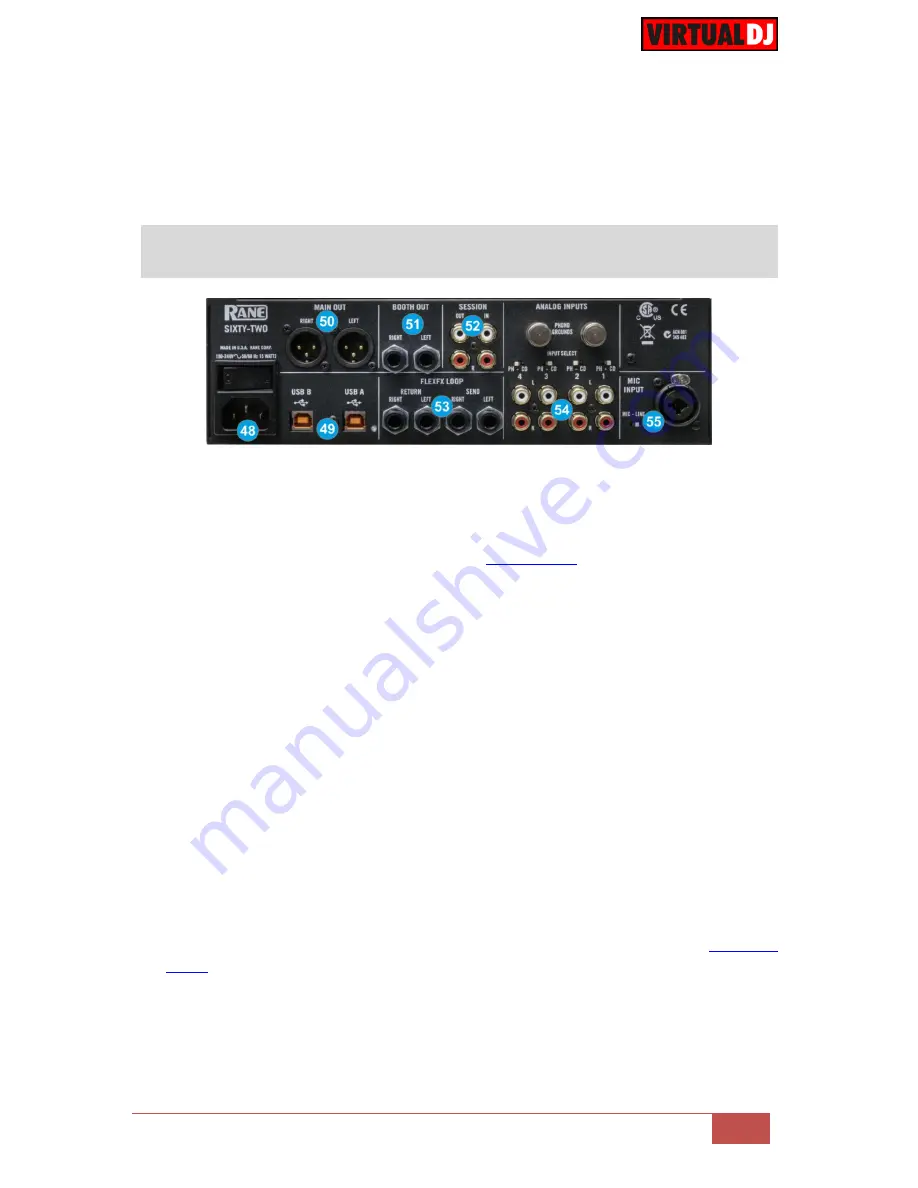
Rear Panel
48. POWER
. Connect the supplied universal AC cord. Power on the unit after all the
necessary connections are done.
49. USB A/B
. These USB connections send and receive audio and control information from
the connected computers. See more details in
Back to Back
.
50. MAIN OUT
. Connect your amplifier using a pair of balanced XLR jacks. The level of this
output is controlled by the MAIN knob at the top panel
51. BOOTH OUT
Use a pair of
balanced ¼“ TRS jacks to connect the unit with your
secondary output (e.g. for monitor). The level of this output is controlled by the BOOTH
knob at the top panel
52. SESSION IN/OUT
. Use standard RCA cables for the connections. The level of both Input
and Output are controlled by the SESSION IN and OUT knobs at the top panel.
53. FLEXFX LOOP
Use balanced pairs of ¼” TS jacks for the SEND and RETURN Inputs.
For a mono FLEXFX Send use the Left Output. The FlexFX output is normally used
along with the FLEXFX LOOP RETURN input to connect outboard effects.
54. ANALOG INPUTS
. Four Phono/CD inputs are provided by RCA jacks. These may be set
for PH or CD using the rear panel slide switches. Analogue inputs 1 and 2 are used by
DECK 1. Analogue inputs 3 and 4 are used by DECK 2. Analogue inputs may be
selected as Timecode Inputs or for recording on USB stereo pair 5-6. See
Timecode
(DVS)
.
Set any unused inputs to CD. Connect your turntable ground wires to the PHONO
GOUND posts on the rear when using PH inputs.


