background image

TTM 57SL 

FOR

 SERATO SCRATCH LIVE •


OPERATOR’S MANUAL 

2.1

40

INTERNAL DIGITAL EFFECTS

There are two Effects Processors available in the 
TTM 57SL. Digital Effects hang out in the mixer 
instead of the software so they are available for 
signal processing even when Scratch Live is not 
running. Each processor can load one of ten 
effects:

• Echo   


[post fader]

• Hold Echo 


[post fader]

• HP Echo 


[post fader]

• HP Hold Echo 


[post fader]

• LP Filter (Low Pass) 

[pre fader]

• BP Filter (Band Pass) 

[pre fader]

• HP Filter (High Pass) 

[pre fader]

• Phaser  


[pre fader]

• Flanger  


[pre fader]

• Desecrator 


[pre fader]

When Scratch Live is running, the deployed effect 
for each Effect Processor is shown onscreen, 
along with all of the control assignments and 
settings. The Effects are still available when the 
mixer is operating stand-alone, however, there 
is no display for indicating the deployed Effect, 
control assignment or settings.
  Scratch Live software effect controls mirror 
the TTM 57SL front panel. When one status 
changes, so does the other.
  For this reason, you may want to begin by 
using the Effects with Scratch Live software 
to learn control assignments. Typically, Effects 
are controlled by ear. If you know which Effect 
is installed in the Effects Processors and what 
controls are assigned to what functions, the 
Effects are very usable without the software. The 
function of the controls has been standardized 
to help keep stand-alone operation simple. The 
TTM 57SL ships with Echo in Processor 1, and 
LP Filter in Processor 2 before Scratch Live 
reassigns them.

DECK

B1

B2

1

2

B3

B4

PROCESSOR 1


    PROCESSOR 2

PGM 1

PGM 2

AUX

MAIN

INSERT POINT

NOTE:  These  defaults  can  be  changed  and 
saved  to  the  mixer. 

SEE  “SAVE  TO  MIXER”  ON 

PAGE 33.

GROUP 6

If you are connected to Scratch Live, switch to 
Group 6 to begin using Effects. Press GROUP 
then 

B6.


SEE “GROUPS” ON PAGE 37.

InSertIng an effect

There are four possible insert points for a 
deployed Effect: PGM 1, PGM 2, AUX BUS or 
Main Mix. When an Effects Processor is inserted 
in PGM 1 or PGM 2, pre- or post-fader operation 
is determined by the Effect. Both the Echo 
Effects are post-fader, and all the Filter Effects 
are pre-fader. Both Effects Processors can use 
the same insert point, but the order depends on 
the effect. For instance, the Filter effect will be 
processed first (because it is pre-fader), and the 
Echo effect will be processed second (because it 
is post-fader). If both are Filter Effects, Processor 
1 will be first. 

NOTE: Any Effect can only be loaded into one 
of the processors.

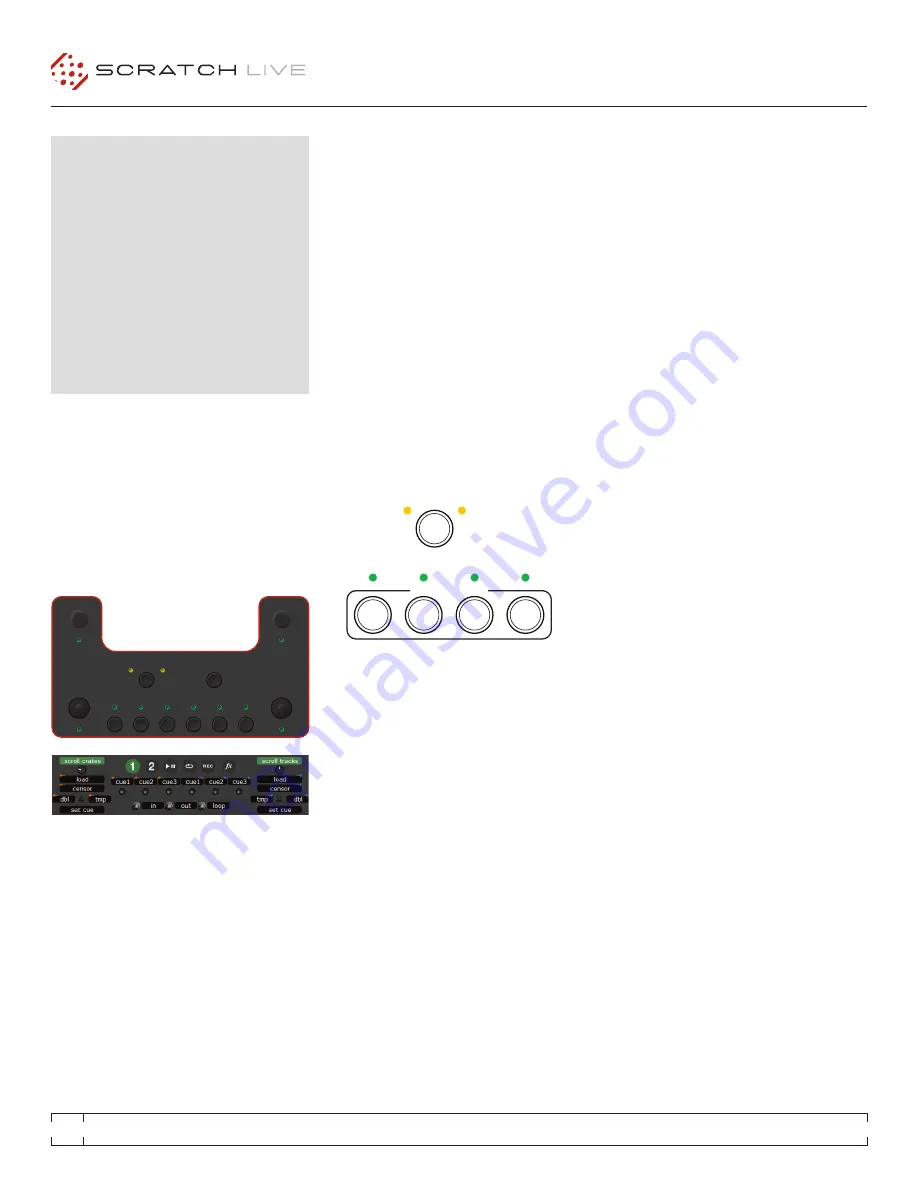
The controls required to select an Effects 
Processor and determine it’s insert point are 
shown below. The DECK button selects the 
Effects Processor to be controlled. Pressing the 
button toggles between Effects Processor 1 and 
Effects Processor 2. 

B1

 inserts the selected processor in PGM 1.

B2

 inserts the selected processor in PGM 2.

B3

 inserts the selected processor in AUX Bus.

B4

 inserts the selected processor in Main Mix.

To share an effect with both PGM 1 and PGM 2, 
insert the effect in the Aux Bus and use the 
FlexFX switches. Remember that an effect in the 
Aux Bus affects the FlexFX, Mic and Aux Inputs.

effectS

HARDWARE & SOFTWARE CONTROL 
PANELS

These “soft” controls have multiple functions 
for controlling Scratch Live. These also control 
the Internal Digital Effects when the mixer is 
operated stand-alone without a computer. The 
Effects function the same way if connected to 
the Scratch Live software or when using the TTM 
57SL without a computer. 

FOR  MORE  INFORMATION  ON  SCRATCH  LIVE 

SOFTWARE CONTROL OPTIONS SEE “ADDITIONAL 

SETUP” ON PAGE 32.


GROUP

DECK

P1

P2

J1

B1

B2

1

2

B3

B4

B5

B6

J2

Содержание Scratch Live TTM 57SL

Страница 1: ...TTM 57SL FOR SERATO SCRATCH LIVE OPERATOR S MANUAL 2 1 ...

Страница 2: ...TTM 57SL FOR SERATO SCRATCH LIVE OPERATOR S MANUAL 2 1 2 ...

Страница 3: ...h Live software Keep this manual in a safe place If you ever lose it a new copy may be downloaded at rane com ttm57sl html To keep up with the latest tips and to check for software updates for your TTM 57SL visit the Official Scratch Live Forum at serato com Copyright Notices 2010 Rane Corporation All rights reserved Scratch Live and the Scratch Live logo are trademarks of Serato Audio Research Tr...

Страница 4: ...ation Troubleshooting 12 Importing and Playing Music 13 Supported File Types 13 Playing Music 13 Track Display 13 Whitelabel net 14 Preparing Your Files 14 Analyzing Files 14 About Corrupt Files 14 Set Auto BPM 14 The Offline Player 14 Playback Control 15 The Control Record 15 The Control CD 15 Vinyl Scroll 15 Main Screen Overview 16 Virtual Deck 16 Visual Aids 16 Tempo Matching Display 16 Track O...

Страница 5: ...back Keys Use Shift 33 Lock Playing Deck 33 Sort Cues Chronologically 33 Enable Hot Cues 33 Use Auto Gain 34 Hi Fi Resampler 34 Play From Start 34 Instant Doubles 34 Play From First Cue Point 34 Braking Internal Mode 34 Audio Output 34 Vinyl Control 34 Adjust Loops with Vinyl 34 Next Song on Flip 34 Enable Vinyl Scroll 34 Reverse Vinyl Scroll 34 Vinyl Scroll Speed 34 Drop to Absolute Position 35 D...

Страница 6: ...face for your favorite Mac or PC software USB 1 1 with 8 channels of streaming 16 bit 44 1 kHz audio with onboard DSP effects processing TTM 57SL Mixer Overview Magnetic Faders Rane s legendary patented magnetic faders are the fastest most accurate and longest lasting on the planet The TTM 57SL uses the same faders and performance oriented layout that made the TTM 56 famous Hardware Features Inter...

Страница 7: ...sed The Aux output is on regular unbalanced RCA jacks Because all signals are identical users may use any of these outputs as the main output if a different cable type is required for system connection Rane recommends balanced wiring for the strongest signal and rejection of hum and noise If your cable to the amp rack is less than 10 feet 3 meters you can often get away with an unbalanced cable Se...

Страница 8: ...Fader controls PGM 2 and the PGM 2 Fader controls PGM 1 PGM 1 is also moved from the A side of the Crossfader to the B side of the Crossfader Fader Contour and Reverse controls stay with the original Fader Fader 1 Contour and Reverse is always with the left Fader and Fader 2 Contour and Reverse is always with the right Fader This switch is slightly recessed to prevent accidental engagement Meter T...

Страница 9: ...essary to connect cables from FlexFX Send to FlexFX Return as the TTM 57SL detects the presence of cables and automatically connects the Send and Return when a cable is not connected Any signal assigned to the FlexFX Loop will be processed by any internal digital effect assigned to the AUX BUS This has the advantage of allowing one of the two internal effects to be assigned to the AUX BUS and then...

Страница 10: ...o install the drivers via the hardware wizard Cancel and close the hardware wizard With your hardware still connected run the Scratch Live driver updater This is usually located in C Program Files Serato driver_updater32 exe or for 64 bit systems C Program Files x86 Serato driver_updater64 exe Repeat this process for each of your USB ports TIP The driver updater can install drivers for different t...

Страница 11: ...r right deck s outputs into input 3 2 Match the L channel from each of your decks usually white with the white uppermost RCA sockets on the mixer and R usually red with the red sockets This is important to give Scratch Live the correct direction of playback If your songs play backwards you probably have the left and right channels swapped from your deck 3 Set the input level dip switches for input...

Страница 12: ...time you play TIP If the slider jumps to the far right then you have a problem with noise in your turntables CD players mixer Check all your connections and make sure your equipment is well grounded In some situations you will not be able to improve the signal quality and you will have to play on regardless In this situation stick to REL mode The Scopes The scopes on the Setup screen display the i...

Страница 13: ... see Whitelabel net on page 14 NOTE iTunes Music Store DRM files cannot be played back by Scratch Live iTunes Plus files are DRM free Playing Music Click on the All icon to show all the tracks in your library Use the keyboard shortcut Shift Left Arrow to load the highlighted track on to the Left Deck and Shift Right Arrow to load the highlighted track on to the Right Deck TIP You can also load tra...

Страница 14: ...calculated ID3 tags contain data about your tracks and are saved inside the files themselves Genre track name and artist are examples of common tag information See Editing ID3 tags on page 29 The Offline Player The offline player is a useful tool for preparing crates auditioning tracks and setting cue and loop points The offline player is available when Scratch Live hardware is not connected and out...

Страница 15: ...act with the computer necessary To use Vinyl Scroll with turntables lift the needle off the record and drop it into special bonus track section at the end of the record s A side The movement of the control disk now controls the selected track within your library Lift the needle out of the Vinyl Scroll section of the record and into the lead out between the Vinyl Scroll area and the end of the reco...

Страница 16: ... blue representing high frequency treble sounds You can also switch to a three band spectrum view by holding the ctrl key and clicking on the waveform Click on the waveform to scrub or make fine adjustments to your position within the track This applies to INT mode only and may be useful if you wish to set cue points in your tracks without your turntables or CD players connected The Main Waveform ...

Страница 17: ...CD player or turntable s pitch slider doesn t need to be at zero we do the math for you You can also use the tempo tapper when no song is loaded for finding the BPM of regular records for example Key Lock When Key Lock is on the key or pitch of the song stays locked at what it would be if the track was playing at normal speed regardless of the platter speed of the turntable or CD player Key Lock h...

Страница 18: ...and meter are displayed TIP Use the space bar to toggle between Library Mode and your current display mode Classic Vertical Mode The two Decks are displayed on the left and right sides of the screen with vertical waveforms in the middle Classic Horizontal Mode The two Decks are displayed on the left and right sides of the screen with horizontal waveforms in the middle Stack Mode The Decks are stac...

Страница 19: ... most closely resembles the properties of normal vinyl The beginning of the track is mapped to the start of the record and by picking up the tone arm and moving the needle to another part of the record needle dropping you can move to a different position within the track ABS mode faithfully reproduces the movement of vinyl control records including stops starts scratching needle dropping rubbing a...

Страница 20: ...ve the slider changes the slider range to 8 10 16 50 or 100 Temporary Cue There is a temporary cue point that can be used like the Cue button on many DJ CD players Press ctrl I to set this temporary cue point on the Left Deck and ctrl K to set it on the Right Deck This temp cue point is shown in the main waveform as a white marker This cue point is not saved with the track and by default is set to...

Страница 21: ...en move the control vinyl Moving the vinyl will adjust the in point Once you are happy with the new in point click the IN button to save and release the control vinyl The control vinyl will go back to controlling playback once the record is back up to normal speed Using the control vinyl to adjust loop end points is optional to turn this feature off disable the Adjust loops with vinyl option in th...

Страница 22: ...creen ie if the onscreen buttons display 1 2 4 8 16 bar loops alt 1 triggers 1 bar loop and alt 5 triggers a 16 bar loop Loop Roll Loop roll performs a standard auto loop but when the loop is turned off the playback position is returned to the position where it would be if it had not entered the loop much like censor The other difference between loop roll and standard autoloop is the roll button i...

Страница 23: ...screen Playing Samples Pressing the play button on each slot will play the loaded audio TIP Use the shortcut keys z slot 1 x slot 2 c slot 3 v slot 4 b slot 5 n slot 6 to trigger each sample respectively SP 6 Instant Doubles You can instant double from the Virtual Decks down to the SP 6 from the SP 6 up to the Virtual Decks and also between the sample slots themselves This means the position track...

Страница 24: ...n addition to the volume slider there is an additional gain knob for each slot These allow you to fine tune the maximum gain volume of the loaded sample The gain adjustment will also be written to the track s ID3 tag meaning that it will be the same everytime you load it SP 6 Output Selector Use the output selector to choose where you wish to have the SP 6 output to L outputs through the left chan...

Страница 25: ...o by clicking the Deck buttons Each Deck can only pass through one FX unit at a time Show Parameters Press the Show Parameters button to expose the individual parameters for each effect You can then control the individual parameters by adjusting their respective knobs In Ultra Knob Mode use this to select which effects are loaded and controlled by the Ultra Knob In Ultra and Super Knob Mode you ca...

Страница 26: ... assign mode controls which have MIDI inputs assigned show a green box indicator around them MIDI Platters The Scratch Live Virtual Decks are not user assignable to MIDI control MIDI devices with platters on them all send different data so user mapping is not possible To control the platter use a natively supported controller Assigning MIDI to other Controls Controls which are not normally visible...

Страница 27: ...te collections There is no limit to the number of crates you can create and any given track can be placed in multiple crates For example you could organize your files into the following crates where any one track would be filed in more than one crate Hip Hop UK Hip Hop French Hip Hop Inst Hip Hop Old Hip Hop Hip Hop LPs To make a new crate click the button under the library window To rename a crat...

Страница 28: ... date and time Using the drop down arrow you can navigate to and view detailed information of any previous sessions There are columns for the period i e date of session name of track and artist name In addition these other categories listed below will give you more detailed information about your sessions Start Time When viewing a song row the start time of the song is displayed When viewing a ses...

Страница 29: ...t the playlist and track information NOTE We recommend that you turn off any wireless networking devices when using Scratch Live If you export your playlist online whilst playing you may experience USB dropouts If so you may wish to avoid using this function Live Playlists Serato Playlists has the Live Playlists option to allow you to display what you are playing online in realtime on your serato ...

Страница 30: ... but the file will remain in your All playlist Deleting a track from a subcrate will remove it from the subcrate and the main crate but not the All playlist Crates that are deleted are sent to the recycle bin trash NOTE To delete any files from your library and your hard drive sending them to the recycle bin use the shortcut ctrl shift delete If you are using iTunes playlists your files cannot be ...

Страница 31: ... created on a drive when files are added to Scratch Live A copy of each Scratch Live folder called ScratchLIVEBackup is created next to the folder it is backing up This folder is created when exiting Scratch Live You will be prompted to backup your Scratch Live library on exit if there is no backup for a drive or if the last backup is more than 1 week old Backup will only keep ONE level backup at ...

Страница 32: ... now position in the audio stream Additional Setup This section covers general preferences and adjustments you can make to improve the performance of Scratch Live Click on setup to get to this area Hardware USB Buffer Size Latency Scratch Live processes audio in small chunks When smaller chunks are used the movement of the record is translated into audio more often which results in a lower overall...

Страница 33: ... button changes the state of the Master Cue button on the mixer Expand Library on Track Scroll With this option turned on the hardware panel will hide temporarily while you are using the mixer to scroll through your library Flashing Deck Indicator The flashing deck indicator shows which Virtual Deck is selected by the deck button on the mixer When this option is on a red border will flash around t...

Страница 34: ... the beginning when loaded in REL and INT modes If this setting is not enabled freshly loaded tracks will continue to play from the point the last track was at This option is on by default Instant Doubles This allows you to quickly match the playhead position of two tracks With this option set when you load a track on one Virtual Deck that is already loaded on the other Virtual Deck it must be the...

Страница 35: ...ratchlive library NOTES If your iTunes library contains a large number of tracks it may take some time for Scratch Live to read it Any changes made in Scratch Live to the file information of tracks in your iTunes library will not appear in iTunes until after you play the track Scratch Live cannot play files that have been protected by Digital Rights Management systems such as those previously sold...

Страница 36: ...e s processor usage for example if you are running a recording program at the same time The default setting is 60 Hz or refreshed 60 times per second This setting applies to the entire screen i e the Virtual Decks the Waveforms the Library and the Setup screen Audio Cache Use the slider to set the amount of audio that is loaded into memory A small audio cache will place less load on your computer ...

Страница 37: ...on the Scratch Live hardware panel are grayed out Groups Functions are organized in a series of groups Each group contains a bank of software controls The first two groups are custom groups designed to contain the commands you need most often during a set The next four groups contain other functions ordered by category To access a group press the GROUP button on the mixer then press B1 General Cus...

Страница 38: ... points on the right Deck Control looping from the footswitch Jump to cue points on the left Deck Hold the joystick down and press a B button to set a cue point on the left Deck Scroll through your crates and library Push to load track on left Deck Push to load track on right Deck Joystick right to Double Copy the track from the left Deck to the right Deck Joystick left to Double Copy the track fr...

Страница 39: ...tapping P1 to the beat or manually adjust by turning P1 The optional footswitch can also tap in the BPM Use the left joystick to quickly halve split double or quadruple the tempo The buttons B1 through B4 set the effect s insert point either PGM the Aux bus which includes the Mic or the Main output Stop and erase the last recording Start recording from the footswitch Start recording Scroll through...

Страница 40: ...roup 6 If you are connected to Scratch Live switch to Group 6 to begin using Effects Press GROUP then B6 See Groups on page 37 Inserting an Effect There are four possible insert points for a deployed Effect PGM 1 PGM 2 AUX BUS or Main Mix When an Effects Processor is inserted in PGM 1 or PGM 2 pre or post fader operation is determined by the Effect Both the Echo Effects are post fader and all the ...

Страница 41: ...the sweep depth Echo Effects P1 controls the delay amount P1 second function taps the BPM manually a single tap re syncs the tag BPM P2 controls the feedback P2 second function no effect in echo effects filter cutoff frequency in HP echo effects Phaser P1 controls the design frequency P1 second function taps the BPM a single tap re syncs BPM BPM affects LFO sweep rate P2 controls the feedback P2 s...

Страница 42: ... indicator off is Cutoff Frequency which starts at 722 Hz and is adjustable from 31 5 Hz to 16 kHz 9 octaves The full sweep of the filter is reached in 11 3 rotations of P1 J1 Multiplier The BPM Multiplier is selected with J1 which toggles between transform operation and BPM multiplier If the green mode indicator is on J1 may adjust the multiplier to 16 8 4 2 1 or P1 Frequency 31 5 Hz 16 kHz Sweep...

Страница 43: ...g with the control returning to the set Wet Dry ratio when the control is at rest in the center Phaser Flanger Control Assignments Phasing is a swept comb filter effect with no linear harmonic relationship between the comb teeth Splitting an audio signal in two shifting the phase of one signal by passing it through an all pass filter then recombining creates the phasing effect The control response...

Страница 44: ...o 11 6 ms The full range is reached in 11 3 rotations of P2 With Depth at minimum the LFO ceases to have any effect and P1 becomes a manual sweep control J2 Wet Dry Mix Pressing J2 toggles between transform operation indicator off and Wet Dry control green indicator on The phaser flanger default is 100 wet J2 has the same operation on all effects See J2 Wet Dry Mix on page 43 Echo Effects Control ...

Страница 45: ... B2 B3 or B4 J2 Wet Dry Mix Pressing J2 toggles between transform operation indicator off and Wet Dry control green indicator on The echo default is 50 Wet 50 Dry J2 has the same operation on all effects See J2 Wet Dry Mix on page 43 Hold Echo Control Assignments If the track has a BPM tag the Echo BPM is automatically set and a lock icon appears in the Echo section To manually set the BPM of the ...

Страница 46: ... Wet Dry Mix Pressing J2 toggles between transform operation indicator off and Wet Dry control green indicator on The hold echo default is 50 Wet 50 Dry J2 has the same operation on all effects See J2 Wet Dry Mix on page 43 Desecrator Control Assignments The Desecrator adds controlled distortion from fine dust to rusty metal spikes by allowing adjustment of bit depth and sample rate without dither...

Страница 47: ... from library ctrl shift del and ctrl shift backspace Delete the file from your library and send to the recycle bin Note to iTunes users files in your iTunes library cannot be deleted this way ctrl shift Toggle the input reverse switch esc Clear search string if searching or exit Scratch Live SAMPLE PLAYER slot 1 slot 2 slot 3 slot 4 slot 5 slot 6 Load to sample slot ctrl alt Z ctrl alt X ctrl alt...

Страница 48: ...entire file and create a file index the first time it is loaded This may take a few seconds for longer files After the first load it should load instantly See Preparing Your Files on page 14 I have a particular MP3 that won t play plays badly takes a long time to load crashes the program What should I do The file may be damaged and may need to be deleted from your library Please go to the forum at...

Страница 49: ... sure this really is an audio file Unsupported file This MP3 contains multiple layers While scanning Scratch Live found frames belonging to multiple MPEG layers Scratch Live does not support MP3s that contain frames from multiple layers some frames may be output as silence Unsupported file This file is more than 2GB in size Self explanatory At the moment Scratch Live does not support files that ar...

Страница 50: ...the feel of the faders The faders are self lubricating and with normal use should not require additional lubrication If you wish you can use a light silicone lubricant rated for use with electrical parts This will help maintain the feel We recommend Caig DeoxIT FaderLube F100 spray lubricant Order DeoxIT F100 from CAIG Laboratories Inc 12200 Thatcher Ct Poway CA 92064 Phone 858 486 8388 Fax 858 48...

Страница 51: ...e Fader If you do make sure the parts are standing straight before reinstalling Magnetic Fader Rail Cleaning Torsion Spring Sensors Rails Torsion spring Sensors Remove ribbon Remove 4 screw Remove 4 screw Mark location before disconnecting ribbon PGM 1 PGM 2 XFADER 8 NOTE In order to achieve the highest possible accuracy each magnetic fader is factory calibrated for the location in which it was sh...

Страница 52: ...icking up huge amounts of noise barely tracking Connect your turntables directly to the hardware BAD TURNTABLE VIBRATION Bass is reaching the stylus Try to isolate the turntable from the speakers DUSTY NEEDLE Dust is preventing the stylus from tracking the groove correctly Clean your needle and the control vinyl DAMAGED NEEDLE Try re seating cleaning or replacing your stylus Scope Reading and Fixe...

Страница 53: ...ING The signal from the needle is not reaching the TTM 57SL Check the cable and cartridge connections LEFT CHANNEL IS NOISE Left signal has been lost with a noisy loose connection TONEARM IS EXTREMELY LIGHT The needle isn t sitting in the groove Increase the tonearm weight RIGHT CHANNEL MISSING The signal from the needle is not reaching the TTM 57SL Check the cable and cartridge connections RIGHT ...

Страница 54: ... 3 L R RIAA ANALOG 4 PHONO LINE ADC ANALOG 4 L R Analog Diagram Simplified block diagram of the analog inputs around the DSP Only one channel is shown Footswitch Diagram Rane does not manufacture or distribute the optional foot switch The foot switch needs to be a passive pull down device capable of grounding the TIP RING or TIP and RING to get the three possible states Good choices are the DigiTe...

Страница 55: ...D EFFECTS RETURN GAIN BLOCK xfader ch fader ON OFF EFFECTS SEND EFFECTS RETURN ON OFF EFFECTS SEND EFFECTS RETURN GAIN BLOCK xfader ch fader ON OFF EFFECTS SEND EFFECTS RETURN ON OFF EFFECTS SEND EFFECTS RETURN ON OFF EFFECTS SEND EFFECTS RETURN ON OFF EFFECTS SEND EFFECTS RETURN EFFECTS INSERT ON OFF EFFECTS SEND EFFECTS RETURN EFFECTS INSERT ON OFF EFFECTS SEND EFFECTS RETURN CUE RECORD CUE RECO...

Страница 56: ...ch leg to ground Gain 50 dB 1 kHz Frequency Response 30 to 20 kHz 0 3 dB max gain CMMR 40 dB 1 kHz max gain S N 76 dB Re 0 dBFS max gain 20 kHz BW Tone Controls 2 band Main Booth Outputs Stereo balanced XLR TRS jacks Frequency Response 15 Hz to 20 kHz 0 3 dB THD N 0 005 re 0 dBFS 20 to 20 kHz 20 kHz BW S N balanced output 102 dB re 0 dBFS A weighted Auxiliary Output Stereo unbalanced RCA jacks Gen...

Страница 57: ...ce with the EMC directive in the event that the equipment is modified without written consent of the manufacturer Type of Equipment Professional Audio Signal Processing Model TTM 57SL Immunity Results THD N re 12 dBu 400 Hz sine BW 20 Hz 20 kHz Baseline 70 dB Test Description Measurement Conditions RF Electromagnetic Fields Immunity 80 MHz 1000 MHz 1 kHz AM 80 depth 3V m 66 dBr 260 MHz 53 dBr 400 ...

Страница 58: ...PECIFIC PERIOD OF THIS LIMITED WARRANTY SHALL BE THAT WHICH IS DESCRIBED TO THE ORIGINAL RETAIL PURCHASER BY THE AUTHORIZED RANE DEALER OR DISTRIBUTOR AT THE TIME OF PURCHASE Rane Corporation does not however warrant its products against any and all defects 1 arising out of materials or workmanship not provided or furnished by Rane or 2 resulting from abnormal use of the product or use in violatio...

Страница 59: ...THE COUNTRY WHERE THE UNIT WAS PURCHASED OR if product was purchased in the U S AT THE RANE FACTORY IN THE U S If the product is being sent to Rane for repair please call the factory for a Return Authorization number We recommend advance notice be given to the repair facility to avoid possible needless shipment in case the problem can be solved over the phone UNAUTHORIZED SERVICE PERFORMED ON ANY ...

Страница 60: ...TTM 57SL FOR SERATO SCRATCH LIVE OPERATOR S MANUAL 2 1 60 RANE TTM 57SL FOR SERATO SCRATCH LIVE OPERATOR S MANUAL 2 1 ...

Отзывы: