background image

23

Warranty

Rand McNally warrants that the product and the component parts thereof, will be free of defects in workmanship and materials for a period of one (1) year from the date of 
purchase. This warranty may be enforced by the first consumer purchaser (“Customer”) only, provided that the product is utilized within the U.S.A. or Canada. During the 
warranty period, Rand McNally will, without charge, repair or replace (with a new or newly reconditioned unit), at its option, a defective product or  component part. For 
repair or replacement of a defective product, Customer must contact Rand McNally at 877-446-4863 for return authorization and instructions. Customer will be required 
to provide proof of date of first Customer purchase, such as a duplicate copy of the original sales receipt, for the warranty to be valid. The Customer must pay any initial 
shipping charges required to ship the product for warranty service, but if the product is under warranty, the return charges will be at Rand McNally’s expense. Repairs or 
replacements have  a 90-day warranty. If the product is still under its original warranty, then the new warranty is 90 days or to the end of the original one (1) year warranty, 
whichever is longer. This warranty gives the Customer specific rights. Other rights may be available to Customer, which vary from state to state.

Exclusions: This limited warranty does not apply: 1) to any product damaged by accident; 2) in the event of misuse or abuse of the product or as a result of unauthorized 
alterations or repairs; 3) if the serial number has been altered, defaced or removed; or 4) if the owner of the product resides outside of the U.S.A. or Canada.

RAND MCNALLY AND ITS LICENSORS DO NOT MAKE ANY OTHER WARRANTY OR REPRESENTATION, EITHER EXPRESS OR IMPLIED, WITH RESPECT TO THE PRODUCT,
INCLUDING ANY WARRANTY AS TO MERCHANTABILITY, FITNESS FOR A PARTICULAR PURPOSE, QUALITY, PERFORMANCE, TITLE OR NON- INFRINGEMENT. IN NO EVENT
WILL RAND MCNALLY OR ITS LICENSORS BE LIABLE FOR ANY INDIRECT, SPECIAL, INCIDENTAL, OR CONSEQUENTIAL DAMAGES ARISING OUT OF THE USE OF OR 
INABILITY TO USE THE PRODUCT, EVEN IF ADVISED OF THE POSSIBILITY OF SUCH DAMAGES. Some states do not allow limitations on how long an implied warranty lasts 
and/or do not allow the exclusion or limitation of incidental or consequential damages, so the above limitations may not apply to some consumers.

©2020 Rand McNally. All rights  reserved. Rand McNally, the  Rand McNally globe logo and ClearDryve are trademarks of  
 RM Acquisition, LLC,  d/b/a Rand McNally.

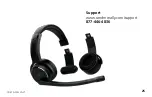
Содержание ClearDryve 210

Страница 1: ...Quick Start Guide...

Страница 2: ...rted with ClearDryve 6 Charge the Battery 6 Power ClearDryve On and Off 7 Pair With a Device over Bluetooth 7 Call Mode 9 Quick Access 9 Answer an Incoming Call 10 End a Call 10 Ignore an Incoming Cal...

Страница 3: ...14 Go to the Next Previous Song 14 Connect to a Wired Device 15 More Functions 16 Active Noise Cancellation 16 EQ Preset 17 Add Remove the Stereo Earpiece 18 Reset to Factory Settings 19 Troubleshooti...

Страница 4: ...2 What s in the Box In box contents includes ClearDryve 210 headphones Audio cable Charging cable Hard sided carrying case Detachable earpiece comes pre assembled to the headphones Detachable headpad...

Страница 5: ...ce Release Note The earpiece release button is located on the inside of the headband The detachable headpad shown separately is pre assembled on the ClearDryve 210 Detachable Headpad Detachable Earpie...

Страница 6: ...4 Function Button Layout 6 7 1 2 3 4 5...

Страница 7: ...the other swivel the mic boom up and over to the other side 1 Vol button 2 Vol button 3 Micro USB port 4 3 5mm audio input 5 Multi function button MFB 6 ANC button 7 Mic boom arm You can press long pr...

Страница 8: ...start taking and managing calls or listening to music Charge the Battery Before use you need to charge the battery on ClearDryve Connect the USB cable to the micro USB port on ClearDryve Connect the o...

Страница 9: ...off When you power ClearDryve on for the first time it automatically enters pairing mode The next time you turn it on it will automatically attempt to connect with the most recently paired device Pair...

Страница 10: ...l change to solid blue You can pair ClearDryve to a new device at any time by entering pairing mode again To enter pairing mode again 1 If the headphones is on turn it off by pressing and holding the...

Страница 11: ...e MFB End a call Press the MFB Ignore a call Press and hold the MFB Note The duration of the press should more than 1 second but less than 3 seconds Holding down the MFB for too long i e over 3 second...

Страница 12: ...e sure the mic boom arm is down End a Call To end a call 1 Press the MFB to hang up 2 ClearDryve will beep once to confirm Ignore an Incoming Call To ignore an incoming call 1 Press and hold the MFB f...

Страница 13: ...mute or unmute the mic when you are on a call To mute the call 1 Move the mic arm up and away from your mouth to about 30 degrees or more above horizontal To unmute the call 1 Move the mic arm arm bac...

Страница 14: ...available To change the volume 1 Press Vol to increase the volume 2 Press Vol to decrease the volume 3 ClearDryve will beep when you reach the lowest or highest volume settings Note Depending on your...

Страница 15: ...e MFB Adjust volume Press Vol or Vol Next Previous Long press Vol or Vol Streaming Music Quick Access Play and Pause To play or pause music 1 Press the MFB while in Music Mode Note ClearDryve does not...

Страница 16: ...e 3 ClearDryve will beep when you reach the lowest or the highest volume Go to the Next Previous Song To switch to a different song 1 Long press Vol to advance to the next song 2 Long press Vol to go...

Страница 17: ...ncluded 3 5mm audio cable to the audio in jack on ClearDryve 2 Connect the cable to the aux out on your music device Note You must use the included aux cable to connect your device to ClearDryve When...

Страница 18: ...the need to crank up the volume by canceling out ambient noise reaching your ear The result is a crystal clear listening experience for you as well To turn ANC on or off 1 Push the ANC button to turn...

Страница 19: ...g during music playback As you listen to music on ClearDryve press and hold the MFB Quickly within 2 seconds tap on the Vol button Each tap on the Vol button causes the next EQ setting to become activ...

Страница 20: ...es The detachable earpiece can be replaced with the headpad for mono configuration To remove the earpiece or the headpad 1 Hold the black earpiece release tab 2 Slide the earpiece off To attach the ea...

Страница 21: ...between your headphones and new devices To reset ClearDryve 1 Make sure ClearDryve is powered off Now press and hold MFB to place it in pairing mode 2 Press and hold Vol and MFB at the same time unti...

Страница 22: ...r connecting to the first device turn off the headphones then press and hold the MFB The headphones will enter pairing mode Follow the steps for your unique device smartphone laptop tablet to connect...

Страница 23: ...lable with ANC turned off When ANC is on the headphones operate with EQ1 active To select a different EQ value turn ANC off then follow the instructions listed in the section entitled EQ presets Help...

Страница 24: ...Nally The Software Materials contain proprietary and confidential information of Rand McNally and its licensors Rand McNally grants User a limited license for use of this product and the Software Mate...

Страница 25: ...e original one 1 year warranty whichever is longer This warranty gives the Customer specific rights Other rights may be available to Customer which vary from state to state Exclusions This limited war...

Страница 26: ...25 Support www randmcnally com support 877 446 4836 CD210 012220 V1...

Отзывы: