background image

E2CF


3D Printer


/ User Manual

I.


ideaMaker Installation

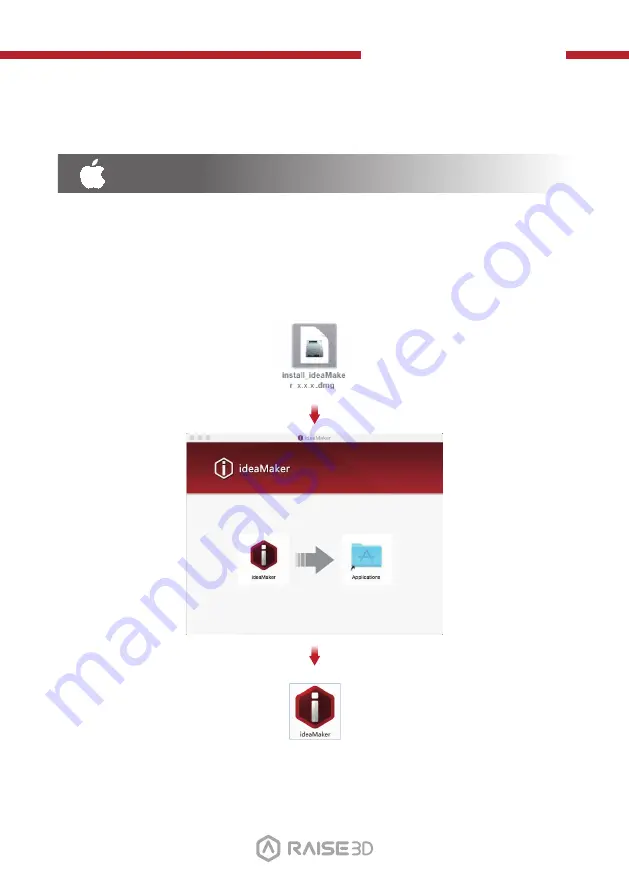
Open the Disk Image for the ideaMaker installer. This is located in the USB storage 

device included with your printer. Alternatively, you can download the latest version 

from

 www.raise3d.com/pages/download#down-im.

Next, drag the ideaMaker icon(left) into the Application folder on the right side.

MAC OS X

20

Содержание E2CF

Страница 1: ...this entire manual before operating the printer This is a class A product In a domestic environment this product may cause radio interference in which case the user may be required to take adequate measures E2CF E2CF 3D Printer ...

Страница 2: ......

Страница 3: ...The contents of this User Manual maybe updated overtime For the latest version scan the QR code or visit the link below ...

Страница 4: ...E2CF 3D Printer User Manual CONTENTS 01 ...

Страница 5: ...ay from the printer Any failure and losses caused by ignoring the following mentioned items and cautions mentioned in the operation and installation instruction are not covered by our warranty and any liability Read this instruction manual carefully Only this will ensure you use the appli ance safely and efficiently This manual is intended for the installer and the user of the appliance Follow the...

Страница 6: ...installing the printer WARNING Risk of electric shock Improper installation is dangerous Connect and operate the printer according to the specifications on the rating plate Connect the printer to a power supply with an alternating current only via a properly installed socket with earthing The protective conductor system of the domestic electrical installation must be properly installed The install...

Страница 7: ... by holding onto protruding parts Holding the machine by a protruding part such as the door may result in the part break ing off the machine If the appliance is moved by holding onto protruding components such as the appliance door the parts may break off CAUTION Risk of cutting Touching sharp edges on the appliance may lead to cuts Do not touch the sharp edges on the appliance Wear protective glo...

Страница 8: ...r lean against the appliance door Do not place any objects on the appliance door The covering plate may break if you stand on or climb onto the appliance The appliance may tip over if you sit on or lean against the open door Reaching into the chamber while the three axis system is still moving may cause hand injuries Wait for the three axis system to come to a complete stop before reaching inside ...

Страница 9: ... the print bed when it is hot Please operate with the heat resistant gloves in the attachments box Keep children away from the print bed when it is hot When operating or printing at high temperatures the print bed becomes hot Do not use a steam cleaner or spray to clean the appliance The use of non original spare parts and non original accessories is dangerous Do not touch the extruder head when i...

Страница 10: ...l interfer ence when the equipment is operated in a commercial environment This equipment generates uses and can radiate radio frequency energy and if not installed and used in accordance with the instruction manual may cause harmful interference to radio communications Operation of this equipment in a residential area is likely to cause harmful interfer ence in which case the user will be require...

Страница 11: ...Linux USB 2 0 2 Ethernet 1 Print Technology Print Head System Filament Diameter XYZ Step Size Print Head Travel Speed Build Plate Max Build Plate Temperature Heated Bed Material Build Plate Leveling Supported Materials Nozzle Diameter Hot End Max Nozzle Temperature Connectivity Noise Emission Acoustic Operating Ambient Temperature Storage Temperature Filter FFF IDEX Independent Dual Extruders 1 75...

Страница 12: ...a nozzle heater block thermocoupler heater rod throat tube and heat sink D Platform Tray The platform tray is highly magnetized to ensure that the build plate stays in place E Touch Screen On board computing system to display printer status error messages and receive commands F Power Saving Button Quick press to put the screen and LED in sleep wake mode Long press for 10 seconds to restart G Dry B...

Страница 13: ...to observe the operation of the printer C LED Light Bar Provides interior lighting of the chassis E Input Power AC input and switching F Filament Exit The filament leads from here to the extruder G Filament Run out Sensor Detects when the material has run out H Switching Power Supply Switches from alternating current to direct current Please be careful it s dangerous Do not remove the power box wi...

Страница 14: ...top Limit Switch Limits the maximum position in the Z direction and provides a Z axis zero reference B Extruder Left Right Feeds the filament into the hotend C X axis Guide Rail Guides the extruder s movement along the X axis D X axis Motor Left Right Respectively controls the corresponding extruder for horizontal movement E Z axis Motor Left Right Controls both ends of the X axis beam for synchro...

Страница 15: ... indicates the presence of high voltages Always stay away from exposed circuitry It is recommended that all conductors be removed Replacement fuse identification and rating markings Identification of a suitable replacement fuse shall be marked adjacent to the fuse holder Protective Earthing Conductor Terminal Marked near the protective earthing conductor terminal Hot parts Burned fingers when hand...

Страница 16: ...nd or default settings for better performance The Raise3D printer is designed with strong compatibility with filaments However please be very careful when using unverified filaments and settings This may cause abnormal printing tasks or damage the printer Please consult Raise3D or authorized dealers in your area for technical support and services Warning The printer belongs to EN55032 Class A In a...

Страница 17: ... cause radio interference in which case the user may be required to take adequate measures AT DE LV NO FI BE IS LI PL SE BG IE LT PT CH CZ IT LU RO UK DK EL HU SI HR EE ES ME SK FR CY NL TR CE Output power table Function Frequency 2412 2472 MHz 5150 5250 MHz 5725 5850 MHz Frequency 18 dBm b 18 dBm g 13 dBm HT 19 dBm a 18 5 dBm HT20 17 5 dBm HT40 14 dBm a 14 dBm HT20 14 dBm HT40 Wi Fi FCC Output po...

Страница 18: ...llation and First Print Raise3D Supplies and Accessories Spatula Filament 2 Tweezers USB Storage Fuse Glue 0 3 mm Feeler Gauge 1 Quick Connectors 5A 10A Power Cable 5 Heat Resistant Gloves Hex Wrenches Filament Guide Tube 2 2 5mm 2mm 1 5mm 3mm 15 ...

Страница 19: ...15 C to 30 C with a relative humidity range of 10 to 90 without condensation The storage temperature shall be in the range of 25 C to 55 C and the relative humidity range shall be 10 to 90 non condensation The altitude shall not exceed 2 000 meters Noise Acoustics 50dB A during printing Know the location of equipment branch circuit interrupters or circuit breakers and how to turn them on and off i...

Страница 20: ...lease use the power cord that conforms to your current country or region and connect it to the power socket Turn on the switch and start the device Turn on the power and the printer will enter the boot process Your Raise3D printer will take about 60 seconds to boot When the touch screen displays the Welcome window the printer is ready Then you can finish the installation and first print according ...

Страница 21: ...l ideaMaker and click Next 1 The slicing software ideaMaker is available on the USB storage device included with your printer Additional downloads and versions are available online at https www raise3d com download www raise3d com Download ideaMaker WINDOWS 18 ...

Страница 22: ...User Manual Click Finish and ideaMaker is installed Follow the instructions provided by the guide and click Install After the installa tion is finished click Next to go to the next step 2 3 I ideaMaker Installation 19 ...

Страница 23: ...the ideaMaker installer This is located in the USB storage device included with your printer Alternatively you can download the latest version from www raise3d com pages download down im Next drag the ideaMaker icon left into the Application folder on the right side MAC OS X 20 ...

Страница 24: ...hen launching ideaMaker for the first time you will need to select your printer model from the drop down list then press Next 1 Select the diameter of your filament Press Finish to finalize the initial settings NOTE ALL E2CF printers use 1 75 mm filaments 2 21 ...

Страница 25: ...cing the model 2 Click the button to import Giveaway Spinner included in the USB storage device 1 Confirm that the selected printer type and material are correct then select the standard slicing template Click Edit to select the type of Platform Addition and the type of Support 3 22 ...

Страница 26: ... and Close to return to the previous menu Click Slice to generate your file 4 Save the sliced files gcode and data by exporting them on the USB storage device NOTE File names that do not conform to the Western Latin character set may not display properly 5 Confirm that the files are saved and eject the USB storage device 6 23 ...

Страница 27: ...ccelerates the post crystallization process and improve stiffness and dimensional stability for end use Place the printed part together with support material into a dying oven Set the oven temperature at 80 for the annealing Avoid any direct contact on hot surface in the oven chamber may lead to materi al melting Normally the annealing time depends on the size of printed part at least for 6 8h 24 ...

Страница 28: ...hen the Wi Fi module is manufactured 2 4G is set at HT20 5GHz is set at HT40 NOTE The Wi Fi s frequency is fixed before being manufactured The customer is not allowed to modify the Wi Fi s parameters If needed please contact our tech support team Alternatively you can select Add Other Network and input a name and password 25 ...

Страница 29: ...erifying that the leveling has not changed during shipping How to level up the X axis As shown in figure 1 click Mainte nance to level up the X axis and it will touch the top beam until horizontal Click the Utilities menu and home the Z axis Press the upward arrow to lift the Z axis about 0 3 mm 0 7 mm 2 26 ...

Страница 30: ...CF 3D Printer User Manual Check the distance between the nozzle and the printing platform After pushing the left extruder to the center position on the platform loosen the nozzle screw 3 N Maintenance 27 ...

Страница 31: ... the printing platform exactly matches the thickness of the gauge about 0 3 mm Tighten the nozzle screw and remove the gauge The other nozzle is adjusted in the same way Follow the steps shown in the figure on the touch screen to run 9 point automatic leveling After the 9 grid interface automati cally closes the leveling is finished 0 3 mm feeler gauge 0 3 mm 4 5 N Maintenance 28 ...

Страница 32: ... the USB storage device into the USB slot on the side of the touch screen During printing you can check the status of your printing including printing time and other parameters from the touch screen in the Home interface NOTE The touch screen will display an image of your model on screen during printing This image will only be shown when the file is sliced by ideaMaker before being uploaded to the...

Страница 33: ...l print time Current print status Print height Pause Restore button Stop button Home Extruder and heating plate temperature Visual display of the current mode X Y Z axis move and return button Move distance Unit Settings Utilities Disable motor button Move the axis Loading Unloading Leveling Choose the X Y Z axis Visual display of X Y Z axis Coordinate value and Custom edit function 30 Contents of...

Страница 34: ...Experiencing Difficulties Contact Information If you run into any issues during this guided setup please contact our expert techni cians by opening a ticket online at support raise3d com ...

Страница 35: ......

Страница 36: ...vine CA 92618 USA Netherlands Office Stationsplein 45 Unit A4 004 3013AK Rotterdam the Netherlands China office 4th Floor B5 1688 North Guoquan Raod Yangpu istrict Shanghai 200438 400 6367 888 For the Mainland of China only ...

Отзывы: