background image


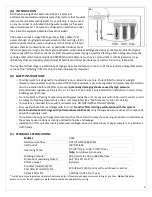
AND REPLACEMENT. THE HIGHER AND CLOSER TO THE FRONT YOU MOUNT THE UNIT THE BETTER FOR REGULAR 
MAINTENANCE.  

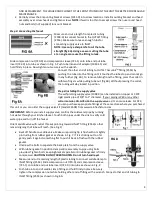
2.


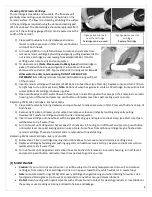
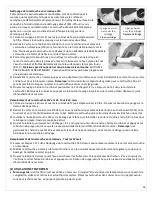
Partially screw the 3 mounting bracket screws (1011-0) into screw locations. Install mounting bracket and head 
assembly over screw heads and tighten screws. 

NOTE: 

If wall is too thin to accept screws then use round head 

nuts and bolts (not supplied) to mount bracket. 


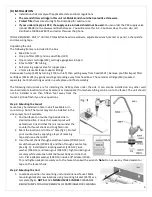
Step 3: Connecting the faucet


Measure and cut a length from plastic tubing 
(1009-0) to connect faucet to the OUTLET fitting 
(2554). Make sure to leave enough tube for 
connecting supply valve to INLET.  

NOTE: Use only a sharp knife to cut the tube 
straight (fig 4A). Using a saw or cutting the tube 
at an angle can cause the fitting to leak. 

 
Slide compression nut (720-0) and compression sleeve (721-1) onto tube and put tube 
insert (722-0) into tube as shown in Fig. 5. Push tube into end of adaptor (1040-15) and 
hold firmly in place. Now tighten nut securely with a wrench.  

Connect the other end of tubing to OUTLET Acculink

TM

 fitting (2554) by 

pushing the tube into the fitting until it touches the tube stop and cannot go 
in any further (Fig. 6A). To remove tubing from the fitting, press the collet in 
with two fingers while pulling tube out (fig 6B). Without pressing the collet, 
the tubing will stay locked in position. 
 

Step 4: Installing the supply valve


The self-piercing supply valve (1008-0) can be installed on copper or CPVC 
rigid plastic pipe of 3/8" to 1" diameter. If your piping is PEX or any other 
softer material, DO NOT USE this supply valve as it can cause leaks. For PEX, 
you can purchase appropriate fittings at the same store where you purchased 

this unit or you can order the supply valve kit (model CK538) from www.rainfreshstore.com 


IMPORTANT:

 Before you install supply valve, confirm the cold water pipe by running 

hot water through your kitchen faucet. Touch both pipes under the sink to verify cold 
water pipe and turn off the faucet. 


Orient saddle valve with outlet threads pointing towards INLET fitting (2553) so that 
remaining length of tube will reach. (See Fig. 1)  


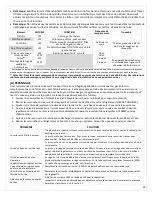
Back off handle on saddle valve. Make sure piercing tip is flush with or slightly 
protruding from rubber gasket as shown in Fig. 7. If it is sticking out too far 
gently push it against something flat to push it back in flush with the rubber 
gasket.  


Unscrew the bolts to separate the back plate from the supply valve. 


With rubber gasket in position clamp entire assembly to pipe using bolts 
provided. Tighten bolts, keeping brackets parallel until rubber gasket is firmly 
compressed. 

CAUTION: DO NOT OVERTIGHTEN. Do not turn handle yet

.   


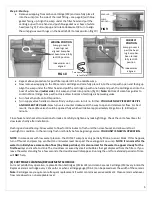
Measure and cut remaining length of plastic tubing to connect saddle clamp to 
INLET fittings (2553). Slide compression nut (720-0) and compression sleeve 
(721-1) onto tube and put tube insert (722-0) into tube as shown in Fig. 8  


Push tube into end of saddle clamp fitting and hold firmly in place. Securely 
tighten the compression nut while holding other end of fitting with a wrench. Connect other end of tubing to 
INLET fitting (2553) as shown in Fig. 6A. 


FIG 8 

Содержание UCS3

Страница 1: ...for reduction of Lead VOC Cyst e g Cryptosporidium Giardia and lindane to NSF ANSI Standard 42 for reduction of chlorine taste odour and to NSF ANSI 372 The standards referenced above evaluate product...

Страница 2: ...be installed before the filter to prevent potentially damaging shocks caused by high pressure Recommended regulator setting is 75 psi 5 1 bar 517 kPa or less Not intended for installation in multi st...

Страница 3: ...t can also be installed on any other wall mounted remote location such as basement or crawl space from where tubing can be run to the faucet The unit should not be installed more than fifteen feet awa...

Страница 4: ...to 1 diameter If your piping is PEX or any other softer material DO NOT USE this supply valve as it can cause leaks For PEX you can purchase appropriate fittings at the same store where you purchased...

Страница 5: ...ly after installation Flushing and conditioning Allow water to flow for 10 minutes to flush unit then close faucet and allow unit to sit overnight to condition In the morning flush unit briefly before...

Страница 6: ...and open faucet to relieve pressure in filter Press vent buttons on top of both heads 2 Remove right sump and lower and at same time remove carbon cartridge by twisting and gently pulling downwards Tr...

Страница 7: ...p of fresh unscented bleach to the first sump reattach all sumps to the unit 4 Open the supply valve and run some water through the system until you smell the bleach coming out of the faucet Turn off...

Страница 8: ...onsist of repair replacement or credit at its option of any part found by the Company inspection to be defective provided that the product has not been misused abused altered or damaged as determined...

Страница 9: ...s 10 D Installation 11 a Installation du robinet 11 b Montage de l unit 11 c Raccordement du robinet 12 d Installation de la soupape trier 12 e Commencez 13 E Nettoyage et remplacement des cartouches...

Страница 10: ...ression trop lev e Le r glage recommand du r gulateur est de 75 psi 5 1 bar 517 kPa ou moins Syst me de filtration non destin tre install dans des b timents de plus de quatre tages Ne pas exposer des...

Страница 11: ...galement tre install tout autre endroit distant support mural comme un sous sol ou un vide sanitaire d o les tuyaux peuvent tre achemin s jusqu au robinet L appareil ne doit pas tre install plus de 4...

Страница 12: ...tif ou vous pouvez commander le kit de la valve d alimentation mod le CK538 sur le site www rainfreshstore com IMPORTANT Avant de proc der l installation de la valve d alimentation confirmez la condui...

Страница 13: ...a pas de fuite lente Rin age et conditionnement Laissez couler l eau pendant 10 minutes pour rincer le syst me puis fermer le robinet toute la nuit pour conditionner le syst me Le lendemain matin lai...

Страница 14: ...joint d tanch it dans le carter Remplacement de le cartouches CF2 et LR1 Tous les 6 mois 1 Fermez la soupape triers et ouvrez le robinet de fa on d pressuriser le filtre Pressez les boutons de purge...

Страница 15: ...nt la valve d alimentation et ouvrez le robinet pour vacuer la pression 2 Retirer les cartouches de leurs carters respectifs et mettez les de c t dans votre r frig rateur NE PAS CONGELER 3 Ajouter de...

Страница 16: ...achat initial Aux termes de la pr sente garantie la soci t s engage r parer ou remplacer sa discr tion toute pi ce qu elle juge d fectueuse pourvu qu elle ne d termine pas que le filtre a t modifi ou...

Отзывы: