background image

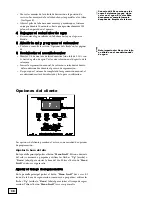
Ajustar los días entre la regeneración

En la pantalla principal pulsar el botón “

Menu Scroll”

tres veces. El

ícono de los días entre la regeneración comenzará a parpadear, utilizar
las flechas “

Up

” (arriba) o “

Down

” (abajo) para ajustar los días entre

la regeneración. Pulsar el botón “

Menu Scroll

” dos veces para salir.

Ajustar las libras de sal

E

n la pantalla principal pulsar el botón “

Menu Scroll

” cuatro veces. El

ícono  de  las  libras  a  regenerar  comenzará  a  parpadear,  utilizar  las
flechas “

Up

” (arriba) o “

Down

” (abajo) para ajustar las libras de sal.

Pulsar el botón de “

Menu Scroll

” una vez para salir.


NOTA: Si el contenido de hierro del agua a ablandar es cero y el nivel
de dureza es inferior a 20 gpg, le sugerimos que elija el ajuste de baja
en sal para un funcionamiento más eficiente.

Regeneración manual

Para regenerar manualmente el sistema, pulsar el botón “

Regenerate

Now”

(Regenerar Ahora). El control efectuará una cuenta regresiva de

10  segundos.  Para  cancelar  la  regeneración,  pulsar  el  botón  “

Menu

Scroll

” antes de finalizar la cuenta regresiva. Una vez la regeneración

iniciada, se podrá, de forma manual, avanzar para cada ciclo mante-
niendo pulsado el botón de “

Menu Scroll”

durante 5 segundos.

Sección del instalador

Programar el reloj electrónico

Enchufar el sistema, el control mostrará automáticamente el modo de
instalación. El control mostrará “

C on

” para acondicionador.

Pulsar el botón “

Menu Scroll

” una vez para avanzar al tipo de unidad.

Nota: el tipo de modelo y de resina se muestran en el lado de la caja de
control.

  •    La configuración predeterminada es 75. Utilizar los botones “

up

       (arriba)  y “

down

” (abajo) para avanzar en el tipo de modelo. La

          gama de modelos es 30, 50, 60, 75, 100, 150, 250 y 400.

  •    Pulsar el botón “

Menu Scroll

” nuevamente para pasar al ajuste de

       resina, la gama es de 34, 100 y 2000. Cuando se refiere al tipo de 
       resina, el modelo ID mostrará la resina como D, T, V, CD, CT, 
       CV; todos los modelos D = 34, todo los modelos T = 100 y 
       todos los V = 2000.

39

Nota importante: Al salir de las opciones
del cliente, el ordenador grabará
automáticamente los cambios que se
han producido.

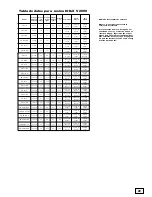
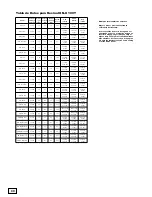
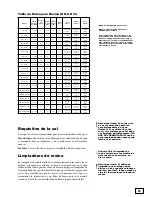
Nota importante: La tabla de datos para
cada modelo está en la página 29 hasta la
página 31.

Содержание TC 100 CV

Страница 1: ... specific reduction claims Part No 16618 Rev H 05 16 The TC series is tested and certified by the WQA to NSF ANSI 372 for lead free Compliance The TC series is tested and certified by the WQA to CSA B483 1 Standard Rainsoft Division of Aquion Inc 101 S Gary Ave Roselle Illinois 60172 1 847 437 9400 or 1 800 860 7638 www rainsoft com TC CONDITIONER SERIES WATER TREATMENT SYSTEM ...

Страница 2: ...ers 7 Maintenance Requirements 7 Product Certification Information 7 Installation Instructions 8_11 System Start Up 12 Customer Settings 13 Installers Section 14 15 How to Calculate the Regeneration Schedule 15 16 Troubleshooting Guide 16 Warranty Information 17 Exploded Views and Parts Lists 18_2 Installer sheet for Iowa only 22 Place for Notes 23 ...

Страница 3: ...l water consumption needs Application Limitations On hardness levels of 60 grains and higher the system may not achieve a hardness of less than 1 grain due to high Total Dissolved Solids some bleed through is possible Bleed through can also be caused by sodium levels higher than 1000 parts per million In either case your system can be programmed to minimize these effects See your RainSoft Dealer f...

Страница 4: ...must be adequate for easy service and accessibility This system is designed to treat cold water only The installation must be on a cold water supply Data Chart for ION X 2000 V Resin Cation Exchange Media Higher or lower pressure will affect the efficiency of the system If the iron content of the water to be soft ened is zero and the hardness level is less than 20 gpg we suggest you choose the low...

Страница 5: ... inches Resin cu ft Service Flow gpm Drain Flow gpm psi Drop High Salting Medium Salting Low Salting TC 50 T 8 x 44 0 5 10 1 6 12 0 10 800 7 5 lbs 9 200 5 0 lbs 4 400 1 5 lbs TC 50 CT 8 x 44 0 5 10 1 5 13 0 10 800 7 5 lbs 9 200 5 0 lbs 4 400 1 5 lbs TC 60SS T 10 x 18 0 6 9 5 2 0 9 0 11 900 9 0 lbs 10 000 6 0 lbs 4 800 1 8 lbs TC 60SS CT 10 x 18 0 6 9 5 2 0 9 0 11 900 9 0 lbs 10 000 6 0 lbs 4 800 1...

Страница 6: ... 8 lbs TC 75 D 8 x 44 0 75 8 8 1 5 15 0 26 100 11 2 lbs 21 300 7 5 lbs 9 900 2 25 lbs TC 75 CD 8 x 44 0 75 9 2 1 5 14 0 26 100 11 2 lbs 21 300 7 5 lbs 9 900 2 25 lbs TC 100 D 10 x 44 1 0 10 0 2 0 10 0 34 500 15 0 lbs 30 500 10 0 lbs 14 200 3 0 lbs TC 100 CD 10 x 44 1 0 9 4 2 0 9 0 34 500 15 0 lbs 30 500 10 0 lbs 14 200 3 0 lbs TC 100S D 10 x 35 1 0 10 0 2 0 10 0 34 500 15 0 lbs 30 500 10 0 lbs 14 ...

Страница 7: ...e from RainSoft Please call 1 800 860 7638 for your free two year supply In between testing you can easily monitor the system s performance in the shower or while washing your hands The feeling of soft water should be present on your skin Product Certification Information The TC Series is tested and certified by the WQA to NSF ANSI Standard 44 for the specific performance claims as verified and su...

Страница 8: ...g with Dow 111 silicone based lubricant or equivalent Attach the supplied upper basket to the bottom of the control valve twist to lock in place Do not use if water contains any amount of iron Align the upper basket with the riser pipe and slowly lower the control valve onto the riser pipe using a twisting motion Align the control valve with the tank Push down on the control valve and continue to ...

Страница 9: ... is the pipe connection on the left side of the valve see figure 2 The arrow molded into the valve indicates the direction of flow When installing on metallic plumbing connect grounding pipe clamp and cables between the inlet and outlet of the tank see figure 2 9 Set the Bypass Valve to Bypass Move the bypass valve handles to the bypass position The valve handles should be perpendicular to the pip...

Страница 10: ... the drain to prevent possible back siphoning see figure 5 11 Install the Brine Safety Float Insert the brine well into the brine tank see figure 6 Attach the brine well to the brine tank with the overflow elbow see figure 6 Insert the safety float into the brine well The top of the safety float should be about 5 inches from the overflow elbow see figure 6 10 Important Note The air gap should be t...

Страница 11: ...terminals on the transformer see figure 8 Insert the other end of the wire with the quick connector into the back of the control box see figure 8 Plug the transformer into a 110 VAC 60 Hz or 230 VAC 50 Hz outlet 11 Important Note for TC CAB Models The overflow elbow is located on the back of the brine tank not shown Important Note The brine over flow line must not be higher than the overflow elbow...

Страница 12: ... again and allow the system to flush for 20 minutes or until approximately 100 gallons has passed through the appliance 4 Flush the Hot Water Heater Run hot water in the bathtub until the water tests soft 5 Add Salt and Program the Computer Please refer to the Customer Settings on pages 13 14 6 Sanitize the Conditioner Mix a 3 4 cup of common unscented 5 25 household bleach with 1 quart of water P...

Страница 13: ...ween regeneration icon will begin to flash use the up or down arrows to adjust the days between regeneration Press the Menu Scroll button two times to exit Setting pounds of salt From the home screen press the Menu Scroll button four times The pounds to regenerate icon will begin to flash use the up or down arrows to adjust the pounds of salt Press the Menu Scroll button one time to exit NOTE If t...

Страница 14: ...T models 100 and all V 2000 Once this is done press the Menu Scroll button 4 times to advance past the backwash time Brine and rinse time and fast rinse The display will rapidly flash save changes and return to the home screen You do not need to adjust the backwash brine and rinse or fast rinse setting from the factory settings The factory backwash setting is 5 minutes and the fast rinse is 1 7 mi...

Страница 15: ...ns by the number of people in the home use 4 in this example Example 75 gallons x 4 people 300 gallons used per day 2 Calculate the Number of Grains to be Softened Per Day Use the number of gallons used per day and multiply it by the grains of hardness in each gallon use 10 in this example Add 5 grains for each part of Iron 1 ppm 5 grains 2 ppm iron in this example Example 10 grains of hardness 10...

Страница 16: ...ss valve 3 Plug in the power supply 4 Loss of water pressure 1 Low pressure to the unit 1 Bypass the system If the problem still exists after bypass it is not related to a RainSoft product Check your water distribution system If the problem is resolved after bypass call your RainSoft Dealer for service 5 Excessive water in the brine tank and or salty water 1 The drain line is plugged restricted 2 ...

Страница 17: ... warranty does not include labor charges and does not cover installation transportation or any other claims or torts Some states do not allow the exclusion or limitation of incidental or consequential damages so parts of the above limitation or exclusion may not apply to you This warranty gives you specific legal rights and you may also have other rights which vary from state to state You also hav...

Страница 18: ...18 18 Valve Exploded View ...

Страница 19: ...ainer blfc button 20 1 17954 Flow control washer 0 25 gpm 21 1 17957 Adapter blfc 0 25 gpm 22 1 17939 1 2 npt x 1 2 barb poly elbow 23 1 17557 Composite bypass valve 24 1 17560 3 4 coupling adapter assembly 25 1 17812 Refill shut off assembly 26A 1 17893 00 injector assembly 26B 1 17947 0 injector assembly 26C 1 18194 1 injector assembly 26D 1 19318 2 injector assembly 26E 1 19393 3 injector assem...

Страница 20: ...20 Control Exploded View 20 ...

Страница 21: ... C NC male connector red outdoor 5B 1 19537 Sealed switch C NO female connector brown outdoor 6 3 17548 10 32 x 1 50 screw pan h phil ss 7 2 18135 4 x 1 25 screw slotted hex washer type 25 8 7 17542 4 20 x 375 screw pan h phil ss 9 1 17489 Front door housing 10 1 17854 Front housing 11 1 19999 TC computer assembly 12 1 17490 Rear housing cover 13 1 19732 PCB computer wire harness Control Parts Lis...

Страница 22: ...ller ___________________________________ Name __________________________________Name __________________________________ Address ________________________________Address ________________________________ City ____________ State ____ Zip ___________City ____________ State ____ Zip ___________ Signature _______________________________Signature _______________________________ Date ______________________...

Страница 23: ...23 Notes ...

Страница 24: ... RainSoft Division of Aquion Inc 101 S Gary Ave Roselle Illinois 60172 Main Switchboard 1 847 437 9400 Customer Service 1 800 860 7638 www rainsoft com 2011 RAINSOFT DIVISION OF AQUION INC ...

Страница 25: ...ROPIETARIO MANUAL DE PROPIETARIO ACONDICIONADOR SERIE TC SISTEMA DE TRATAMIENTO DE AGUA La serie TC está probada y certificada por la WQA en NSF ANSI 44 para las afirmaciones específicas de rendimiento verificadas y sustentadas en datos de prueba Consultar la hoja de datos de rendimiento para las afirmaciones específicas de reducción ...

Страница 26: ...isitos de mantenimiento 32 Información sobre la certificación del producto 32 Instrucciones de instalación 32 37 Arranque del sistema 37 Opciones del cliente 38 Sección del instalador 39 41 Cómo calcular el programa de regeneración 41 Guía de resolución de problemas 42 Información sobre la garantía 43 Vista despiezada y lista de piezas 44 47 Hoja del instalador solamente por el Iowa 48 Notas 49 ...

Страница 27: ...con el consumo de agua y los niveles de dureza Afortunadamente la tecnología actual nos permite utilizar la cantidad necesaria de sal para lograr la máxima eficiencia basada en sus necesi dades individuales de consumo de agua Restricciones de aplicación En niveles de dureza de 60 granos o más el sistema podrá no lograr de una dureza de menos de 1 grano debido al alto Total de Sólidos Disueltos alg...

Страница 28: ...stentes La tubería debe estar libre de cal y o acumulación de hierro La tubería que contiene grandes cantidades de cal y o hierro debe ser reemplazada Especificaciones adicionales No instalar este sistema en lugares donde el agua es microbiológi camente insegura o de calidad desconocida sin una desinfección adecuada antes o después del sistema Este sistema debe ser instalado de acuerdo con todas l...

Страница 29: ...7 5 lbs 9 900 2 25 lbs TC 100 V 10 x 44 1 0 10 0 2 3 10 0 34 500 15 0 lbs 30 500 10 0 lbs 14 200 3 0 lbs TC 100 CV 10 x 44 1 0 10 0 2 0 10 0 34 500 15 0 lbs 30 500 10 0 lbs 14 200 3 0 lbs TC 100S V 10 x 35 1 0 10 0 2 0 10 0 34 500 15 0 lbs 30 500 10 0 lbs 14 200 3 0 lbs TC 100S CV 10 x 35 1 0 10 0 2 0 12 0 34 500 15 0 lbs 30 500 10 0 lbs 14 200 3 0 lbs TC 150 V 10 x 54 1 5 10 4 2 0 13 0 51 800 22 ...

Страница 30: ... 7 5 lbs 6 600 2 25 lbs TC 100 T 10 x 44 1 0 10 0 2 0 10 0 30 500 15 0 lbs 26 100 10 0 lbs 13 500 3 0 lbs TC 100 CT 10 x 44 1 0 10 0 2 0 11 0 30 500 15 0 lbs 26 100 10 0 lbs 13 500 3 0 lbs TC 100S T 10 x 35 1 0 10 0 2 0 10 0 30 500 15 0 lbs 26 100 10 0 lbs 13 500 3 0 lbs TC 100S CT 10 x 35 1 0 10 0 2 0 11 0 30 500 15 0 lbs 26 100 10 0 lbs 13 500 3 0 lbs TC 150 T 10 x 54 1 5 9 6 2 0 12 0 45 700 22 ...

Страница 31: ...ntes oxidantes fuertes por favor tenga cuidado y siga las instrucciones cuidadosa mente Modelo Tamaño del tanque pulgadas Resina pies cúbicos Flujo de Servicio gpm Flujo de drenaje gpm Caída de psi Alta salazón Media salazón Baja salazón TC 50 D 8 x 44 0 5 10 0 1 5 14 0 17 400 7 5 lbs 14 200 5 0 lbs 6 600 1 5 lbs TC 50 CD 8 x 44 0 5 7 8 1 5 9 0 17 400 7 5 lbs 14 200 5 0 lbs 6 600 1 5 lbs TC 60SS D...

Страница 32: ...positivos de tratamiento de agua vendidos a los consumidores al por menor en California acompañados de determinadas propiedades saludables deben estar certificados por el Departamento de Salud Pública del Estado de California La serie TC no está certificada en el Estado de California para el propósito de hacer declaraciones de propiedades saludables Instrucciones de instalación 1 Medidas de seguri...

Страница 33: ...l sistema de tuberías abrir todos los grifos de la casa y tirar de la cadena El agua se drenará del grifo más bajo o por la salida No sudar las tuberías con agua en ellas o mientras está conec tada al sistema el vapor puede dañar las piezas de plástico en la válvula No apuntar el soplete de soldadura directamente al tanque mineral o a la válvula de control Estos materiales compuestos durarán una v...

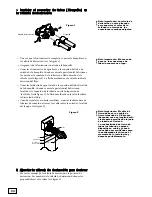
Страница 34: ...adera de tuberías de conexión a tierra y los cables entre la entrada y la salida del tanque ver figura 2 9 Ajustar la válvula de derivación para derivar Mover las manijas de la válvula de derivación a la posición de derivación Las manijas de la válvula de derivación deben estar perpendiculares a los tubos ver figura 3 34 Horquilla Valvula de derivacion Figura 1 Nota importante La válvula de deriva...

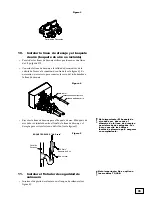
Страница 35: ...ado entre el final de la línea de drenaje y el desagüe para evitar el retorno del sifón ver la figura 5 11 Instalar el flotador de seguridad de salmuera Insertar el depósito de salmuera en el tanque de salmuera ver figura 6 35 Pos icion de Der ivacion Figura 3 CODO 1 2 LINEA DE DRENAJE 1 2 ABRAZADERA DE BALLESTA1 2 Mr Drain Boquete de Aire Tubo Vertical Canal de Desagüe BOQUETE DE AIRE Mr Drain No...

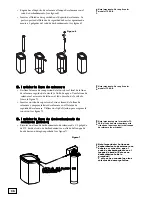
Страница 36: ...seguridad de salmuera Utilizar un clip de fijación para asegurar la conexión ver figura 7 13 Instalar la línea de desbordamiento de salmuera Interior Ejecutar una línea de desbordamiento de salmuera de 1 2 pulgada de D I desde el codo de desbordamiento en el lado del tanque de borde hacia un desagüe aprobada ver figura 7 36 Nota importante No se aplica a los modelos TC CAB Figura 6 Nota importante...

Страница 37: ... de colocar su aparato Rainsoft TC en servicio es muy importante vaciar los residuos las tuberías de agua fría Abrir el grifo de agua fría en la bañera Dejar correr el agua durante 5 a 10 minutos hasta que el agua salga clara Abrir todos los restantes grifos y dejar que el resto de la tubería libere el aire atrapado en el sistema Cerrar todos los grifos 3 Abrir la válvula de derivación 37 Consejo ...

Страница 38: ...ación Después que el sistema ha completado la regeneración manual el acondicionador estará desinfectado y listo para su utilización Opciones del cliente Las opciones del cliente permiten el acceso a una variedad de opciones de programación Ajustar la hora del día En la pantalla principal pulsar el botón Menu Scroll El ícono de ajuste del reloj comenzará a parpadear utilizar las flechas Up arriba o...

Страница 39: ...el botón Menu Scroll antes de finalizar la cuenta regresiva Una vez la regeneración iniciada se podrá de forma manual avanzar para cada ciclo mante niendo pulsado el botón de Menu Scroll durante 5 segundos Sección del instalador Programar el reloj electrónico Enchufar el sistema el control mostrará automáticamente el modo de instalación El control mostrará C on para acondicionador Pulsar el botón ...

Страница 40: ...tará en función del tamaño del modelo Sólo config urar estos valores en las aplicaciones que requieren una progra mación especial El tiempo de llenado se ajustará automáticamente al configurar las libras de regeneración a partir de la pantalla prin cipal Después del control estar programado se puede acceder al modo de instalación pulsando el botón up arriba durante 5 segundos y la palabra CODE apa...

Страница 41: ...dos al día y multiplicar por los granos de dureza en cada galón usar 10 en este ejemplo Agregar 5 granos para cada parte de Hierro 1 ppm 5 granos 2 ppm de hierro en este ejemplo Ejemplo 10 granos de dureza 10 granos de hierro 20 granos de dureza 300 galones utilizados al día x 20 granos de dureza 6 000 granos a ser ablandados por día 3 Calcular los días entre la Regeneración Dividir la capacidad d...

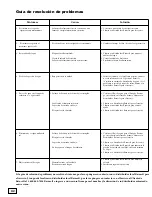
Страница 42: ...l desagüe Revisar por torceduras en la línea de drenaje Llamar a su distribuidor Rainsoft para el servicio 2 Llamar a su distribuidor Rainsoft para el servicio 3 Llamar a su distribuidor Rainsoft para obtener ayuda 4 Llamar a su distribuidor Rainsoft para el servicio 6 El sistema no es capaz utilizar la sal 1 La línea de drenaje está obstruida restringida 2 El inyector está obstruido 3 La presión ...

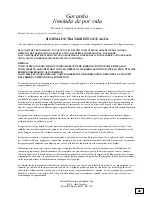
Страница 43: ...o incluye los cargos de mano de obra no cubre la instalación el transporte o cualquier otro reclamo Algunos estados no permiten la exclusión o limitación de daños incidentales o consecuentes por lo que partes de la anterior limitación o exclusión pueden no aplicarse a usted Esta garantía le otorga derechos legales específicos y también puede tener otros derechos que varían de estado a estado Usted...

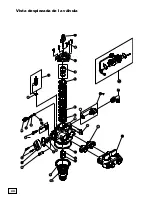
Страница 44: ...44 Vista despiezada de la válvula ...

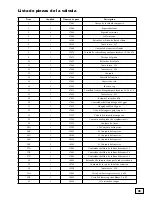
Страница 45: ...trolador del flujo del agua0 25 gpm 21 1 17957 Adaptador blfc 0 25 gpm 22 1 17939 Codo de la lengüeta poly npt x 23 1 17557 Válvula de derivación compuesta 24 1 17560 Conjunto de adaptador de acoplamiento 25 1 17812 Conjunto de cierre 26A 1 17893 00 Conjunto del inyector 26B 1 17947 0 Conjunto del inyector 26C 1 18194 1 Conjunto del inyector 26D 1 19318 2 Conjunto del inyector 26E 1 19393 3 Conjun...

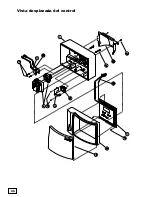
Страница 46: ...46 Vista despiezada del control ...

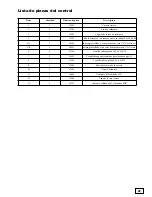
Страница 47: ...tor sellado y conector macho rojo C NC exterior 5B 1 19537 Interruptor sellado y conector hembra marrón C NO exte 6 3 17548 Tornillo cabeza plana 10 32 x 1 50SS 7 2 18135 Tornillo hexagonal ranurado para lavadora tipo 25 8 7 17542 Tornillo cabeza plana 4 20 x 375SS 9 1 17489 Puerta delantera de la carcasa 10 1 17854 Carcasa delantera 11 1 19999 Conjunto del ordenador TC 12 1 17490 Tapa de la caja ...

Страница 48: ...__________Vendedor__________________________________ Nombre_____________________________________Nombre____________________________________ Dirección____________________________________Dirección__________________________________ Ciudad_______Estado_________CódigoPostal______Ciudad_______Estado_________CódigoPostal____ Firma________________________________________Fecha_______________________________...

Страница 49: ...49 Notas ...

Страница 50: ...50 Notas ...

Страница 51: ...51 Notas ...

Страница 52: ... RainSoft Division of Aquion Inc 101 S Gary Avenue Roselle Illinois 60172 Principal panel de control 1 847 437 9400 Servicio al Cliente 1 800 860 7638 www rainsoft com 2013 RAINSOFT DIVISION OF AQUION INC ...

Отзывы: