background image

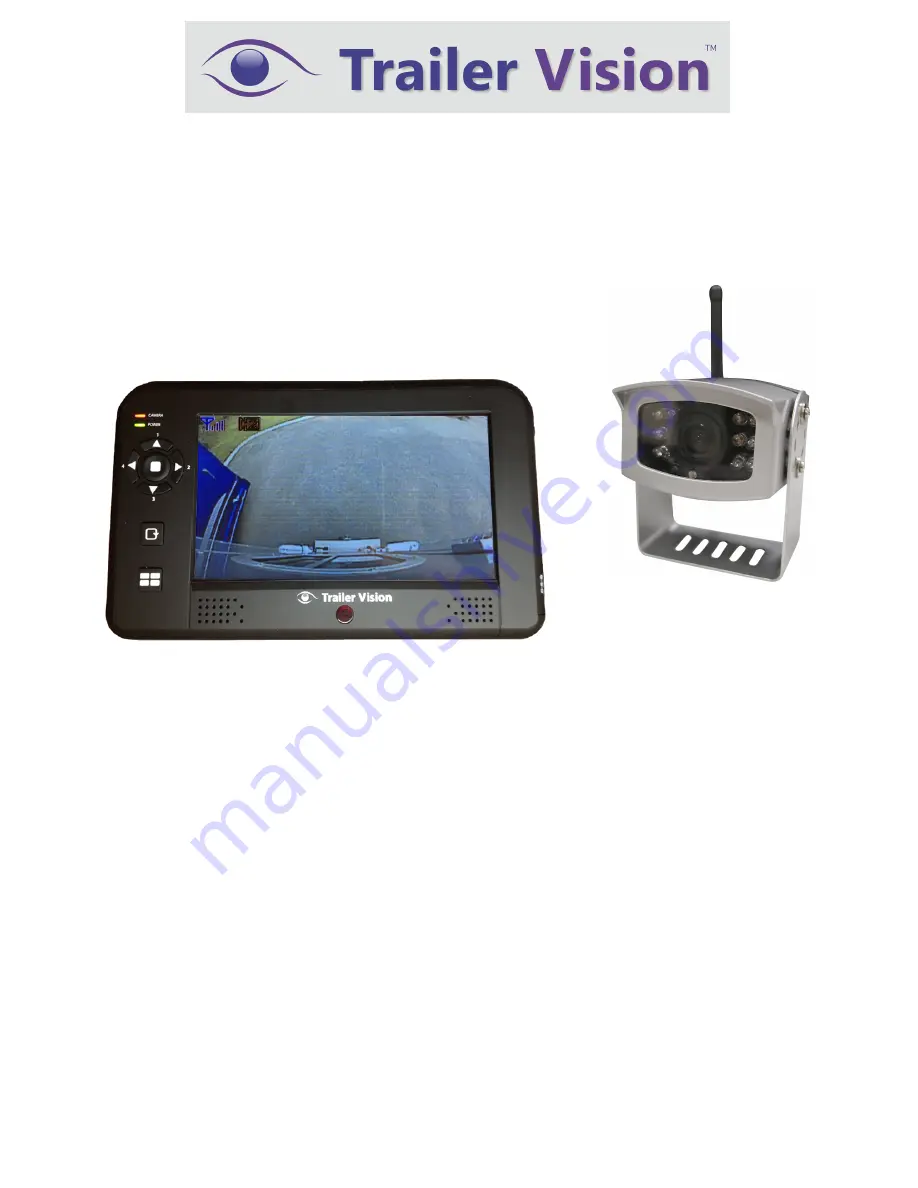
Digital Wireless Camera System


Installation and User Manual 

Digi-Max2

Version 1.0

PLEASE READ CAREFULLY AND SAVE 

This manual contains important information about this 

product’s operation. If you are installing this product for others, 

you must leave this manual

or a copy

,

 with the end user.

Our Focus - Your Peace of Mind

Summary of Contents for Digi-Max2

Page 1: ...al Digi Max2 Version 1 0 PLEASE READ CAREFULLY AND SAVE This manual contains important information about this product s operation If you are installing this product for others you must leave this manual or a copy with the end user Our Focus Your Peace of Mind ...

Page 2: ... in the package 5 INSTALLING THE MONITOR 6 GETTING TO KNOW THE CAMERA 7 GETTING TO KNOW THE MONITOR 8 CONFIGURING THE MONITOR 10 Scan frequency 10 Camera setting CAM 1 4 10 Pairing camera s 11 Brightness 12 Monitor and Camera Version 12 Factory Reset 12 Setting SCAN Mode 13 Setting QUAD Display 13 TROUBLE SHOOTING 15 ABOUT DIGITAL WIRELESS TECHNOLOGY 16 PRODUCT SPECIFICATION 17 ...

Page 3: ...te control for remote easy operation IMPORTANT SAFETY PRECAUTIONS Damage caused by non compliance with this User Manual will void the warranty We will not assume any liability for damages to items or persons caused by improper handling or non compliance with the safety notices Any warranty claim will be null and void in such cases 1 Do not drop puncture or disassemble the camera or monitor otherwi...

Page 4: ...r is encouraged to try to correct the interference by one or more of the following measures Reorient or relocate the receiving antenna Move the equipment away from the receiver Plug the equipment into an outlet on a circuit different from that to which the receiver is connected Consult the dealer or an experienced radio television technician for additional suggestions You are cautioned that any ch...

Page 5: ...egative supply please try connecting one way and then try the other way if the camera doesn t work Connecting the camera the wrong way will not damage the camera it just won t operate while connected the wrong way 4 Start the vehicle engine switch on the lights etc to power the camera The camera power indicator will be illuminated when the camera is powered Note If automatic display of the rear ca...

Page 6: ...verse gear with ignition turned on 4 The screen should display the image of the vehicle rear view automatically If it doesn t please refer to the Pairing Camera s section to pair the camera to the monitor Note If NO SIGNAL is displayed on the monitor at any time while reversing immediately stop the vehicle until the image is displayed or it is safe to continue With battery pack available separatel...

Page 7: ...nitor on the vehicle dashboard 4 Adjust the windscreen mount arm to achieve the desired viewing angle the arm is extremely stiff but does adjust 5 Connect the cigarette adaptor to the DC power jack of the LCD monitor IMPORTANT ONLY use the adaptor provided in the package 7 Plug the power unit into the cigarette power source turn on the ignition and press the Power button to turn on the monitor 8 P...

Page 8: ...7 GETTING TO KNOW THE CAMERA 1 Camera Lens 2 Pairing Button 3 Mounting Bracket 4 IR LEDs 5 Light Sensor 6 Antenna 7 Power cord 8 Pairing LED Indicator 9 Power LED Indicator ...

Page 9: ... Menu Mode Cursor Right QUAD View Mode Hot key CH2 3 Menu Mode Cursor DOWN QUAD View Mode Hot key CH3 4 Menu Mode Cursor Left QUAD View Mode Hot key CH4 5 Menu Mode Menu Enter Button 6 SCAN Mode SCAN Button 7 QUAD Mode QUAD Button Power Button Pairing Indicator Power Indicator Antenna Trigger Cable Power Adaptor 6 7 1 2 3 4 5 1 2 3 4 5 6 7 ...

Page 10: ...A Frame Rate QVGA Frame Rate Perfect 5 10 fps 15 30 fps Good 3 5 fps 12 20 fps Fair 2 4 fps 8 15 fps Low 0 1 fps 0 4 fps Zero 0 fps 0 fps Channel Indicator displays the current active camera Status Indicator No Signal appears if the monitor does not receive a signal from the camera Signal Indicator Status Indicator ...

Page 11: ...he SCAN function 2 Press to choose the scan frequency You can configure the system to perform scanning every 3 seconds 8 seconds 15 seconds Camera setting CAM 1 4 Turn ON OFF the specified camera or set to Mirror to mirror the camera image If the camera is set OFF the camera image won t show on the monitor even it is supplied with power 1 Press MENU button and to choose CAM 1 2 Press to turn ON OF...

Page 12: ...an extra new camera s is utilised 3 Before pairing the camera make sure that the camera power cable is connected to a power source 4 Only assign one camera to one channel Channel memory will be overwritten if another camera is assigned to the same channel Example To pair a new camera to channel 3 please follow the steps below 1 Press MENU button to highlight channel 3 in the Pair CAM function and ...

Page 13: ...ness function 2 Press MENU button to enter the sub menu 3 Use to choose the monitor or camera 1 4 and press to adjust the brightness 4 Choose EXIT and press MENU button to return to the main menu Monitor and Camera Version Use this feature to check the monitor and camera version number when it is necessary MENU button To check the monitor and camera version number press and to display the monitor ...

Page 14: ...wn to go To exit SCAN display please press to the specified channel Setting QUAD Display Press the QUAD button to enter the QUAD mode and display all the camera images on the monitor 1 Press MENU button and use Left Right to turn all available channels ON 2 Use QUAD button to enter QUAD Mode 3 All camera images will be display on the monitor at the same time Unavailable channels will be displayed ...

Page 15: ...ired to assigned channels Please refer to the Pair CAM section for Pairing instructions QUAD display will be restored to single camera display when a direction button Left Right Up Down is pressed 2 TURN ON all available channels PRIOR to entering QUAD mode Note In QUAD display the Camera Pairing function is not available ...

Page 16: ... section as a guide Low signal or unstable signal Antenna directional limitation Adjust camera antenna and monitor position Strong radio signal near by Position WiFi router etc away from the camera and or monitor Camera image is missing during manual scan Scan channel s been set OFF Press OK button go to menu enable the channel s See Advance Operation Setting Auto Manual Scan Sequence for detail D...

Page 17: ...te walls large scale metal products and objects should ideally not be located near to the camera or the monitor Water also creates a signal obstacle as it absorbs the signal so should be avoided People etc passing through the tranmission area may also cause unstable signal quality However in normal use as a reversing or interior camera the system should offer excellent performance and provide a cl...

Page 18: ...dulation GFSK Transmission Power 14 2DBm Antenna Gain 3dBi Ant Communication distance 200M Power Source Power Supply DC 12 24V Current Consumption IR ON 220mA IR OFF 150mA Waterproof IPxx IP66 Monitor LCD Panel Size 7 0ͳ Resolution 480 234 Luminance 200cd Back Light LED Transceiver Frequency 2 405 2 480GHZ Modulation GFSK Sensitivity 82DBm TV Format NTSC PAL Video Compression MPEG 4 Resolution 640...

Reviews: