19
Always switch off the machine and unplug it before assembling.
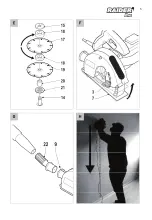
Replacing the cutting discs (fig. B- D)
Worn or damaged cutting discs must be replaced immediately.
- Only use sharp and undamaged cutting discs.
- Only use cutting discs that are suitable for the material to be worked.
-Only use cutting discs with a maximum permitted speed that is equal to or exceeds the maximum no-
load speed of the machine.
-Only use diamond cutting discs that are suitable for dry cutting.
- Always replace both cutting discs at the same time.
-Never attempt to remove the guard.
•Place the machine on a stable surface.
•Loosen the Allen screws (12) using the Allen key (13).
•Loosen the locking knob (3) and lower the base (7).
•Remove the guard (6).
•Keep the spindle lock button (5) pressed to lock the spindle (14).
•Loosen the outer flange (15) using the flange key (16).To untighten,turn clockwise. To tighten, turn anti-
clockwise.
•Remove the old cutting disc (17), the spacers (18), the old cutting disc (19), the spindle sleeve (20), and
the inner flange (21).
•If necessary, clean the flanges (15 & 21).
• Mount the inner flange (21), the spindle sleeve (20), the new cutting disc (19), the spacers (18), and the
new cutting disc (17).
• Firmly tighten the outer flange (15) using the flange key (16).
• Release the spindle lock button (5).
• Mount the guard (6).
• Raise the base (7) and tighten the locking knob (3).
• Firmly tighten the Allen screws (12) using the Allen key (13).
6. Operation with the machine
Setting the slot width (fig. B - E)
The slot width can be set using the spacers be tween the cutting discs. The number of spacers between
the cutting discs determine the slot width.
- Do not set the slot width during use.
- Always mount at least one spacer
between the cutting discs.
• Determine the slot width.
• Mount the spacers (18) around the cutting discs (17 & 19) in the required order. Refer to the chapter
“Replacing the cutting discs”.
Setting tha slot depth (fig.A & F)
The slot depth is variable between 5 and 40 mm. The slot depth can be read from the scale (4).
Do not set the slot depth during use.
• Slacken the locking knob (3).
• Tilt the base (7) to the required position.Set a slot depth approximately 3 mm deeper than the required
depth to compensate for possible unevenness of the wall surface.
• Tighten the locking knob (3).
Switching on and off (fig. A)
• To switch on the machine,keep the lock-off but ton (2) pressed and simultaneously press the on/off
switch (1).
• To switch off the machine, release the on/off switch (1).
Overload protection
The machine is equipped with an overload protec tion device which automatically switches off the machine
if the machine is overloaded
• Switch off the machine.
Содержание PRO RDP-WCH02
Страница 3: ...3 FIG A H ...
Страница 4: ...4 www raider bg ...
Страница 5: ...5 ...
Страница 76: ...76 www raider bg ...
Страница 79: ...79 ...

