background image

Page 26 

Version 1.0

Setting Up Your Receiver

6

Setting Up Your Receiver

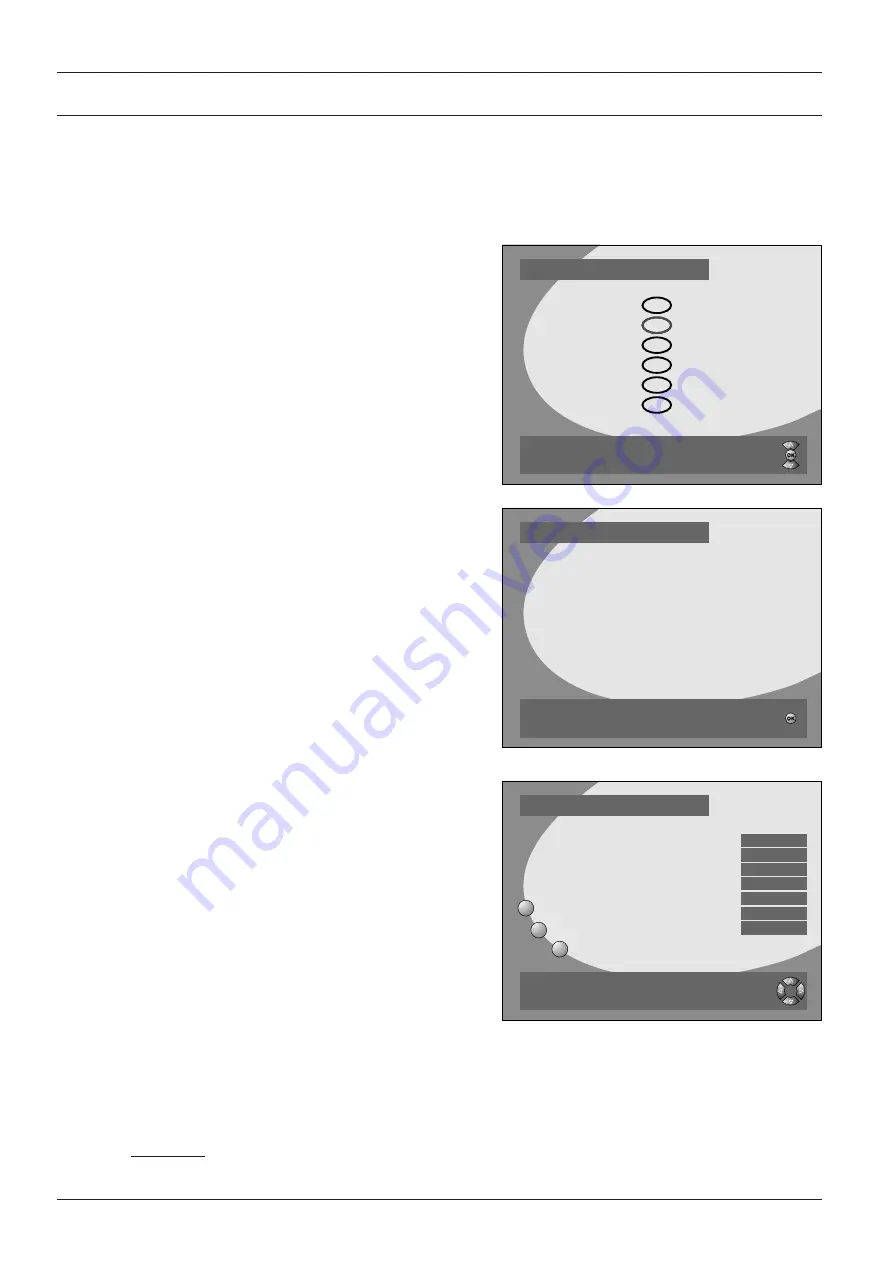
• Switch your television on and set it to receiver-receive (AV or SCART input).

• Press the Power button on your receiver or on your remote control unit.

The ON message appears on the receivers display
and the following screen appears.
The Main Menu appears on your TV screen:

• Select the language of your choice.

Instructions on what you need to do and which
buttons on the remote control should be used are
contained in the orange dialog box.

The following screen tells you how to proceed.

General Settings

When you press OK, the “General Settings” menu
appears.

The screen shows you which buttons you can use
and which functions are available.
Example:
“BACK” – return to the previous menu.
“Exit”

– return to the television picture.

“Menu” – return to the Main Menu.

• Enter your time zone by selecting a country in your

time zone under section 1.

• Under item 2, select ON to choose Summer Time or

OFF to choose Winter Time.

• Under item 3, specify the TV Aspect Ration of your television set.
• Under item 4 select the optimum video format for your television.
• Under items 5 and 6, select the desired language.
• If your parabolic antenna is fitted with a control motor which can receive and convert the receivers

control signal, select “7. DiSEqC 1.2” ON (this is described in more detail in section 9.5 Antenna
Control).

CAUTION:

If DiSEqC 1.2 is set to ON, the DiSEqC 1.0 function (A, B, C, D) is no longer assured!

Welcome !

Select the language of your choice [UP/DN]
and press [OK] to confirm selection.

D

GB

F

I

E

TR

Welcome !

Press [OK] to enter the General Settings menu.

Your Digital Satellite Receiver is
factory pre-programmed.

After you have adjusted several settings 
in the GENERAL SETTINGS
you have to press [EXIT] for loading 
the pre-programmed channeldata.
If you don´t want to use this data
press [MENU] and select CHANNEL MANAGER 
to start your own searching.

General Settings

Exit

Menu

Back

Choose the setting you wish to change [UP/DN].
Change the setting by toggling with [LT/LR].

TV

Main menu

Go Back 

1. Time Zone

2. Summer Time

3. TV aspect Ratio

4. TV Signal

5. Menu Language

6. Main Audio Language

7. DiSEqC 1.2

Germany

ON

4:3

CVBS

English

English

OFF

Содержание DT-10 S

Страница 1: ...ad these instructions carefully before using this appliance Retain for future reference RADIX shall not be liable for damages resulting from improper use of this appliance RADIX Electronic Vertriebs GmbH D 61381 Friedrichsdorf F R Germany ...

Страница 2: ...g Include a copy of your invoice or receipt as well as a detailed description of the problem Please ensure you affix adequate postage to the package or refer all repairs to an authorised retailer Thank you for purchasing your DT 10S digital satellite receiver In doing so you have chosen an appliance built for the future allowing you to take advantage of numerous programmes and additional services ...

Страница 3: ...incl Digital 28 8 Channel Lists and Information 29 8 1 Channel Lists 29 8 2 Channel Guides and Information on Channel Contents 30 8 2 1 Comprehensive Information on Channel Contents 30 8 2 2 Information on the Content of the Current Channel 30 9 Programming Your Receiver in the Main Menu 31 9 1 General Settings 31 9 2 Preference Lists 31 9 3 Channel Manager 32 9 3 1 Automatic Search 33 9 3 2 Manua...

Страница 4: ... not allow liquids or objects to fall into the receiver DANGER Do not cover ventilation holes risk of fire through overheating DANGER Only use original spare parts or professionally recommended spare parts Failure to do so may result in damage or injury and will cancel the guarantee CAUTION Switch the appliance off during electrical storms or if it not used for long periods Disconnect the antenna ...

Страница 5: ... Functions Number buttons Select button up Select button down Previous Page preference list Program information Continous Page preference list Back Select button continue Menu Button OK Button Audio Mode Channel assignment No function on this model Select button back Volume button Radio button ON OFF Button Electronic Program Guide Exit menu Mute Button No function on this model Last channel ...

Страница 6: ...O L AUDIO R WARNING WARNING WARNUNG WARNUNG CAUTION CAUTION IF INPUT 13V 18VDC 400mA MAX IF OUTPUT RS 232 TV VCR Mains connection 95 V 264 V Scart Connection IF Input Antenna cable coaxial for digital signal IF Output for Analog Receiver RS 232 for connection to PC Audio conection for HiFi system analog SCART Connection Video Recorder Video connection Antenna F type connector F type connector TV H...

Страница 7: ... connecting the LNB to the receiver CAUTION When assembling the F type connector make sure that no part of the inner wire mesh sheath touches the inner core see diagram below Failure to do so can cause a short circuit and damage your receiver Core Bent Wire Wire mesh Tighten the safety nut on the F type connector by hand only Do not over tighten The receiver is pre programmed at our factory to imm...

Страница 8: ...cify the TV Aspect Ration of your television set Under item 4 select the optimum video format for your television Under items 5 and 6 select the desired language If your parabolic antenna is fitted with a control motor which can receive and convert the receivers control signal select 7 DiSEqC 1 2 ON this is described in more detail in section 9 5 Antenna Control CAUTION If DiSEqC 1 2 is set to ON ...

Страница 9: ...l of your choice or select one from a preference list NOTE The program number consists of three digits You can also enter a one or two digit number for example 1 13 and press the OK button to confirm Use the UP button to move up one channel use the DOWN button to move down one channel Press the LAST button to return to the last channel you viewed Each time you change channels the channel name and ...

Страница 10: ...e AUDIO button Use the UP DOWN keys to select one of the languages BL provided by the broadcaster Press the button and select one of the following options Stereo sound from right and left Mono L sound from left only Mono R sound from right only Press the AUDIO button again or press the EXIT button to exit this menu NOTE The actual purpose of this function is to transmit various language channels t...

Страница 11: ...o the following Press the OK key while watching a programme Press the button again to remove the onscreen display Press the button to change the programme list If one of the programme lists is displayed the current programme is selected If you use the UP DOWN buttons to change the broadcaster the programme and TV picture also change Press the INFO key while watching a programme and programme list ...

Страница 12: ...urrent and next programs are displayed along with start times on the screen as described in Sec tion 7 2 Press the INFO key again to obtain more compre hensive information about the current program Press the key to obtain information this informa tion for the next program Press the INFO or EXIT button to exit this menu 20 20 Pro 7 0001 Exit Now 20 15 Südseeparadies A content indication for the cur...

Страница 13: ...st be creative Menu item 1 allows you to change the names at any time Use 2 Add Delete Program to create your list Use the UP DOWN buttons to select the desired program in the complete video list right and confirm your choice with OK The program is now included in your personal list It now has the current list number three digit and has a P to identify it as a TV program Favorite List Manager Exit...

Страница 14: ...ete Program from Complete List 9 3 Channel Manager Using the program manager you can load new broadcasters into your receivers memory In order to make these settings you will need certain information which is available from your local special ist or in specialist magazines DiSEqc Control and 22 kHz Switch Signal DiSEqC Settings DiSEqC Sound OPTION Polarisation Vertical Horizontal LNB Band 9 75 10 ...

Страница 15: ...p to date as possible When you enter a transponder and activate the network search the receiver automatically searches all transponders which belong to the network The definition of the network varies according to different satellite opera tors with the result that all channels on a satellite or only some are examined PID Packed Identifier The PID number is the identification for video and audio s...

Страница 16: ...ete all Channels CAUTION When you carry out this function password needed all settings are deleted and you will need to reprogram your receiver If you want to replace the entire program information delete all programs Your receiver now displays the Welcome menu as described in Section 6 9 4 Access Manager Several functions on your receiver can only be accessed using a password the factory default ...

Страница 17: ...s you must only use menu items 1 4 In the submenu 1 Set Limits the physical limits are set within which the parabolic antenna can move without obstruction To do this move the antenna as far east as possible and this position should be stored using Set East Limit After this the antenna moves westwards using menu item 1 and the west limit is set If the structural surroundings change you can delete t...

Страница 18: ...ss Replace cables or use a in cable signal booster Faulty LNB Replace LNB Faulty connection Repair connection Water corrosion damage No stereo sound Wrong cable connecting Check SCART cable TV and receiver Remote control Batteries exhausted Replace batteries does not respond Remote control not Hold remote control in pointed at receiver correct position 11 Recycling and Disposal Please dispose of t...

Страница 19: ...z Viterbi Decoding Rate 1 2 2 3 3 4 5 6 7 8 8 9 Reed Solomon Decoding FEC 204 188 t 8 Rear Panel Transport Demultiplexer IF Input F Female Type IF Loop through output F Female Type Demultiplex According to ISO IEC 13818 1 Cinch Output AUDIO Left Right VIDEO Max Input Stream 60MHz Serial 7 5MHz Parallel 2SCART Output 1TV 1VCR PID Handling Capability 32 PID RS232 Serial Port 9 Pin D Female Type SI F...

Отзывы: