D9412G/D7412G Operation & Installation Guide
43488D
Page 22
© 2002 Radionics
D9412G/D7412G
3.4
Installing the Assembly
1.
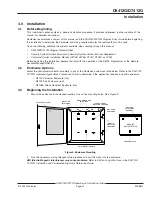
Place the assembly over the inside back of the enclosure, aligning the large rectangular openings of the
mounting skirt with the mounting hooks of the enclosure. Slide the assembly down so it hangs on the hooks.
See
Figure 2.
2.
Remove the tape from the #6x1/4-inch screw in the mounting tab on the assembly. The screw passes through
the mounting tab and into the skirt mounting hole in the enclosure. Tighten the screw to secure the assembly
in the enclosure.
3.
Connect earth ground to the panel before making any other connections. See section
3.5 Connecting Earth
Ground.
3.5
Connecting Earth Ground
3.5.1
Terminal
To help prevent damage from electrostatic charges or other transient electrical surges, connect the system to earth
ground at Terminal 10 before making any other connections. A grounding rod or cold water pipe are recommended
earth ground references.
Do not use telephone or electrical ground for the earth ground connection. Use 14-16 AWG wire when making
the connection. Do not connect any other panel terminals to earth ground.
3.5.2
Ground Fault Detect Enable
Ground fault detect capability is available only on firmware
versions 6.10 or higher.
GROUND FAULT is defined as “a circuit impedance to Earth Ground
of approximately 95 kilohms or less.” The panel will detect a ground
fault on Terminals 1-9 and Terminals 11-32 if the Ground Fault
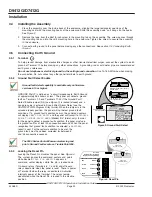
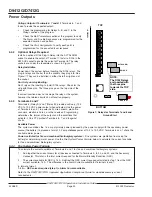
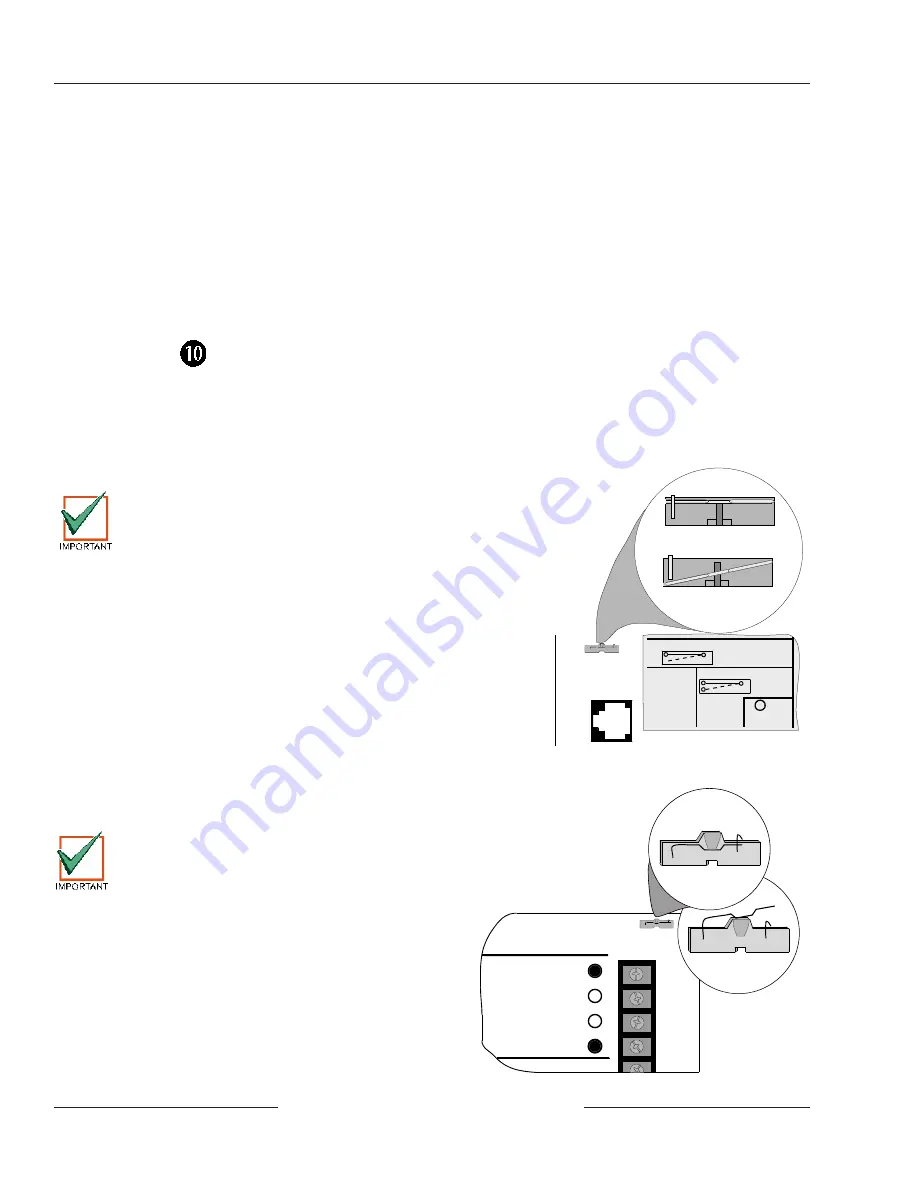
Detect Enable jumper (S4) (see
Figure 3) is locked (closed) and a
non-zero value is entered in Area 5 Silent Alarm Relay (see the
D9412G/D7412G Program Entry Guide). When the jumper is in the
unlocked (open) position, the panel will not detect ground fault
conditions. If a ground fault condition occurs, the command centers
will display
SERVC GND FAULT
and the panel will transmit a
TROUBLE
REPORT GROUND FAULT AREA
(Modem IIIa
2
format only). In order
for the panel to detect a ground fault condition, the panel must see
the ground fault for at least 30 consecutive seconds. When the panel
recognizes that ground fault condition is corrected, a
RESTORAL
report is sent. For the restoral condition to be met, the
ground fault must have been corrected for between 5
and 45 consecutive seconds.
The 9000 Series Control/Communicators log and
print a Ground Fault event as a Trouble Point 256.
3.5.3
Locking the Reset Pin
Locking the Reset Pin disables the panel. See
Figure 4.
The system ignores the command centers and points
while disabled.
CALL FOR SERVICE
appears in
command center displays while the pin is locked down.
On-board relays (Terminals 6, 7, and 8) and off-board
relays deactivate when the panel is reset. There is power
at Terminal 8 when the relay is deactivated. Activation
interrupts power at that terminal. The relays remain
deactivated while the Reset Pin is locked in the disable
position.
Installation
Figure 4: Reset Pin
Reset Pin
Disable All Except Battery
Charging And Programming
PERIPHERAL DEVICE CONNECTIONS
RED
POWER +
YELLOW
DATA BUS A
GREEN
DATA BUS B
BLACK
COMMON
32
31
30
29
RESET PIN
LOCKED (CLOSED)
RESET PIN
NORMAL (OPEN)
Figure 3: Ground Fault Detect
GROUND FAULT DETECT
Enabled
Disabled
PHONE
LED
RED
ON WHEN
COMMUNICATING
OFF WHEN IDLE
LOOP START
PHONE MONITOR SELECT
GROUND START
Requires
Relay # D136 in
Ground
Start Socket
GND START
GROUND FAULT
DETECT ENABLE
S4
With S4 closed, panel detects
ground faults.
With S4 open, panel does not
detect ground faults.
Содержание D7412G
Страница 1: ...D9412G D7412G Control Communicators Operation and Installation Guide ...
Страница 2: ...D9412G D7412G Operation Installation Guide 43488D Page 2 2002 Radionics D9412G D7412G Notes ...
Страница 12: ...D9412G D7412G Operation Installation Guide 43488D Page 12 2002 Radionics D9412G D7412G Introduction Notes ...
Страница 20: ...D9412G D7412G Operation Installation Guide 43488D Page 20 2002 Radionics D9412G D7412G Overview Notes ...
Страница 32: ...D9412G D7412G Operation Installation Guide 43488D Page 32 2002 Radionics D9412G D7412G Power Outputs Notes ...
Страница 56: ...D9412G D7412G Operation Installation Guide 43488D Page 56 2002 Radionics D9412G D7412G Arming Devices Notes ...
Страница 60: ...D9412G D7412G Operation Installation Guide 43488D Page 60 2002 Radionics D9412G D7412G SDI Devices Notes ...

