Radiodetection RD8100, Руководство пользователя
Radiodetection RD8100 - профессиональный прибор для быстрого обнаружения подземных объектов. На нашем сайте вы можете скачать бесплатно Руководство по быстрой локализации, чтобы использовать прибор с максимальной эффективностью. Скачайте его с manualshive.com.
Поделиться
Скачать


Отзывы:
Нет отзывов
Похожие инструкции для RD8100

Cable Cubby 1202
Бренд: Extron electronics Страницы: 8

Shortrack 90
Бренд: Huntron Страницы: 7

AV61400
Бренд: Belkin Страницы: 18
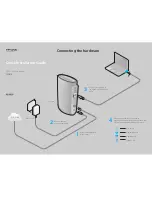
TC-7610
Бренд: TP-Link Страницы: 2
TC-7610
Бренд: TP-Link Страницы: 27

9083P
Бренд: Di-LOG Страницы: 31

33-856
Бренд: IDEAL Страницы: 5

TP R BNC A
Бренд: Extron electronics Страницы: 44


