3
•
1¢ ZINC
— Indicates that the target is probably a zinc penny. Other
targets (such as large gold) also fall into this category.
•
S-CAPS
— Indicates that the target probably is a screw cap or
other type of metal, such as a bottle cap. Medium-sized gold falls
into this range, as well as large aluminum items.
•
PULL TAB
— Indicates that the target is probably a pull-tab. Some
small gold objects also read as pull-tabs.
•
IRON/FOIL
— Indicates that the target is probably iron or foil.
Some oxidized (rusted) iron occasionally registers in the silver
range.
PROBABLE COIN DEPTH
— Displays an arrow steadily at the estimated
depth (in inches) for coin-sized objects until another target’s depth is
detected.
LOW BAT Indicator — Blinks when you turn on the power and lights
steadily when the batteries need to be replaced.
TESTING AND USING THE METAL
DETECTOR
To learn how the metal detector reacts to different metals, you should
test it before you use it the first time.
This metal detector is a very sensitive and deep-seeking detector. It
responds loudly to many targets that other detectors would only emit a
weak signal for. Because of this, trash metal and other sources of in-
terference might cause confusing signals.
Most good targets respond with a strong, repeatable signal. If a signal
does not repeat after sweeping the search coil directly over the sus-
pected target a few times, it is more than likely trash metal. False sig-
nals can be caused by trashy ground, electrical interference, or by
large irregular trash objects. These signals are easily recognized by
their often broken or non-repeatable nature.
Dig only those targets that emit a strong repeatable signal. As you
sweep the search coil back and forth over the ground, learn to recog-
nize the difference between the signals that occur at random and sig-
nals that are stable and repeatable.
Remember: While in
DISC
,
NOTCH
, or
AUTO NOTCH
modes, move-
ment is required for the metal detector to target and identify an item.
Air Testing
Notes:
• In
DISC
,
NOTCH
, or
AUTO NOTCH
mode, the search coil will not
detect without motion. To test in these modes, you must move the
object, since the metal detector is stationary.
• If you are using a coin, the metal detector detects it more easily if
you hold it so a flat side (not the edge) is parallel with the surface
of the search coil.
1. Remove any watches, rings, or other metal jewelry you are wear-
ing, then place the metal detector on a wooden or plastic table.
2. Select either
ALL METAL
,
DISC
,
NOTCH
, or
AUTO NOTCH
.
3. Adjust the search coil so it faces up.
Note: Never test the metal detector on a floor inside a building.
Most buildings have metal of some kind in the floor, which might
interfere with the objects you want to test, or mask the signal com-
pletely.
4. Move a sample of the material you want the detector to find (such
as a gold ring or a coin) about 1–2 inches above the search coil.
Outdoor Testing and Use
1. Find an area on the ground outside where there is no metal.
2. Place a sample of the material you want the metal detector to find
(such as a gold ring or a coin) on the ground.
Note: If you are using valuable metal, such as gold, to test the
metal detector, mark the area where you placed the item to help
you find it later. Do not place it in tall grass or weeds.
3. Adjust the stem length, as necessary (see Step 2 under “Assem-
bling the Metal Detector” on Page 1).
4. Turn on the metal detector.
5. In the
ALL METAL
mode, make any settings or adjustments as
described in “Using the ALL METAL Mode” on Page 4.
Hold the search coil level and about 1–2 inches above the ground
and slowly pass the metal detector over the target item. The metal
detector sounds a continuous tone for as long as the target is
under the search coil. Motion is not required to detect a target.
In the
DISC
,
NOTCH
, or
AUTO NOTCH
mode, make any settings or
adjustments as described in “Using the DISC Mode‚’ “Using
NOTCH Mode‚’ or “Using AUTO NOTCH Mode” on Page 4.
Slowly and continuously move the search coil over the area where
you placed the sample, sweeping the search coil in a side-to-side
motion.
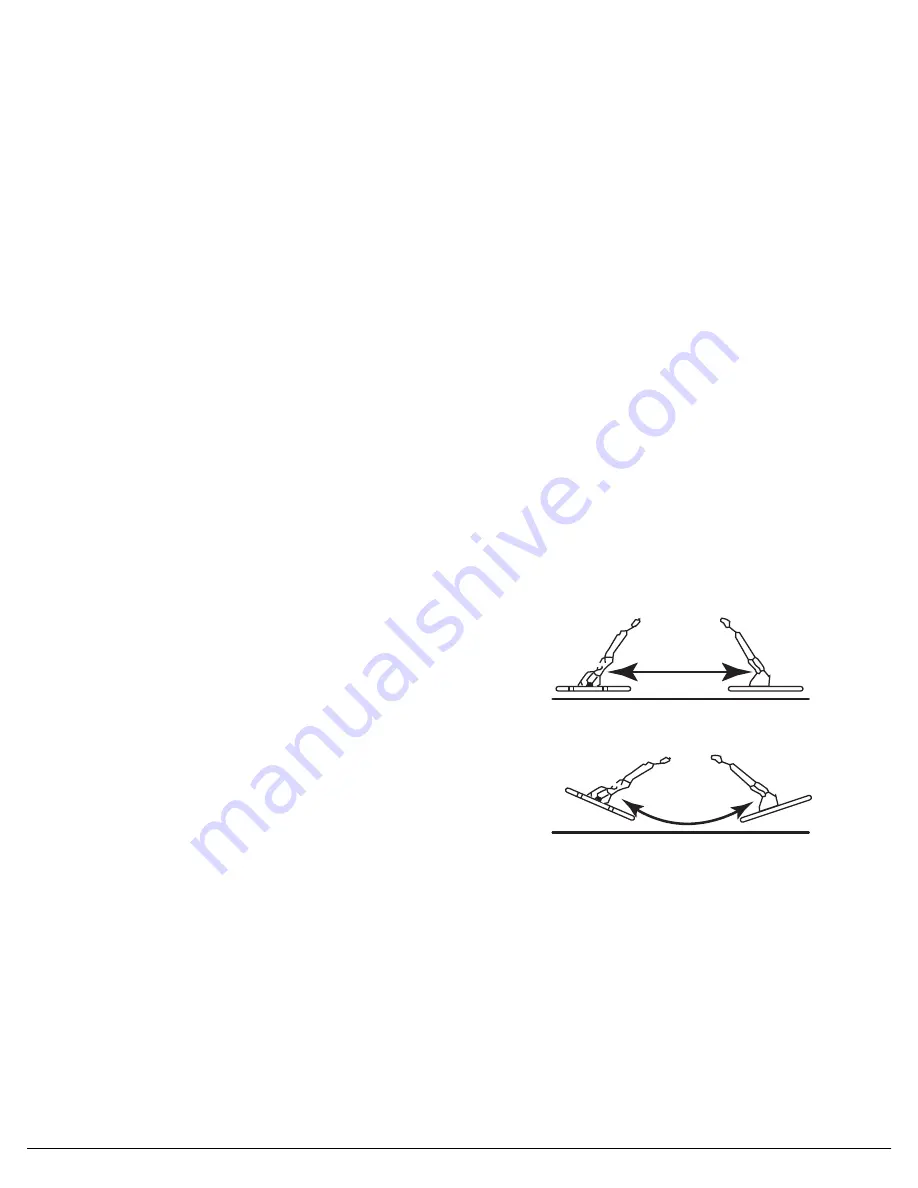
Search Coil Sweeping Hints
• Sweep slowly, from side-to-side — hurrying makes you miss tar-
gets or causes the metal detector to give you false signals.
• Keep the search coil level with the ground, about 1–2 inches from
the surface. Do not sweep the search coil as if it were a pendu-
lum. Raising the search coil while sweeping or at the end of a
sweep causes false readings.
• When repetitively passing the search coil over the object, allow a
few seconds to pass to give the detector a chance to recover from
its last reading.
• Slightly overlap your sweeps as you move forward.
RIGHT
WRONG


