background image


Digital BUS-WATCH

®

 R1001 / R4001


Security Cabinet Floor Mount

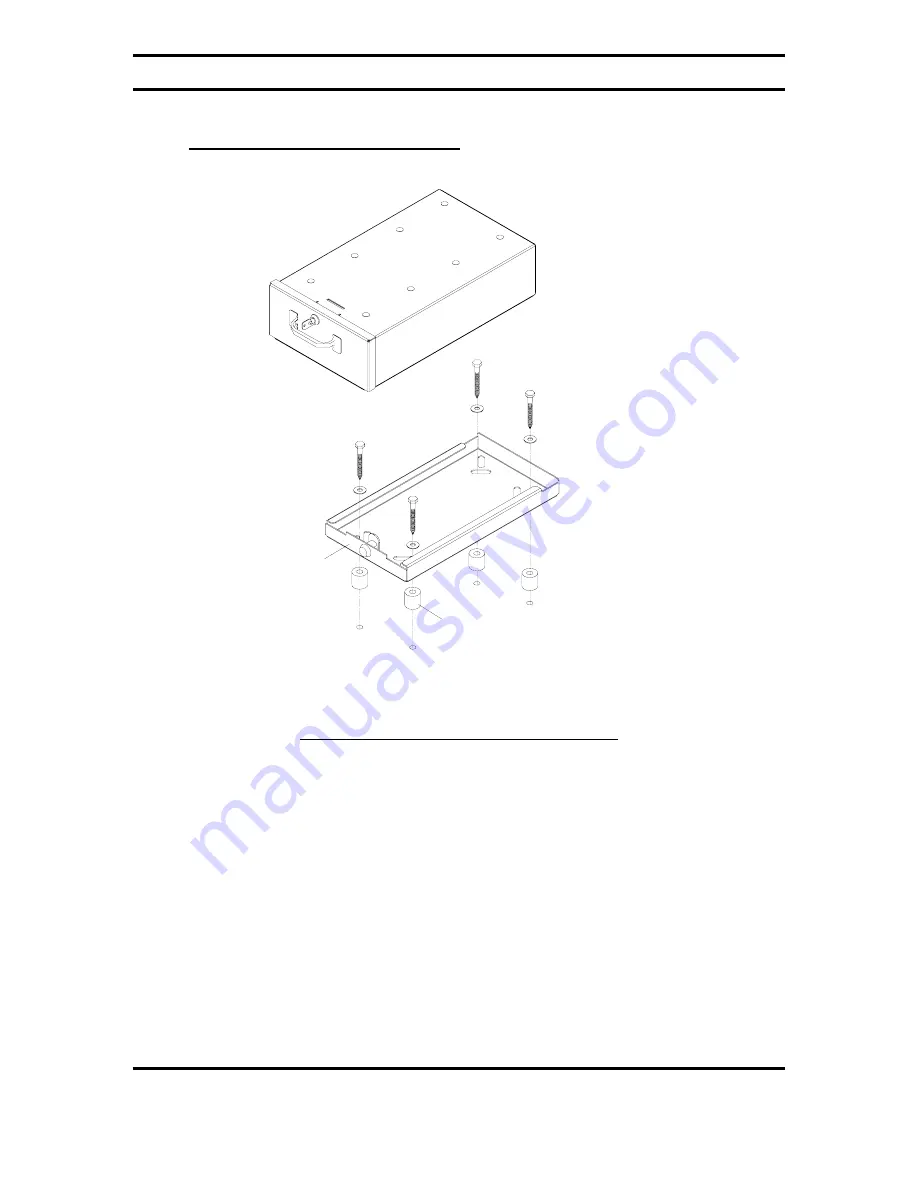
MOUNT BRACKET

540857

USE REI HARDWARE PACK 

#060094 TO MOUNT 

BRACKET ON THE FLOOR

RUBBER

MOUNTS

SLIDE RAILS ON

BOTTOM OF LOCK BOX


Figure 23: Security Cabinet Floor Mounting 


Find a suitable location to mount the slide bracket on the floor. The Digital BUS-

WATCH® should not present a trip hazard or head impact hazard and should not 
interfere with the seating, safety, or comfort of the passengers. 


1)


An area 15 and 1/2 inches should be unobstructed in front of the slide bracket to 
allow sliding the Digital BUS-WATCH® onto the bracket. 

2)


Position the slide bracket on the floor and drill four 3/16th inch holes into the 
floor using the mounting holes as a guide. 

3)


Set aside the slide bracket. Position four rubber shock mounts over the pilot holes. 

4)


Place the slide bracket over the rubber shock mounts. Align the mounting holes to 
the center of the shock mounts. 

5)


Secure slide bracket to the floor using four lag bolts. 

6)


Carefully slide the cabinet onto the slide bracket being sure to check alignment of 
the connector. Lock to secure. 

Page 33 of 96 

Radio Engineering Industries, Inc. 

640370 -- Rev 0 -- 8/17/2007 

Содержание Digital BUS-WATCH R1001

Страница 1: ...Digital BUS WATCH Digital BUS WATCH R1001 R4001 Hardware User Manual Hardware Installation Manual Page 1 of 96 Radio Engineering Industries Inc 640370 Rev 0 8 17 2007...

Страница 2: ...19 Long Term Storage 19 Installation 20 System Wiring Power and Camera Cables 20 External Record Indicator Event Mark Button Harness 22 GPS Antenna Module Harness 23 Vehicle Sensor Options Harness 24...

Страница 3: ...n Menu Page 42 System Setup 43 Time Date Search 80 Event Search 83 Advertising 84 Movies 85 Music 86 DVR Firmware Upgrading 87 Removable Hard Drive Module USB Firmware Upgrade 87 Front Panel USB Firmw...

Страница 4: ...re 21 Security Cabinet Under Seat Mount 31 Figure 22 Security Cabinet Mount Conversion 32 Figure 23 Security Cabinet Floor Mounting 33 Figure 24 Camera Connection and Placement 34 Figure 25 Potential...

Страница 5: ...amera Recording Parameters Screen Shot 66 Figure 67 Camera 2 Cameras Recording Parameters Screen Shot 66 Figure 68 Camera Camera Name Screen Shot 67 Figure 69 System Setup Schedule Screen Shot 68 Figu...

Страница 6: ...h managing a Media Advertisement System for education entertainment or to create extra value added services for all public and commercial transportation in the current and future markets Features Ultr...

Страница 7: ...or TCP IP media updating and status file downloading Simultaneous and independent operation of DVR and streaming advertising Video Retrieval and Archiving The DVR has Ethernet and USB ports on the fr...

Страница 8: ...AS R1001 R4001 MOBILE DVR SYSTEMS CAMERA CABLES VARIOUS LENGTHS AVAILABLE DIGITAL BUS WATCH OR DOME SLIM LINE OR OR WEDGE STANDARD CAMERAS CAMERAS 2 3 4 ARE NOT APPLICABLE WITH R1001 DVR SYSTEM LOCK B...

Страница 9: ...CATORS USB 2 0 CABLE CONNECTION ETHERNET CABLE CONNECTION HARD DRIVE BAY 5 6 4 3 2 1 1 4 6 5 3 2 USB 2 0 ETHERNET HDD HTR REC FULL FAULT HDD CAM2 PWR CAM1 CAM4 CAM3 AUDIO OUT R L OUT VIDEO 7 FRONT PAN...

Страница 10: ...VEHICLE SENSOR CABLE CONNECTION GPS GPS RECEIVER CONNECTION ACC ACCELEROMETER MODULE CONNECTION TRIGGER ALARM PANIC CABLE CONNECTION POWER CABLE CONNECTION AUDIO OUTPUT CONNECTIONS R AND L 10 14 15 12...

Страница 11: ...Digital BUS WATCH R1001 R4001 Remote Control REMOTE 7 1 2 8 3 4 5 9 10 11 12 6 Figure 4 DVR Remote Control Page 11 of 96 Radio Engineering Industries Inc 640370 Rev 0 8 17 2007...

Страница 12: ...e 9 FWD Playback Function X2 X4 10 SETUP Menu 11 EXIT Exit Numeric 12 Playback Functions Figure 5 Remote Control Button Description Use the ARROW keys to move between selections input fields and icons...

Страница 13: ...NPUT KEYS Use the numbers to input values in the system setup screen or switch through the channels in live and playback modes Figure 7 Remote Control Numeric Input Keys Page 13 of 96 Radio Engineerin...

Страница 14: ...ve Modules DVR Loading and Unloading Inserting the Hard Drive Turn the hard drive key to the unlocked and off position Insert the hard drive into the bay Turn the hard drive key to the locked and on p...

Страница 15: ...Digital BUS WATCH R1001 R4001 Figure 8 Removable Hard Drive Module Loading and Unloading Page 15 of 96 Radio Engineering Industries Inc 640370 Rev 0 8 17 2007...

Страница 16: ...er for the advertising logs alarm1 The folder with the recorded video associated with alarms bak For internal DVR use only movie The folder for movie files music The folder for music files record The...

Страница 17: ...836 1672 3344 6688 3 236 472 944 1892 3788 7580 4 272 544 1092 2184 4372 8744 5 320 644 1292 2584 5168 10336 6 392 788 1576 3156 6316 12632 7 504 1012 2028 4060 8120 16244 8 708 1420 2840 5684 11368 2...

Страница 18: ...d When the keylock on the back of the DVR is switched into the green dot position the USB port functions normally and the hard drive will be recognized by a PC as an external USB hard drive When the k...

Страница 19: ...e the unit drops during operation the heater will periodically come on to maintain a working operating temperature The unit can operate to temperatures below 40 F The menus and the Installers Mode are...

Страница 20: ...s P N 710144 is used for satellite location and movement information shown in Figure 13 on Page 23 For additional vehicle monitoring the BUS WATCH Vehicle Sensor Options harness P N 512008 is availabl...

Страница 21: ...d if the system is in TIMER record mode REAR VIEW TRIGGER ACC GPS SENSORS CAM1 CAM2 POWER R AUDIO OUT CAM4 CAM3 VIDEO OUT L C C F ICP 710134 4 CH DIGITAL BUS WATCH CAM1 2 3 4 POWER SWITCH MAY BE VEHIC...

Страница 22: ...me in 2 different types of switches both in 2 different lengths Reference the Digital BUS WATCH Systems Related Part Numbers System Harnesses section of this manual on Page 89 for specific part number...

Страница 23: ...power consumption The GPS Antenna Module is housed in a black water resistant case and designed to withstand rugged operating conditions Information provided to the DVR system include longitude latit...

Страница 24: ...egarding vehicle performance Many vehicles have different sets of signals that can be monitored Three levels of on screen display are available to the installer School Bus Transit and Custom The defau...

Страница 25: ...age as shown in Figure 71 on Page 70 Speedometer Harness Wiring Instructions Refer to the vehicle service manual for speedometer type exact wire location and transmission manufacturer warnings The BUS...

Страница 26: ...tions Harness The Digital BUS WATCH Surveillance system when equipped with the BUS WATCH Option Harness will display information on screen in the Installers Mode when the vehicle s monitored switches...

Страница 27: ...s is so that if external dampening is used for the DVR it will not throw off the Accelerometer readings To properly install the Accelerometer Module the user must align the device with the picture on...

Страница 28: ...th the included L Brackets as shown in Figure 18 above The mounting holes are positioned so that the L Brackets can be flipped for a hanging mount installation This type of installation is recommended...

Страница 29: ...the DVR be enclosed in its own protective enclosure The R1001 and R4001 DVRs can be installed in REI s industrial grade security cabinet P N 710133 as shown in Figure 19 below Figure 19 REI s Industr...

Страница 30: ...Installers need to ensure the correct amount of open space in front of the installation so that the DVR may be removed from the slide bracket as shown in Figure 20 below 15 50 IN 15 50 IN 9 00 IN TOP...

Страница 31: ...3 1 Find a suitable location under the first seat behind the driver or under the driver s seat An area 15 1 2 inches should be unobstructed in front of the slide bracket to allow sliding the security...

Страница 32: ...om Hanging Mount to Floor Mount remove the 8 thread protection caps from the bottom side of the Security Cabinet Next reverse the placement of the slide rails and screws from top to bottom of the Digi...

Страница 33: ...should be unobstructed in front of the slide bracket to allow sliding the Digital BUS WATCH onto the bracket 2 Position the slide bracket on the floor and drill four 3 16th inch holes into the floor...

Страница 34: ...utdoor cameras for exterior placement Figure 24 Camera Connection and Placement For a single camera installation it is common to place the camera in the front of the vehicle looking towards the rear o...

Страница 35: ...Digital BUS WATCH R1001 R4001 Figure 25 Potential Single and Two Camera Placement Options Page 35 of 96 Radio Engineering Industries Inc 640370 Rev 0 8 17 2007...

Страница 36: ...Digital BUS WATCH R1001 R4001 INTERIOR 4 CAMERAS 4 CAMERAS EXTERIOR Figure 26 Potential Multiple Camera Placement Options Page 36 of 96 Radio Engineering Industries Inc 640370 Rev 0 8 17 2007...

Страница 37: ...Digital BUS WATCH R1001 R4001 Typical Camera Lens Viewing Angles Figure 27 4mm Lens Angles Page 37 of 96 Radio Engineering Industries Inc 640370 Rev 0 8 17 2007...

Страница 38: ...Digital BUS WATCH R1001 R4001 Figure 28 8mm Lens Angles Page 38 of 96 Radio Engineering Industries Inc 640370 Rev 0 8 17 2007...

Страница 39: ...is in the ON position Upon turning the system switch ON the Digital BUS WATCH will commence recording System Shut Down To stop the recording process place the system switch in the OFF position If the...

Страница 40: ...channel or view all channels at the same time by pressing the zero button on the remote Removable Hard Drive USB Connection Using the REI RMS PC Software the user can access the files by connecting t...

Страница 41: ...y to see some of the important information relating to the proper installation of the DVR Any of the vehicle sensor options that are being currently activated such as brakes or turn signals would disp...

Страница 42: ...s can be viewed or set TIME DATE SEARCH is where the user can play back video by choosing the specific Time and Date they would like to view EVENT SEARCH allows the user to select video playback by pr...

Страница 43: ...n of the Menu is subdivided into 5 main categories SYSTEM CAMERA SCHEDULE EVENT SETUP and SYSTEM INFO System Figure 32 System Setup Screen Shot The SYSTEM Section of the SYSTEM SETUP Sub Menu is subdi...

Страница 44: ...in Figure 6 on Page 12 and Figure 7 on Page 13 on the remote control the user can change these settings The first line on this subsection allows the user a place to manually enter the date and also to...

Страница 45: ...for Daylight Saving Time in the U S Beginning in 2007 DST begins on the second Sunday of March and ends the first Sunday of November Congress retains the right to revert the Daylight Saving Time back...

Страница 46: ...the DVR to overwrite the hard drive First In First Out as the DVR needs more room for storage When this is set to NO the DVR will write once and then stop lighting the HDD FULL LED on the face of the...

Страница 47: ...g the DVR did not exit all the way out of the menus HDD Format Figure 36 System Hard Disk Format Start Screen Shot HDD FORMAT is where the user can go to completely wipe all of the Video and Audio fil...

Страница 48: ...ure 37 System Hard Disk Format Are You Sure Screen Shot Figure 38 System Hard Disk Format Formatting HDD Screen Shot Figure 39 System Hard Disk Format Formatting Successful Screen Shot Page 48 of 96 R...

Страница 49: ...inistrator or IT Department for a suitable network addressing scheme IP ADDRESS the IP address of the DVR MASK the net mask of the DVR GATEWAY is the gateway address on the local network CENTER IP is...

Страница 50: ...ork addressing scheme MEDIA SERVER IP the IP address of the Media Server CONTROL PORT the control port of the Media Server DOWNLOAD PORT the download port of the Media Server NTP IP the IP address of...

Страница 51: ...ot to change any of the recorder settings The ADMIN password allows the user to gain full access to all the menus as if there were no password protection The REI password is used by REI Service person...

Страница 52: ...sword is entered correctly the user will see an affirmation message towards the bottom of the screen such as shown in Figure 47 below If the Administrator Password is entered correctly the user will s...

Страница 53: ...he advertisement clips from the computer to the unit etc The DVR will present 2 drives to the computer the Removable Hard Drive and an internal compact flash slot Make sure your computer has enough dr...

Страница 54: ...access the Flash Drive After the DVR accesses the Flash Drive the DVR needs to upload the files as shown in Figure 51 on Page 55 After the DVR uploads the files a list of the files and folders on the...

Страница 55: ...WATCH R1001 R4001 USB Mode continued Figure 51 USB Host Mode Upload Data Screen Shot Figure 52 USB Host Mode Flash Drive File List Screen Shot Page 55 of 96 Radio Engineering Industries Inc 640370 Rev...

Страница 56: ...re 53 USB Host Mode File Destination Screen Shot Figure 54 USB Host Mode Copying File Message Figure 55 USB Host Mode Copy Successful Message Figure 56 USB Host Mode Restart Messages Page 56 of 96 Rad...

Страница 57: ...RROW keys to select the option for modification Press ENTER at the highlighted line The screen will pop up a text entry keyboard as shown in Figure 58 on Page 58 Use Arrows to choose characters press...

Страница 58: ...Digital BUS WATCH R1001 R4001 Driver Information continued Figure 58 Data Entry Keyboard Screen Shot Page 58 of 96 Radio Engineering Industries Inc 640370 Rev 0 8 17 2007...

Страница 59: ...be configured to be either on or off The audible alarm options are as follows CAMERA 1 FAILURE YES NO CAMERA 2 FAILURE YES NO CAMERA 3 FAILURE YES NO CAMERA 4 FAILURE YES NO SYSTEMS ERROR YES NO SENS...

Страница 60: ...gs use the USB Flash Drive to upload the new configuration file place the configuration file on the hard drive with Windows Explorer or use the PC Remote Management Software to change the configuratio...

Страница 61: ...Digital BUS WATCH R1001 R4001 Default Setup continued Figure 61 System Default Setup Restoring Screen Shot Page 61 of 96 Radio Engineering Industries Inc 640370 Rev 0 8 17 2007...

Страница 62: ...he DVRs have the option to have the current configuration settings saved to a file on the Hard Drive as shown in Figure 62 on Page 62 The file is named rsconfig cfg and is put in the root directory of...

Страница 63: ...R4001 Camera Figure 63 Camera Menu Screen Shot The CAMERA Section of the Menu is subdivided into 2 main categories RECORDING PARAMETERS and CAMERA NAMES Page 63 of 96 Radio Engineering Industries Inc...

Страница 64: ...check represents that this channel will be recorded RESolution CIF HD1 D1 QUALITY 1 8 1 being the best video quality Frame Rate 1 2 4 8 15 or 30 Frames per Second AUDIO ON or OFF for Audio recording f...

Страница 65: ...composite If the DVR is set to record at a resolution of CIF or D1 the maximum frame rate for each of the 4 cameras is 30 Frames Per Second or 120 frames composite When using the Digital BUS WATCH R4...

Страница 66: ...US WATCH R1001 R4001 Figure 66 Camera 1 Camera Recording Parameters Screen Shot Figure 67 Camera 2 Cameras Recording Parameters Screen Shot Page 66 of 96 Radio Engineering Industries Inc 640370 Rev 0...

Страница 67: ...ction overlays the time and date across the top of the video feed through screen coming out of the video output ports on the front and back of the DVR The inserted clock overlay is not recorded onto t...

Страница 68: ...subsections of this section DATE SCHEDULE 1 and SCHEDULE 2 The DVR start mode is configured in the SYSTEM GENERAL RECORD MODE section of the SYSTEM SETUP portion of the menu as shown in Figure 35 on...

Страница 69: ...vents The EVENT SETUP Section of the Menu is subdivided into 2 main categories SENSOR and EVENT RECORD MODE Figure 70 Event Setup Sensor Screen Shot The SENSOR subsection of the EVENT SETUP SECTION is...

Страница 70: ...e 22 The IO INPUT sections are sub sectioned into 3 main options SCHOOL BUS as shown in Figure 71 above TRANSIT BUS as shown in Figure 72 on Page 71 and CUSTOM as shown in Figure 73 on Page 72 The pur...

Страница 71: ...e data entry keyboard as shown in Figure 58 on Page 58 and are limited to 8 characters DISPLAY The characters that are displayed on the Installers Mode Page as shown in Figure 30 on Page 41 The displa...

Страница 72: ...When set to this state a voltage below 4 volts generally 0 Volts DC or Ground on the given sensor input is interpreted by the DVR to mean that the signal is activated a voltage above 4 volts generall...

Страница 73: ...rtia Sensor Harness as shown in Figure 16 on Page 27 Because of the varying nature of the installation options the installer should go to this page and select CALIBRATE and then APPLY to zero out the...

Страница 74: ...SPEED UNIT MPH or KM H SPEED CAL For calibration of analog speedometer pulses SPD The target speed of the bus i e 030 MPH P S The number of Pulses Second that the DVR is counting CALIBRATE Press ENTER...

Страница 75: ...rm s is triggered When in this mode the DVR changes to the quality and frame rate settings as shown in the CAMERA section in Figure 64 on Page 64 for the set amount of time Depending on the record set...

Страница 76: ...tion SYSTEM INFO contains recorded information about the DVR System as shown in Figure 77 above The SYSTEM INFO Section of the Menu is subdivided into 3 main categories HDD INFOrmation SYSTEM INFOrmat...

Страница 77: ...information about the DVR Operating Systems and Hard Drive Module The HDD INFO subsection also is where the user can go to clear the EVENT and ADVertising Logs The HDD INFORMATION section shows the c...

Страница 78: ...on shown in Figure 79 above is used to display information about the DVR operating environment The information delineated here is high and low SYSTEM VOLTAGES high and low SYSTEM TEMPERATURES inside t...

Страница 79: ...The information is subdivided into the X Y and Z axis In a proper installation Reference Figure 16 on Page 27 the X axis is drawn from the back to the front of the bus the Y axis is drawn from the sid...

Страница 80: ...yback as shown in Figure 81 above These files are selectable by using the arrow buttons the numeric buttons and the ENTER key on the remote control entering in a date and optionally a time of the reco...

Страница 81: ...is present on the drive By pressing the SETUP button on the remote control calendars of available video pop up to help the user pick the right date as shown in Figure 82 above The dates that have vide...

Страница 82: ...Figure 83 above The size of the video file is determined by the RECORD FILE SIZE as shown in Figure 35 on Page 46 Use the arrow buttons and the ENTER key on the remote control to select and activate a...

Страница 83: ...e derived when the DVR senses an input signal that has been set up previously such as in the EVENT SETUP subsection of the main menu reference Figure 75 on Page 74 Use the arrow buttons and the ENTER...

Страница 84: ...DVR or select an advertising file to manually playback as shown in Figure 85 above The video files must be in MPEG2 format The advertising files must be put on the hard drive in the ads directory thr...

Страница 85: ...put on the hard drive through the USB Flash Drive upload or by using Windows Explorer to manually put the files in the movie directory The DVR always records based upon the RECORD MODE settings as sho...

Страница 86: ...music files must be put on the hard drive through the USB Flash Drive upload or by using Windows Explorer to manually put the files in the music directory The DVR always records based upon the RECORD...

Страница 87: ...gh the Removable Hard Drive Module USB connection Removable Hard Drive Module USB Firmware Upgrade To upgrade the firmware on the DVR you must put the upgrade file in the ads directory on the hard dri...

Страница 88: ...atically upgrade upon exiting the menu system Flash Drive Put the upgrade file in the ads directory on the hard drive reference Figure 50 on Page 54 DVR will automatically upgrade upon exiting the men...

Страница 89: ...es 512001 Power Cable 35 Feet 512002 Power Cable 16 Feet 512008 Vehicle Sensor Options Cable 30 Feet 511986 External Record Indicator Event Mark Cable Aftermarket 20 Feet 512023 External Record Indica...

Страница 90: ...S WATCH Covert Microphone Y Cable 512151 BUS WATCH Voice Band Pass Filter 511667 Rear Observation Color Camera to BUS WATCH Cable 2FT Digital Bus Watch to Digital Bus Watch R1001 R4001 Transfer Harnes...

Страница 91: ...xterior Wedge Camera Color 6mm 710068 Exterior Wedge Camera Color 8mm 710001 Exterior Wedge Camera Black White 4mm 710034 Exterior Wedge Camera Black White 6mm 710036 Exterior Wedge Camera Black White...

Страница 92: ...BLE 27 M M BNC 511623 COAX CABLE 37 M M BNC 511879 COAX CABLE 40 M M BNC Amplifiers 690143M AUDIO AMPLIFIER 12 VOLT 200 WATT 700887 VIDEO DISTRIBUTION AMPLIFIER LOW PROFILE Speakers 231010 SPEAKER ASS...

Страница 93: ...the drive In most cases we can find that the reason the DVR is not doing what the end user wants it to is because the DVR is not configured to operate in that manner A good example of this would be if...

Страница 94: ...elow Configure DVR to Overwrite Video See Figure 35 Remove Some Video Files See Figure 9 HDD Full LED On Hard Drive is Full of Video Format Hard Drive See Figure 36 Fault LED On Camera s Not Connected...

Страница 95: ...C IP Settings not Configured Correctly Configure Network Settings Contact you System Administrator or IT Department USB Connection Not Working DVR in Wrong USB Mode Change USB Mode See Figure 49 No Vi...

Страница 96: ...amera Video Loss Detection Advertisement System Video Playback Format MPEG Video Out BNC TV Out on the back panel RCA TV Out on the front panel Play List Method By Sequence Rolling Message Displaying...

Отзывы: