


Page 8
First steps for installing the RaceChip
Open your vehicle’s bonnet and close and lock the doors. For vehicles with a keyless system:
please place the key outside the radio reception range of the vehicle (to be on the safe side, at a
distance of 10 metres).
After locking the vehicle, wait another 10 minutes. This ensures that there is no residual
electrical voltage in the engine bay connections and that the signal flow in the engine ceases.
10 min
Generally speaking, you do not require special tools to perform the installation. However, a
simple wire cutter is useful for the purposes of removing excess material from the cable tie once
the installation is complete.
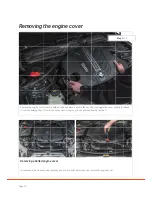
In the following section we explain how to install your RaceChip using an example engine. If your
engine has a different design, individual engine parts may be arranged differently in the engine
compartment when compared to the images here. However, the parts that are relevant for the
Race Chip are largely the same.
Before installing the RaceChip, please first wait for your engine to cool down. Otherwise there is
a risk of sustaining burns.


