background image

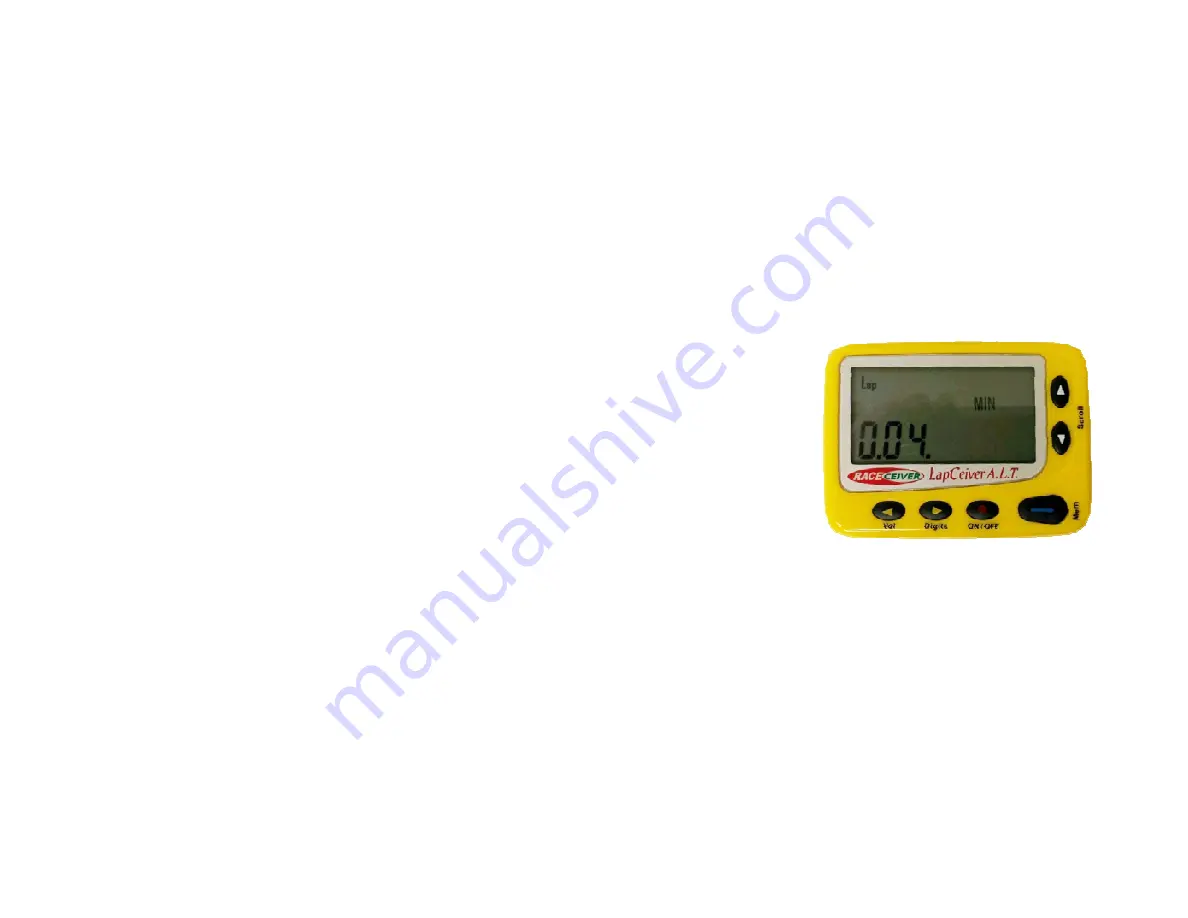
"Lap"

 and 

"MIN" & 8(m)   88(ss)

 appear on the 

LCD  

and 

"88"

 second (or last set time) is blinking. 

Adjust seconds by using 

 and 

▽ (up or down white) 

buttons  then press and release the 

blue

 button to save. 

Then, 

"8"

 minute is blinking. 

Adjust minute by using 

 or 

▽(up or down white)

 buttons, and 

press and hold 

blue

 button for 3 seconds for saving. 

If you press and hold the 

blue

 button for too long 

(3 seconds after the seconds are saved and LapCeiver A.L.T goes 
back to Infra-Red operation without displaying the minutes.  You 
must unlock this function again by holding the 

blue 

button for 3 

seconds.   This will take you back to the set seconds location, press 
and release to go to the   set minute location.


The LapCeiver A.L.T. goes back to Infra Red operation. 

Содержание LapCeiver

Страница 1: ...Drivers Your Electronic Spotter Get your lap times as they happen Anyway you want them ...

Страница 2: ...e same signal to the LapCeiver A L T You can input the serial number of up to 5 transponders into the LapCeiver A L T one in each of the 5 memory banks Each memory bank will hold up to 500 laps 2 Infra Red IR Mode This mode works with an IR transmitter that is set up across the track When your car passes through the beam the Infra Red Detector mounted on your car and connected to the LapCeiver A L...

Страница 3: ... Reverse Splitter to connect your RACEceiver or 2 way radio and only use one headset The LapCeiver A L T Features 5 Memory Banks each with 500 Lap Memory The ability to save up to 5 Transponder ID s 3 or 5 Digit Announcement for example 10 235 or 235 seconds Digital Volume Indicator Accurate readings to 1 100th of a second Lap count and times shown on display Lap times by crossing the scoring Loop...

Страница 4: ...r A L T To install the AA battery 1 Slide the locking tab up to release the battery cover 2 Slide the battery cover to the right and remove it from the back of the LapCeiver A L T 3 Install the battery matching the polarity and shown in the battery compartment 4 Reinstall the battery cover by sliding the cover along the rail to the left 5 Lock the cover in place by pushing the locking tab down Inf...

Страница 5: ...of use Common operation These functions work the same in both the Infra Red or Transponder modes 1 Power on off Press and hold red on off button for 3 seconds 2 Volume up down Press right yellow button for volume up and left yellow button for volume down 3 Audio test Plug the earpiece into the Ear jack Press and hold down white button The data displayed on the LCD will be audible ...

Страница 6: ...imes or both Function 1 default The Fast Fastest voice and Lap times are both audible The 3 or 5 digit announcement icon and the icon will appear on the display Function 2 Lap Times only are audible Press the red button to select this function The icon will turn off and the 3 or 5 digit announcement icon is on the display You will hear the Lap times only Function 3 The Fast Fastest voices only are...

Страница 7: ... on the LCD and a women s voice says fastest 8 Selecting 3 digit or 5 digit audible announcement Press and left and right yellow buttons at the same time for 5 digit announcement Press and left and right yellow buttons at the same time again for 3 digit announcement The 3 or 5 Icon is shown on the display to indicate announcement selected The default is 3 digit announcement for example 10 2 second...

Страница 8: ...n and return to the common operation Note When a memory bank is locked you cannot receive data in that memory bank You must move to another unlocked memory bank in order to record new lap times If all 5 memory banks are locked you will not receive any laptimes See 7 Changing memory banks 11 Memory delete Press and hold up white left yellow button at the same time to delete the data in the current ...

Страница 9: ...s included in your package that will enable you to upload your laptimes to your computer One end has a standard USB connector which will plug into your computer the other end has 2 connectors that will be plugged into the USB Ear jacks Software is available soon for you to download when you complete your warranty registration Note You must use the correct jack for the LapCeiver A L T to work corre...

Страница 10: ...o the car setup or driving line have the desired effect Plug the IR Detector into the USB jack located on the right side of the LapCeiver A L T the antenna icon on the LCD will disappear Mount the IR Detector on the car Make sure the detector faces in the direction of the IR Transmitter 1 Sensitivity Track or weather conditions can affect how well the IR Detector picks up the IR beam You may need ...

Страница 11: ...sing or up or down white buttons Press red and blue button at the same time again to lock 2 Minimum lap time This function is used to prevent readings from other Infra Red transmitters and giving short lap times The default is 0 minute 02 seconds The maximum is 9 minutes 59 seconds Press and hold blue button for 3 seconds ...

Страница 12: ... and press and hold blue button for 3 seconds for saving If you press and hold the blue button for too long 3 seconds after the seconds are saved and LapCeiver A L T goes back to Infra Red operation without displaying the minutes You must unlock this function again by holding the blue button for 3 seconds This will take you back to the set seconds location press and release to go to the set minute...

Страница 13: ...itter The IR Transmitter operates using a 9volt battery not included or the optional power supply It may be mounted on the track wall directly or mounted using a mini tripod Ensure that the Beacon side of the IR Transmitter is pointed towards the track Power the IR Transmitter on ...

Страница 14: ...e Lap Transmitter resends this information for use by the LapCeiver A L T This requires the track to have a Timing Scoring System with Lap Transmitter in use and there must be a Transponder mounted on the vehicle to be monitored yours or someone else s When the IR receiver is disconnected the antenna icon is displayed ...

Страница 15: ...ers portion of the display will appear Select each digit of ID code Transponder ID by pressing up white button Change the number of each digit 0 9 by pressing down white button After setting all the ID codes Transponder IDs in each of the memory banks press up and down white buttons at the same time There must put a Transponder ID in each of the memory banks for that memory bank to store laptimes ...

Страница 16: ...o hear your LapTimes and the Officials Battery Care Battery life is between 13 27 hours on a new alkaline battery depending on the brand battery 1 Remove the battery from the LapCeiver A L T when storing Corrosion may take place if the battery is left in the LapCeiver A L T for long periods of time 2 Keep battery contact surfaces and compartment clean 3 Store batteries in a dry place at normal tem...

Страница 17: ...heck that the lens of the IR Detector is clean Check the IR Detector is plugged into the USB port on the side of the LapCeiver A L T You must complete 2 full laps for the laptime to display 2 Check Transponder ID in Transponder Mode Ensure that you have entered the last 6 digits of the Transponder ID Confirm that the track has a functional LapTransmitter that is powered on and connected to the Tim...

Страница 18: ...me that my lap time is 1 minute and I know that my lap times should be over 2 minutes Check your Minimum Lap Time it appears that there is more than one IR Transmitter active on your track and your IR Detector is seeing both of them Set the minimum lap time to 1 min 30 secs 5 I can t hear anything Make sure that the earpiece is plugged into the connection marked Ear and that the plug is completely...

Отзывы: